


- NEW DVD Series – Stone Setting with Bezels
- Tube Set Charm by Kim St. Jean
- Prong Basket Pendant by Kim St. Jean
- NEW DVD Series – Stone Setting with Cold Connections
- New DVD Series – Stone Setting with Wire
- NEW DVD Series: Introduction to Stone Setting by Kim St. Jean
- Featured Tool: Bracelet Bending Plier
- NEW Dvd by Eva Sherman
- Fun, Fast Fold Forming DVD Series
- Double Band Ear Cuff from Alex Simkin
FREE Pattern – Beaded Cluster Earring

by Judy Ellis, Wirejewelry.com
Wire Jewelry Tip for July 11th, 2016
Beaded Cluster Earring Pattern
by Rhonda Chase
I’d like to welcome our newest content contributor to WireJewelry.com – Rhonda Chase. We have featured Rhonda here on our blog before, but we are happy she will now join us as a regular!
A little about Rhonda:

Rhonda Chase is an award-winning jewelry artist who began her career as a graphic designer. For many years, she owned a successful design and marketing firm in the San Francisco Bay Area, serving large corporate clients.
In 2009 Rhonda decided get her hands away from her computer and back into the art she loves. She focused on jewelry design and quickly gained recognition the field: winning awards and showing her work in galleries.
She has been writing tutorials and teaching art classes in various disciplines for over 20 years. Rhonda has taught jewelry making classes for our sister company JewelryTools.com at the JOGS Gem Show in Tucson.
Today Rhonda shares a simple pattern with us called: Beaded Cluster Earrings.
Rhonda says:
There are many ways to make popular cluster dangle earrings like these. The directions I see most often are for attaching beads to a chain with jump rings. However, my favorite way to make these great earrings is a little more laborious, but it gives you more control, a sturdier earring and often a fuller look. In this tutorial, I’ll show you how to make your own dangles and build your own dangle chain for the earring base. This is also an ideal project to practice making wrapped loops and end up with awesome earrings. I hope you enjoy it!

Materials:
- An even number of small beads (20-30). If the holes are bigger than the headpins, you’ll also need the same number of seed beads.
- Two larger beads
- One pair of ear wires
- Jump rings (open) – I used 4mm ovals. (10 – 14, depending on how many beads you use)
- Headpins – one per bead (1 – 2 inches, 22g – 24g)
Tools:
- Two pairs of pliers with a flat interior surface. They can be chain nose or flat nose.
- Round nose pliers
- Wire cutter
Instructions:
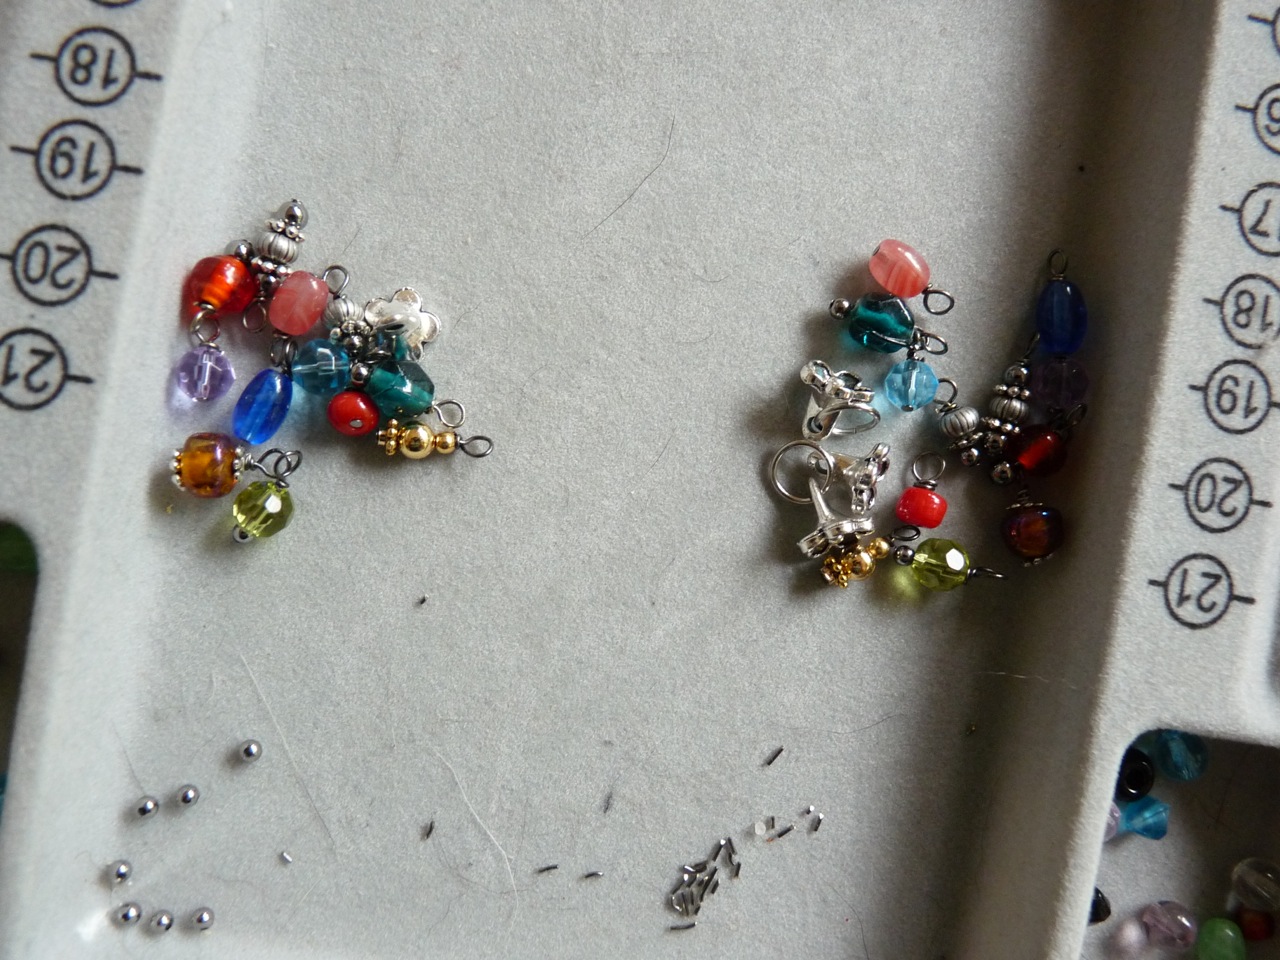
Make all your dangles first -
Step 1: String a bead (with optional seed beads) onto a headpin. Leave at least a 1/2″ un-beaded “tail”.
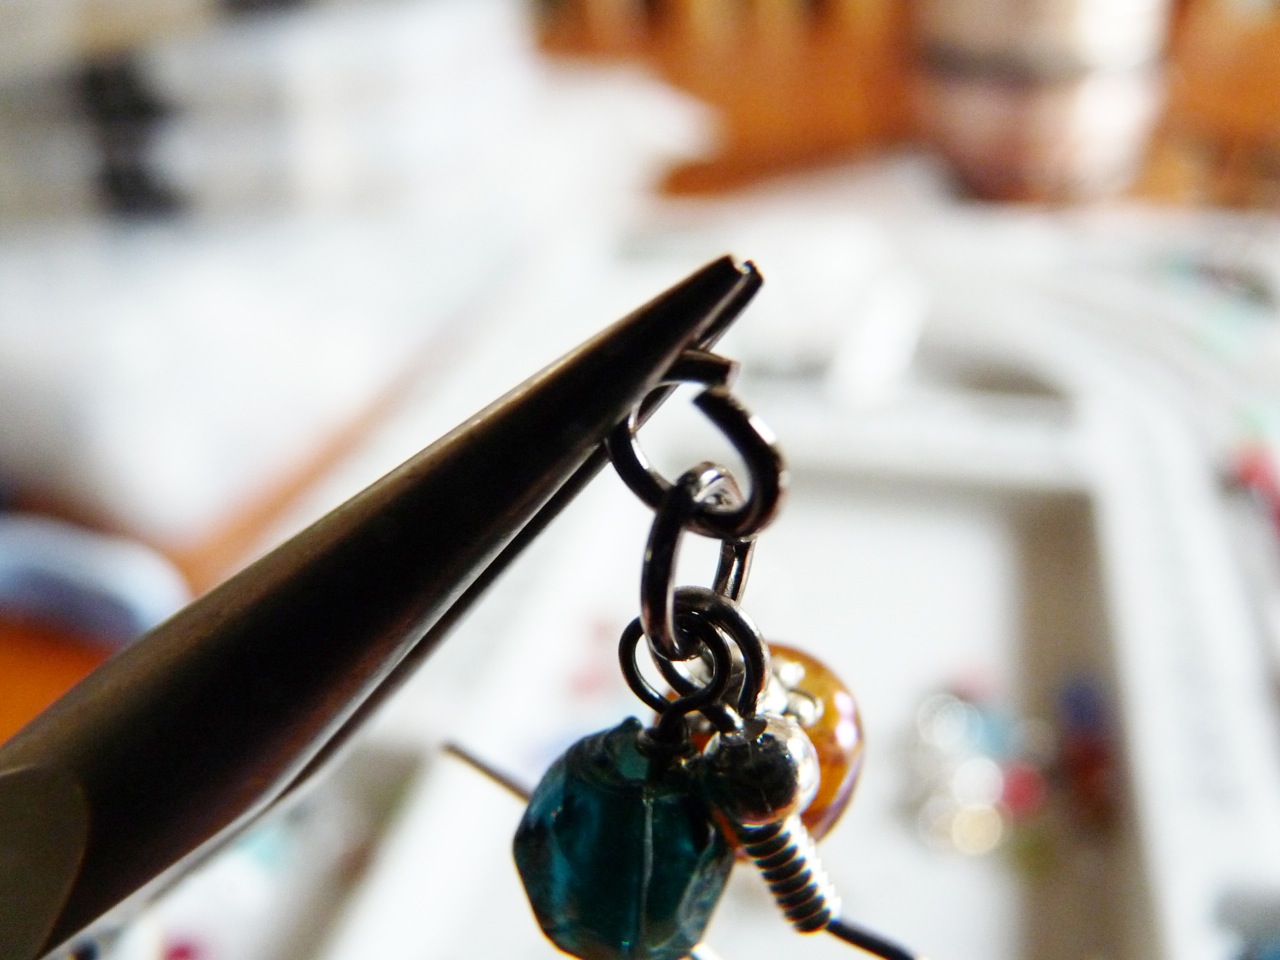
Step 2: Bend the tail of the headpin at a right angle, 2 – 4mm above the top of the beads(s) with flat nose pliers.

Step 3: With round nose pliers, hold the wire tail at the bend and loop the wire tail over the pliers and into a circle with your fingers.
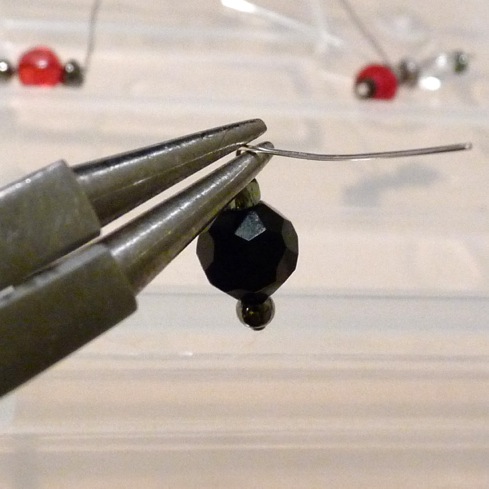
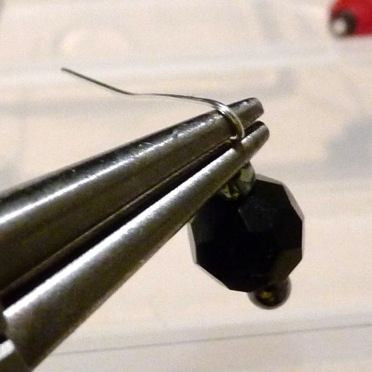

Step 4: Then wrap the remaining wire tail around the headpin in the space left above the beads. Make at least 1 full wrap. You can wrap as many times as you want after that, if the wire is long enough. Use pliers to add stability.

Step 5: Cut excess wire close to the wraps.
Keep Making Dangles -
Step 1: Repeat. Repeat. Repeat. Keep making dangles with the small beads until you have two (matched) sets of at least 5 – 10 beads each. I used 12 dangles for each earring for a total of 24 small bead dangles.
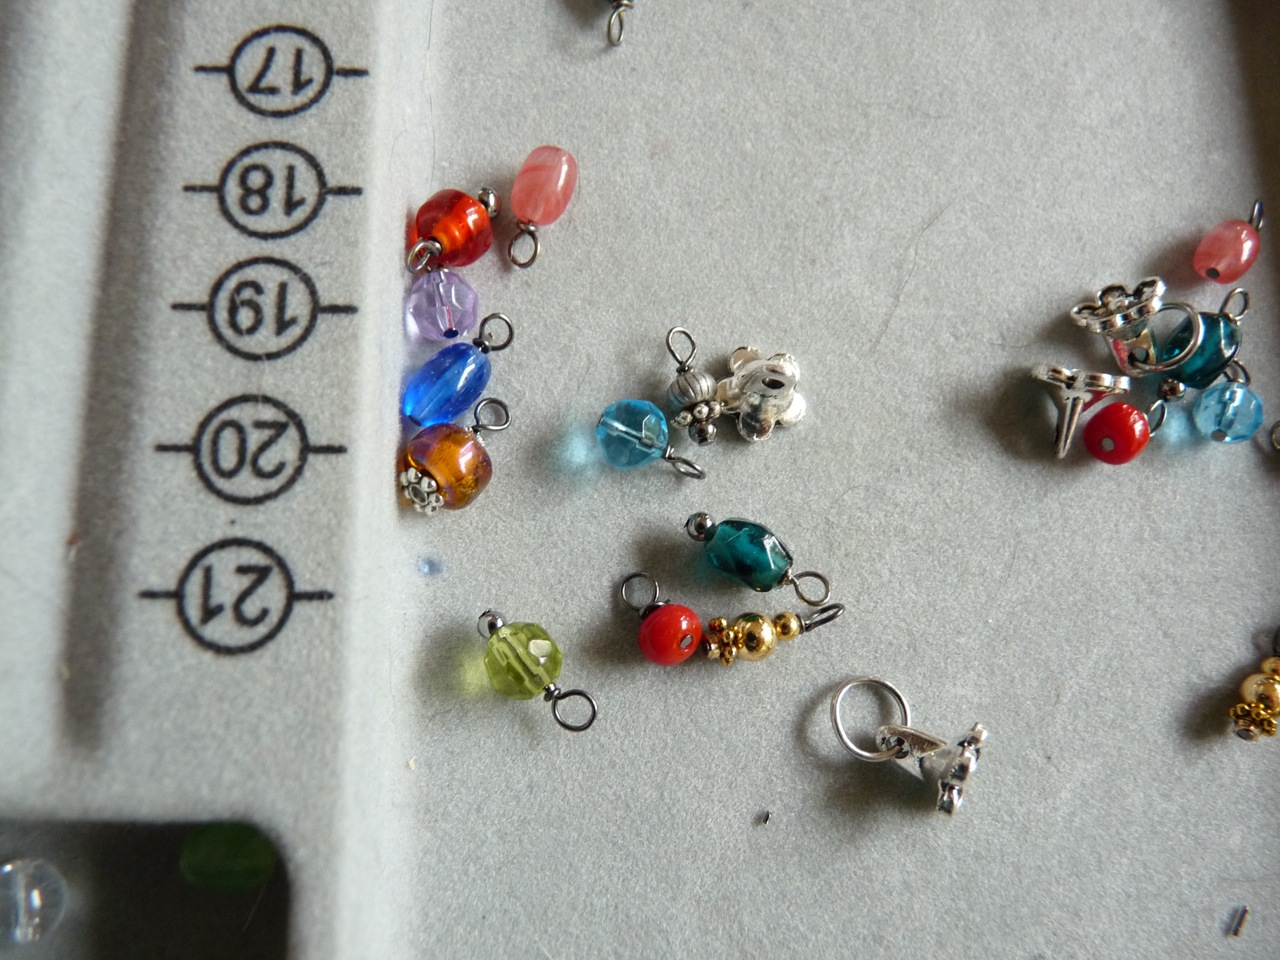
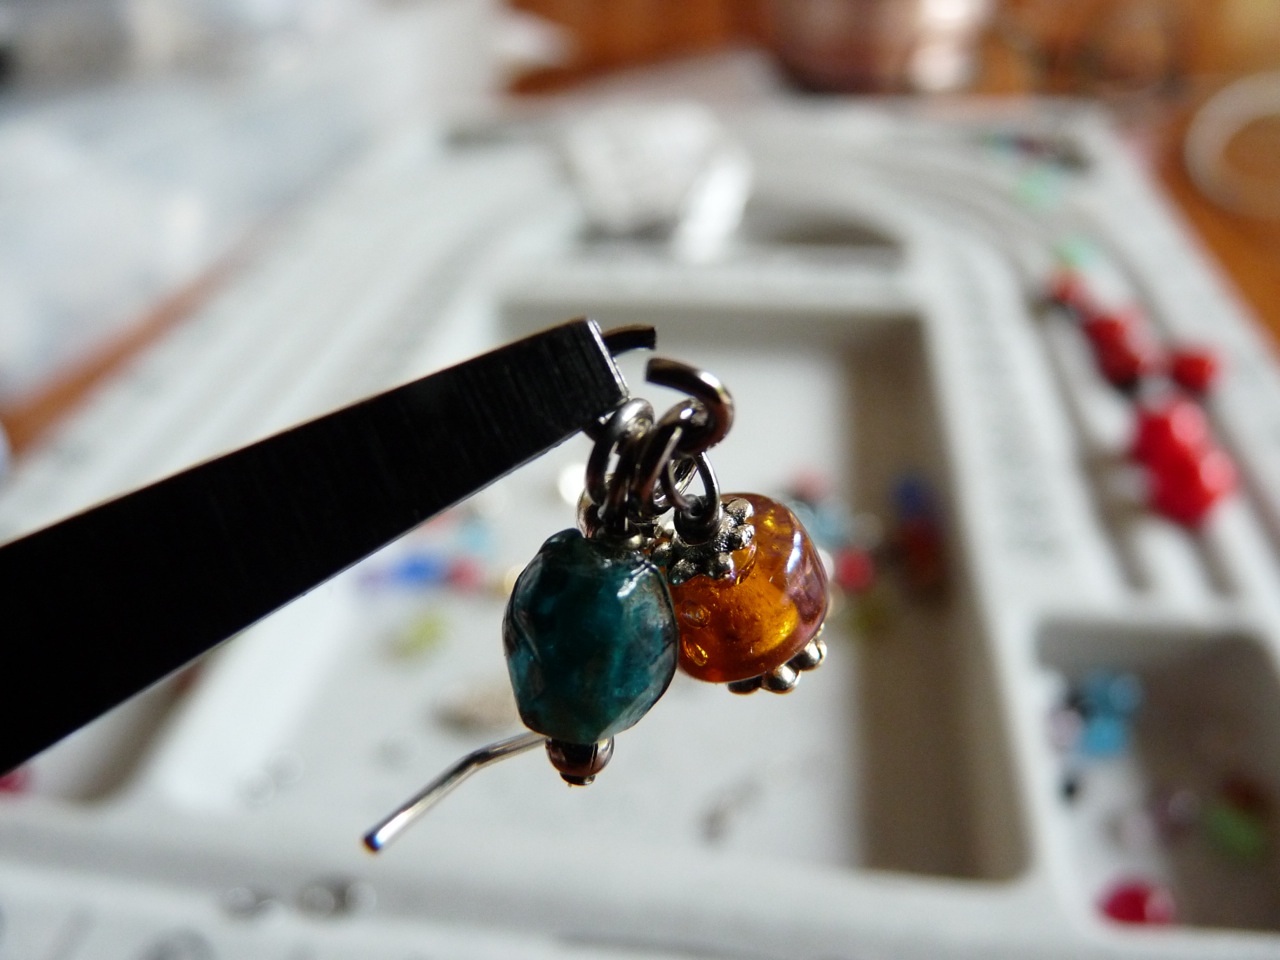
Large Beads -
Step 1: Make dangles with your large beads. You’ll only need two. These will hang at the bottom of your earrings.
Begin Assembly -
Step 1: Open 1 jump ring with pliers.
Step 2: Slide the jump ring on one ear wire.

Step 3: Add 1 dangle to each side of the ear wire and close the jump ring.
Step 4: Set the grouping down in this configuration and repeat with the other ear wire.
Note: I find the easiest way to open jump rings is to hold each side of the cut with a pair of flat surfaced pliers and twist slightly in opposite directions. Never pull the opening apart. Always twist.
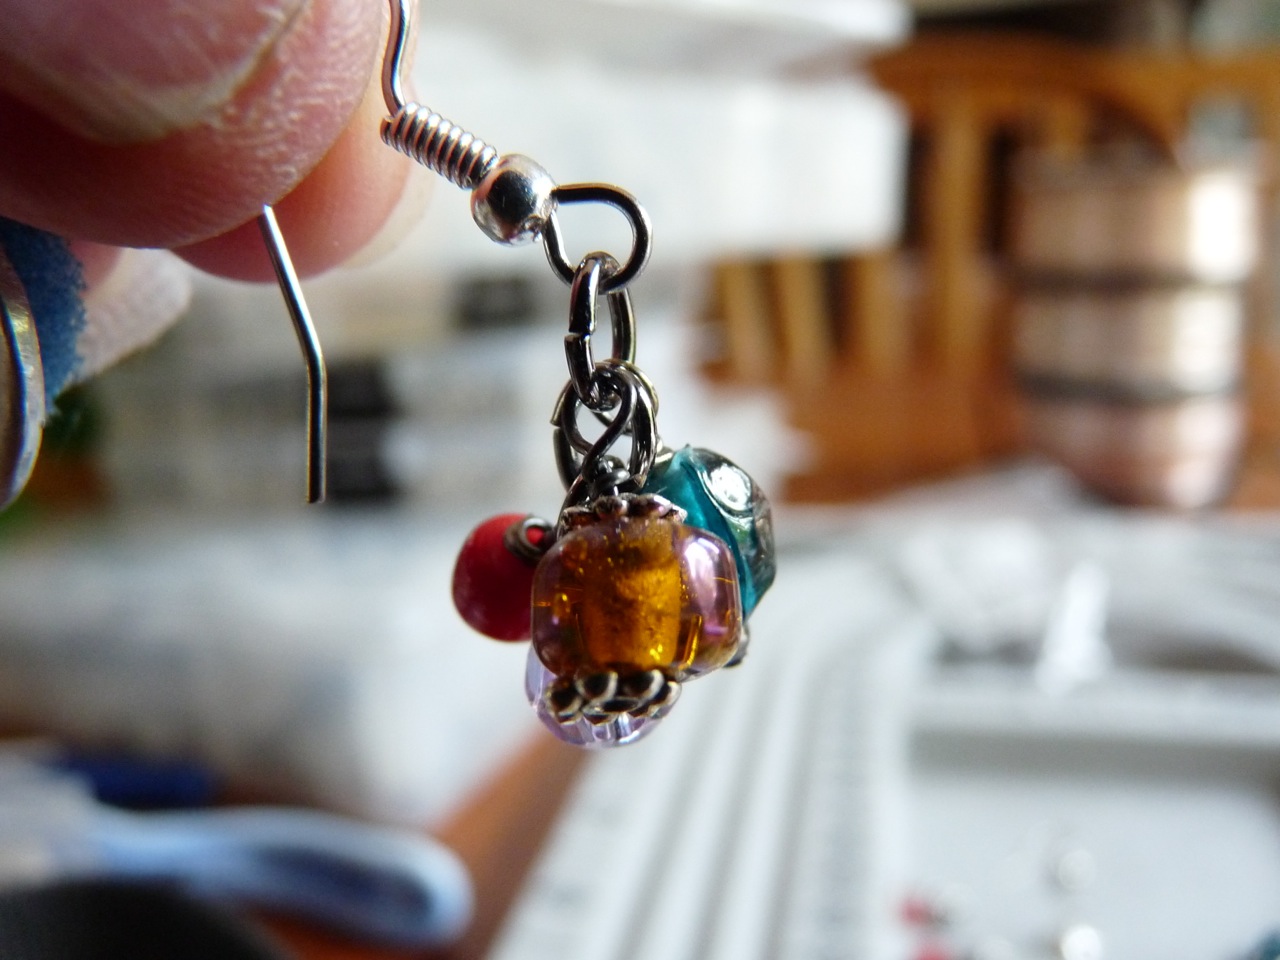
Second Level-
Step 1: Open a second jump ring.
Step 2: Add it to the first ring, making sure you keep the configuration from the previous step.
Step 3: Add a dangle so they fall to each side of the open jump ring.
Step 4: Close the jump ring. You will build a chain of dangles in this way until you like the look and the length. Continue until you’ve attached all your dangles. Repeat with the other earring (in bead order if possible).
HINT: It helps to work upside down, but hold your earrings right-side-up once in a while to see how they look. Remember to make sure your dangles fall to each side of the jump ring when you pick up the cluster.
More Dangles -
The Last Dangle -
Step 1: Before you close the last jump ring on each earring, add the dangle with the large bead.
Step 2: Close the jump ring and hold your earring by the ear wire to see how it looks.
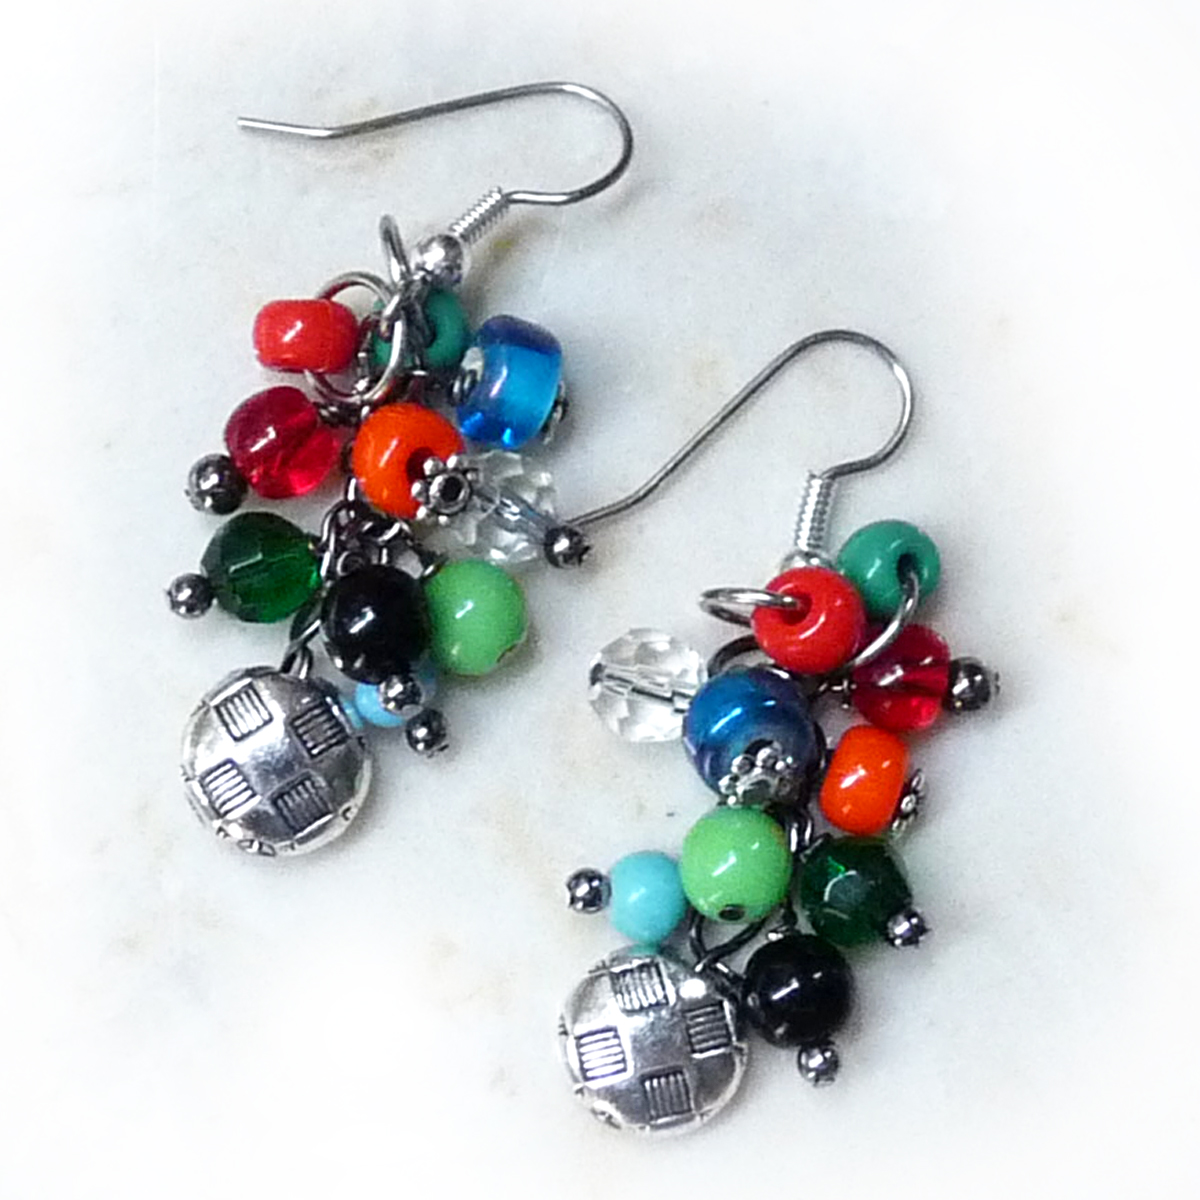
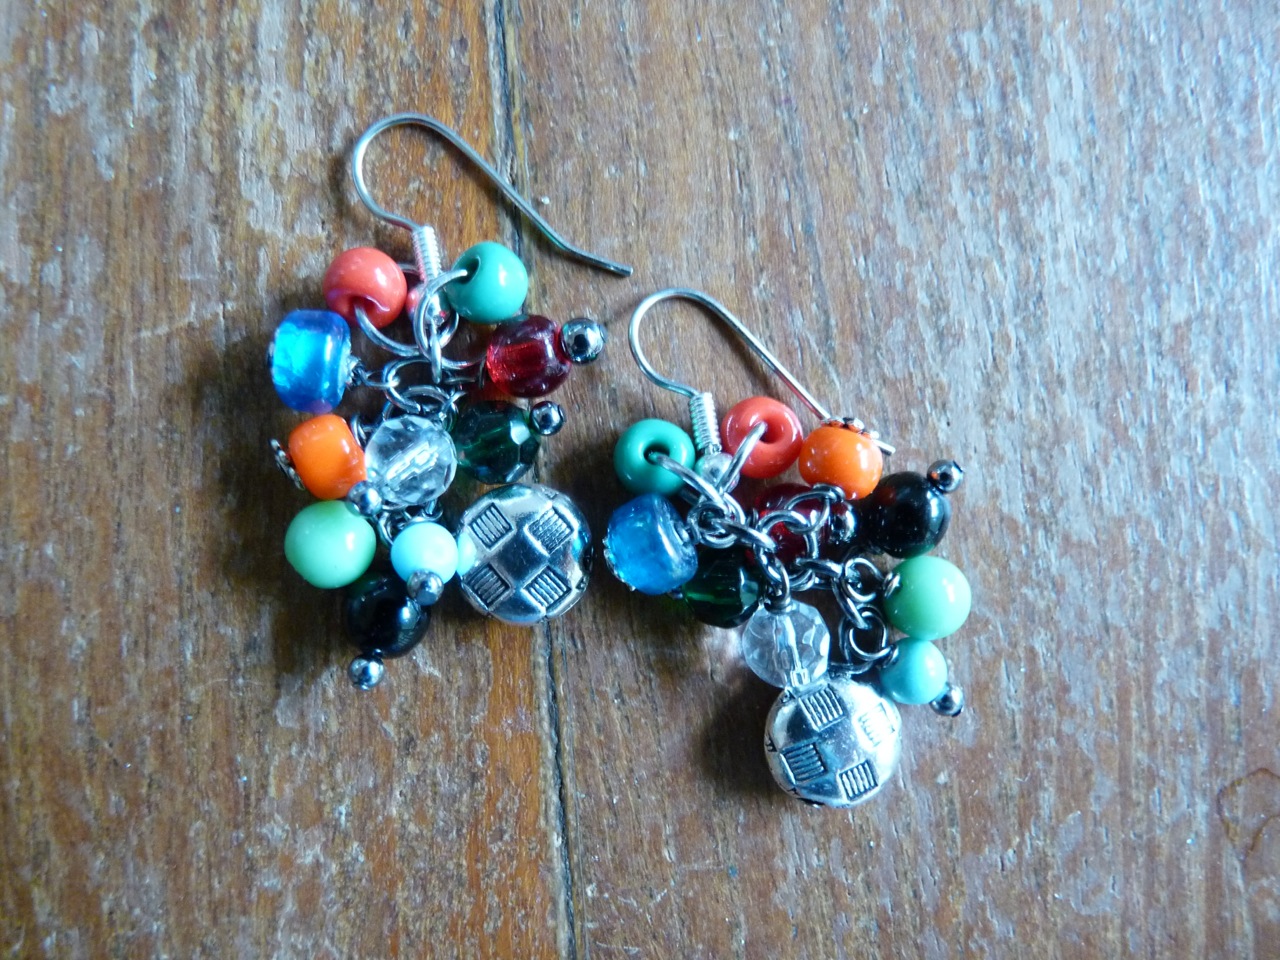
Do the other one and you’re done!
If you’d like to see more from Rhonda you can see her blog posts HERE!
Happy Wrapping!
![]()
Click to Receive Daily Tips by Email
Related Posts


Wire Jewelry Ideas
-
 See Yourself as a Creative Thinker-Part IV By Karen Meador, PhD
Wire Jewelry Article for September 27th, 2017 If...
- September 27, 2017
-
 See Yourself as a Creative Thinker-Part III By Karen Meador, PhD
Wire Jewelry Article for September 20th, 2017 If...
- September 20, 2017
-
 See Yourself as a Creative Thinker-Part II By Karen Meador, PhD
Wire Jewelry Article for September 13th, 2017 If you...
- September 13, 2017
-
 See Yourself as a Creative Thinker By Karen Meador PhD
Wire Jewelry Article for September 6th, 2017 This is...
- September 6, 2017

Design & Inspiration
-
 Free Pattern: Smile Cluster Necklace by Karen Meador
by Judy Ellis, Wirejewelry.com Wire Jewelry Pattern for August...
- August 7, 2017
-
 Free Pattern: Long crystal round maille earrings by Kylie Jones
by Judy Ellis, Wirejewelry.com Wire Jewelry Pattern for August...
- August 3, 2017
-
 Free Pattern: Stone Twist Wrap by Karen Meador
by Judy Ellis, Wirejewelry.com Wire Jewelry Pattern for July...
- July 31, 2017
-
 Free Pattern: Floating Bead Earrings By Kimberly Newman
by Judy Ellis, Wirejewelry.com Wire Jewelry Pattern for July...
- July 27, 2017
Featured Tools
-
 Get to Know Your Hand Tools – Tube-Cutting Jig By Helen I. Driggs
by Judy Ellis, Wirejewelry.com Wire Jewelry Tip for August...
- August 4, 2017
-
 Wire Jewelry Video: Using Punch Pliers by Judy Freyer Thompson
by Judy Ellis, Wirejewelry.com Wire Jewelry Tip for August...
- August 2, 2017
-
 Wire Jewelry Video: Aligning a Hole Punch by Judy Freyer Thompson
by Judy Ellis, Wirejewelry.com Wire Jewelry Tip for July...
- July 26, 2017
-
 Get to Know Your Hand Tools – Wire Cutters – Helen I. Driggs
by Judy Ellis, Wirejewelry.com Wire Jewelry Tip for July...
- July 25, 2017
0 comments