


- NEW DVD Series – Stone Setting with Bezels
- Tube Set Charm by Kim St. Jean
- Prong Basket Pendant by Kim St. Jean
- NEW DVD Series – Stone Setting with Cold Connections
- New DVD Series – Stone Setting with Wire
- NEW DVD Series: Introduction to Stone Setting by Kim St. Jean
- Featured Tool: Bracelet Bending Plier
- NEW Dvd by Eva Sherman
- Fun, Fast Fold Forming DVD Series
- Double Band Ear Cuff from Alex Simkin
Using Tiles on Tube Rivets and Eyelets

by Judy Ellis, Wirejewelry.com
Featured Tool Tip for March 6th, 2017
Using Tiles on Rivets and Eyelets
with Judy Larson
Today we finish up our series of Tips from Judy Larson on Eyelet and Rivet Tools: Tip #3: Make a Tube Spreader Tool & #4 is How to Use the Tile and Nails on Rivets and Eyelets. These two tips go hand in hand!
Judy Says:

Tip #3: Make a Tube Spreader Tool:
Step 1: Find a few nails that are larger in diameter than the tube of the rivets and eyelets you use most often. Many local lumberyards sell nails, purchased by the pound, in bins. You should be able to purchase a few for just pennies.
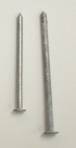
Step 2: File tips of the nails to a shallow sharp point and you will have an instant tube rivet and eyelet setting tool. These were ground down on an electric grindstone in the shop, but you could use a file. It will just take longer. Note: You cannot use nails right out of the box. The tips are not round and the point is too long.

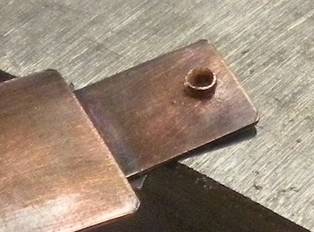
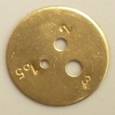
Tip #4: How to Use The Tile and Nails On Tube Rivets and Eyelets:
Step 1: Punch the appropriate size holes in the pieces you will be attaching your rivets or eyelets to.
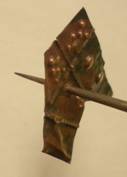
Step 2: You may want to make the hole a bit larger if your rivet or eyelet does not fit. In this particular leftover fold formed piece, there was a hole caused when dimpling pliers broke through the metal. A bead reamer was used to make the hole large enough to fit a small brass 3mm eyelet or domed head rivet with a tube style back.
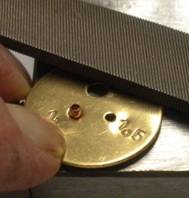
Step 3: Place the tube rivet or eyelet through the pieces you are securing it to. Then put two tiles on the rivet using the hole that best fits. Use a file the file off the excess tube until it is flush with, and not more than a hair above, with the tile. Do not cut the tube with a flush cutter. It will squash the sides together.
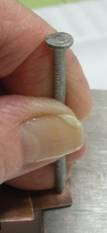
Note: In the following step, if you use a bench block under your piece when using a hammer with your tool to spread out the tube on the back of your piece, the face or your rivet or eyelet will be flattened out. The face of your rivets and eyelets will not be as easily damaged or flattened if you use a notepad or magazine instead of a bench block.
Step 4: Place the tip of the nail in the tube on the back of the rivet or eyelet. Gently hammer the nail until the tube starts to spread out. Once the top of the tube is spread enough that it cannot be removed from the hole, you can then use a domed face or ball hammer to finish spreading the tube out and flatten it.
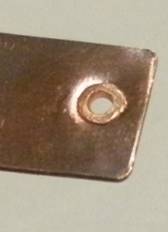
Hint: A 1.8mm hole punch is not quite large enough for small diameter tube rivets and eyelets. Use a bead reamer to make the hole slightly larger.


Hint: Rivet and eyelet setters are a good investment if you will be using a lot of eyelets and tube rivets in your jewelry
I hope you’ve enjoyed these quick tips. For more tips from Judy Larson – CLICK HERE!
Happy Wrapping!
![]()
Click to Receive Daily Tips by Email
Related Posts


Wire Jewelry Ideas
-
 See Yourself as a Creative Thinker-Part IV By Karen Meador, PhD
Wire Jewelry Article for September 27th, 2017 If...
- September 27, 2017
-
 See Yourself as a Creative Thinker-Part III By Karen Meador, PhD
Wire Jewelry Article for September 20th, 2017 If...
- September 20, 2017
-
 See Yourself as a Creative Thinker-Part II By Karen Meador, PhD
Wire Jewelry Article for September 13th, 2017 If you...
- September 13, 2017
-
 See Yourself as a Creative Thinker By Karen Meador PhD
Wire Jewelry Article for September 6th, 2017 This is...
- September 6, 2017

Design & Inspiration
-
 Free Pattern: Smile Cluster Necklace by Karen Meador
by Judy Ellis, Wirejewelry.com Wire Jewelry Pattern for August...
- August 7, 2017
-
 Free Pattern: Long crystal round maille earrings by Kylie Jones
by Judy Ellis, Wirejewelry.com Wire Jewelry Pattern for August...
- August 3, 2017
-
 Free Pattern: Stone Twist Wrap by Karen Meador
by Judy Ellis, Wirejewelry.com Wire Jewelry Pattern for July...
- July 31, 2017
-
 Free Pattern: Floating Bead Earrings By Kimberly Newman
by Judy Ellis, Wirejewelry.com Wire Jewelry Pattern for July...
- July 27, 2017
Featured Tools
-
 Get to Know Your Hand Tools – Tube-Cutting Jig By Helen I. Driggs
by Judy Ellis, Wirejewelry.com Wire Jewelry Tip for August...
- August 4, 2017
-
 Wire Jewelry Video: Using Punch Pliers by Judy Freyer Thompson
by Judy Ellis, Wirejewelry.com Wire Jewelry Tip for August...
- August 2, 2017
-
 Wire Jewelry Video: Aligning a Hole Punch by Judy Freyer Thompson
by Judy Ellis, Wirejewelry.com Wire Jewelry Tip for July...
- July 26, 2017
-
 Get to Know Your Hand Tools – Wire Cutters – Helen I. Driggs
by Judy Ellis, Wirejewelry.com Wire Jewelry Tip for July...
- July 25, 2017
0 comments