


- NEW DVD Series – Stone Setting with Bezels
- Tube Set Charm by Kim St. Jean
- Prong Basket Pendant by Kim St. Jean
- NEW DVD Series – Stone Setting with Cold Connections
- New DVD Series – Stone Setting with Wire
- NEW DVD Series: Introduction to Stone Setting by Kim St. Jean
- Featured Tool: Bracelet Bending Plier
- NEW Dvd by Eva Sherman
- Fun, Fast Fold Forming DVD Series
- Double Band Ear Cuff from Alex Simkin
Snowflake Cascade

by Judy Ellis, Wirejewelry.com
Wire Jewelry Pattern for December 16th, 2015

To continue with our Christmas Tips/Patterns I wanted to share this Snowflake Cascade pattern by Davina Dryland. We’ve been getting some wonderful snow here in Utah and I thought it appropriate to share this with all of you who might be getting the fluffy white stuff as well!
On the 8th Day of Christmas…
Snowflake Cascade
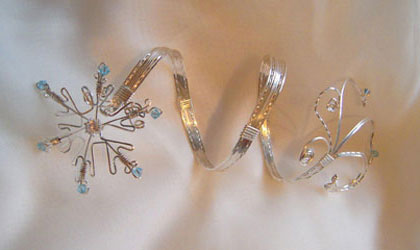
Designed by Davina Dryland
Skill Level: Advanced
Materials:
- 3 3″ lengths of 24-gauge square half-hard silver wire
- 6 3″ lengths of 21-gauge square half-hard silver wire
- 6 1 ½” lengths of 21-gauge half-round half-hard silver wire
- 6 4mm Aquamarine Bicone Swarovski beads
- 1 6mm silver snapset
- 1 6mm clear Cubic Zirconia stone (CZ).
-
Bracelet (fits a 6.5″ wrist)
- 8 16″ lengths of 21-gauge square half-hard silver wire (add extra length for larger wrist sizes)
- 5 4 ¾” lengths of 18-gauge half-round half-hard silver wire
- 3 1 ½” lengths of 18-gauge half-round half-hard silver wire
- 3 1 ½” lengths of 24-gauge round half-hard silver wire
- 2 4mm Aurore Boreale Bicone Swarovski bead
- 1 4mm Aquamarine Bicone Swarovski beads
Tools:
- Round Nose Pliers
- Chain Nose Pliers
- Flat Nose Pliers
- Wire Cutters
- Ruler
- Wire twister
- Oval bracelet mandrel
- Fine Tip Marker
- Masking or Painter’s Tape
Instructions:
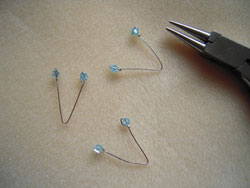
- Straighten, clean, measure and cut all wires. On each 3″ piece of 24-gauge square wires, measure ½” from each end and mark. Thread a 4mm aquamarine bi-cone Swarovski crystal onto the wire, then using flat nose pliers bend wire 90° at the mark. Push the crystal up to the bend, pull the wire down and around the crystal and secure underneath with chain nose pliers. Repeat at each end of every 3″ 24-gauge square wire.

- Measure the length of each 24-gauge square wire with the crystals, find and mark the center. Then using round nose pliers bend the wire at this point to create a v shape with the wire. Repeat with other two wires with crystals.
- Place the bend part of each wire around every second prong in the 6mm silver snapset. Hold the wires and snapset secure while turning upside down to push a 6mm CZ into the snapset. (Make sure the wires don’t come out of place)

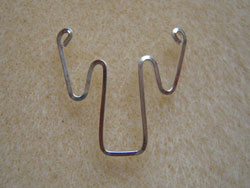
- Measure and mark the center point on the pieces of 3″ 21-gauge square wire, use flat nose pliers place the mark in the middle of the pliers and with your fingers push both ends of the 90° in the same direction. Repeat on the other five pieces of 3″ of 21-gauge square wire.

- Measure and mark ½” from the 90 degree angle use round nose pliers bend the wire 180° around with fingers. Measure and mark ¼” from the 180° angle and bend again with round nose pliers 180° up. To finish the end of wire off curve the end inwards and around. Mirror the design on the other side of wire. Repeat pattern on all other five pieces of 3″ 21-gauge square wire.
- Attaching pattern wire to snowflake. Use 1 ½” of 21-gauge half-round silver wire wrap five time around the 24-gauge square with crystal and two 21-gauge square pattern pieces. Repeat with all pattern pieces till snowflake is complete.

Making the Bracelet:
- Straighten, clean, measure and cut all wires. Twist two strands of 16″ 21-gauge square wire with a wire twister. Place the twisted strands as the second one in from the outer end of the bundle. Bundle all 8 lengths of 16″ 21-gauge square wires make one end flush, (tape the bundle at the ends and middle to make it easier to hold). Measure from the flush end 1″ and mark, then measure from this point 3″ down the bundle and mark. Repeat down the bundle and you should have five marks which are 3″ apart. Use 4 ¾” length of 18-gauge half-round wire, make a hook that will cover the bundle, wrap around at the mark five times. Repeat at each mark on the bundle. (When all the wraps are complete and bundle is secure you can remove the tape if used)

- At the other end to the flush end of the bundle, pair up the stands and pull apart/space with fingers. On the bottom three paired strands use round nose pliers, place 1″ from the end of wire (top wire of each pair) bend up 90°, moves pliers down wire abit, bend wire 180° around to make a small semi-circle, bend the wire back flush with bottom paired wire. Use 1 ½” 18-gauge half-round wire, wrap twice around to secure the pairs of wire together. Trim excess wire on the ends and fold the end underneath (the underside of the bracelet) with flat nose and push together. Repeat on the other two pairs.

- Attaching the crystals. Thread on a 4mm crystal aurore bi-cone Swarovski bead on 1 ½ ” 24-gauge half-hard round wire, form a hook at the end, attach the hook at the top part of the semi-circle. Make sure it is secure using chain nose pliers. The crystal should sit in the semi-circle of the wire, secure the loose end of the wire around the 21-gauge wires. Repeat with another 4mm crystal aurora and a 4mm aquamarine bi-cone Swarovski. The top two strands of wire curl in with round nose pliers to form two tight swirls.

- At the flush end of the bundle, pull out the two outer wires from each edge and curl outwards to the bundle using round nose pliers. The center four strands of wire, bend them upwards with fingers. Place the round nose pliers on all the ends of the wire and roll downwards to form a hook.

- Attach the snowflake onto the hook, push ends closed with chain nose pliers till the snowflake is secure on the bundle.

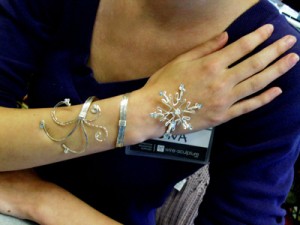
- Shape the bundle on an oval bracelet mandrel. The snowflake rests on the back of the hand, the bracelet then wraps around the wrist once and the end rests up the arm.


I hope that you enjoy making this beautiful Snowflake Cascade! To help get your project underway – here’s a little gift – Take 10% off of anything Site Wide with Promo Code TREE10. This code is good from Dec. 2nd to Dec. 24th -so get a little wire, a few beads or any type of tools you might need to help make your holiday’s bright!
Happy Wrapping!
![]()
Click to Receive Daily Tips by Email
Related Posts


Wire Jewelry Ideas
-
 See Yourself as a Creative Thinker-Part IV By Karen Meador, PhD
Wire Jewelry Article for September 27th, 2017 If...
- September 27, 2017
-
 See Yourself as a Creative Thinker-Part III By Karen Meador, PhD
Wire Jewelry Article for September 20th, 2017 If...
- September 20, 2017
-
 See Yourself as a Creative Thinker-Part II By Karen Meador, PhD
Wire Jewelry Article for September 13th, 2017 If you...
- September 13, 2017
-
 See Yourself as a Creative Thinker By Karen Meador PhD
Wire Jewelry Article for September 6th, 2017 This is...
- September 6, 2017

Design & Inspiration
-
 Free Pattern: Smile Cluster Necklace by Karen Meador
by Judy Ellis, Wirejewelry.com Wire Jewelry Pattern for August...
- August 7, 2017
-
 Free Pattern: Long crystal round maille earrings by Kylie Jones
by Judy Ellis, Wirejewelry.com Wire Jewelry Pattern for August...
- August 3, 2017
-
 Free Pattern: Stone Twist Wrap by Karen Meador
by Judy Ellis, Wirejewelry.com Wire Jewelry Pattern for July...
- July 31, 2017
-
 Free Pattern: Floating Bead Earrings By Kimberly Newman
by Judy Ellis, Wirejewelry.com Wire Jewelry Pattern for July...
- July 27, 2017
Featured Tools
-
 Get to Know Your Hand Tools – Tube-Cutting Jig By Helen I. Driggs
by Judy Ellis, Wirejewelry.com Wire Jewelry Tip for August...
- August 4, 2017
-
 Wire Jewelry Video: Using Punch Pliers by Judy Freyer Thompson
by Judy Ellis, Wirejewelry.com Wire Jewelry Tip for August...
- August 2, 2017
-
 Wire Jewelry Video: Aligning a Hole Punch by Judy Freyer Thompson
by Judy Ellis, Wirejewelry.com Wire Jewelry Tip for July...
- July 26, 2017
-
 Get to Know Your Hand Tools – Wire Cutters – Helen I. Driggs
by Judy Ellis, Wirejewelry.com Wire Jewelry Tip for July...
- July 25, 2017
0 comments