


- NEW DVD Series – Stone Setting with Bezels
- Tube Set Charm by Kim St. Jean
- Prong Basket Pendant by Kim St. Jean
- NEW DVD Series – Stone Setting with Cold Connections
- New DVD Series – Stone Setting with Wire
- NEW DVD Series: Introduction to Stone Setting by Kim St. Jean
- Featured Tool: Bracelet Bending Plier
- NEW Dvd by Eva Sherman
- Fun, Fast Fold Forming DVD Series
- Double Band Ear Cuff from Alex Simkin
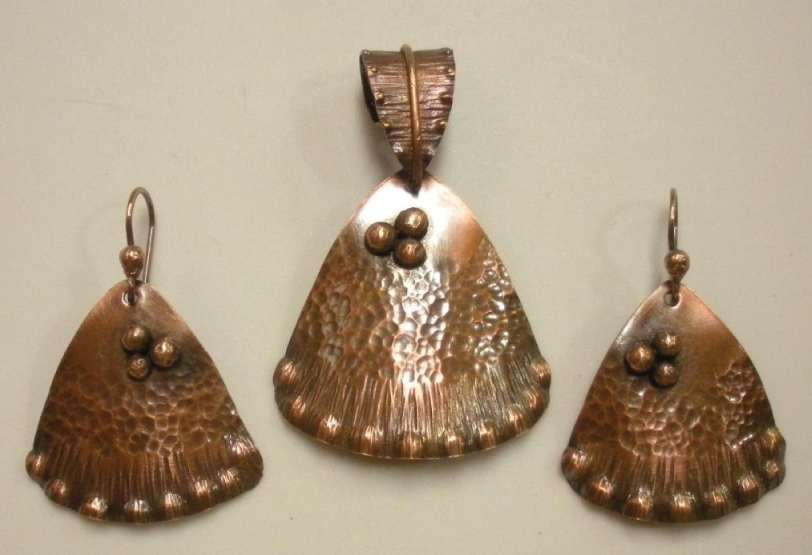
FREE Pattern: Triangle Shield Earrings, Pendant and Bail

by Judy Ellis, Wirejewelry.com
Wire Jewelry FREE Pattern for February 13th, 2017
Triangle Shield Earrings, Pendant and Bail
by Judy Larson
Today we feature another great sheet metal pattern from Judy Larson. This easy to make sheet metal project is a great addition to your sheet metal jewelry collection.
Designed by Judy Larson © 2016
Level: Beginner to Advanced
Soldering and riveting experience is necessary to make this project.
Materials:
- 24 gauge sheet metal – use the three triangle and one bail templates
- 11/4″ of 20 gauge round wire
- Set of purchased ear wires or make your own
- One purchased bail or make your own (shown)
Tools:
- Tools for your preferred method of cutting out sheet metal shapes
- Flat and chain nose pliers
- 1.5mm hole punch
- 3mm dimpling pliers
- Mini TruStrike Sharp Designer Hammer
- Mini TruStrike Embossing Hammer
- Rubber or plastic mallet
- Bench block
- Nylon Bracelet Bending Plier
- Tools and solder for your preferred method of soldering
- Butane torch and fire brick
- 340 grit sandpaper
- Ultra fine point permanent
- File Pickle and pickle pot
- Tumbler with steel shot Liver of sulfur
- 0000 steel wool
Instructions:
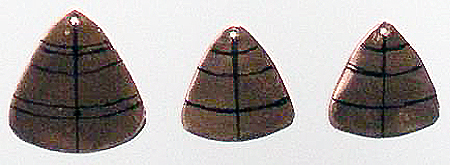
Step 1: Copy the three triangle and one bail templates. You can find Judy’s Jewelry Component Templates HERE
Step 2: Transfer the designs to your sheet metal.
Step 3: Cut the triangles out using your preferred method for cutting sheet metal.
Step 4: File any sharp edges.
Step 5: Use a 1.5mm hole punch to make holes in the center top of each piece.
Step 6: Decide on the position of the design elements you want for your pieces. Use an ultra fine point permanent marker to draw these lines on the front of each piece. Mark the center line on the front and back of each piece.
Step 7: Place each triangle shape on a bench block. Use the narrower side of the Mini TruStrike Sharp Designer Hammer to texture the lower edge of each triangle piece.
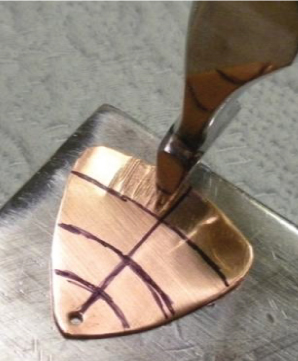
Step 8: Use the larger side of the Mini TruStrike Embossing Hammer to texture the center area of each triangle piece.
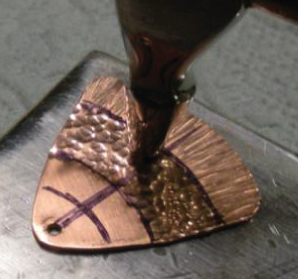
Step 9: The metal pieces will no longer be flat after texturing. Place each piece on a bench block and use a rubber or plastic mallet to flatten them.
Step 10: The first decorative dimple should be formed right on the center line. Place the indented cup side of the dimpling pliers on the FRONT side of the metal piece. The edge of the metal piece should be on the edge of the indented cup. When you close the jaws of the pliers, the hook portion should be just inside the edge of the metal piece right on the line on the BACK side of the piece.

Step 11: To make each succeeding dimple along each side of the bail, place the edge of the indented side of the dimpling pliers jaw against the previous dimple. As in Step 10, the edge of the metal piece should be on the edge of the indented cup. When you close the jaws of the pliers, the hook portion should be just inside the edge of the metal piece.
Step 12: Remove the marker lines from the pieces with an alcohol soaked pad.
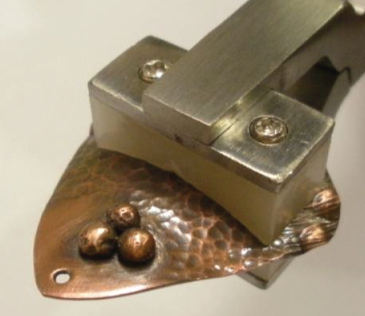
Step 13: Cut nine 1/8″ pieces of 20 gauge wire. Lay them side by side on a fire brick. Use your torch to melt them into balls. Note: If you want all large metal balls used as decoration, use three 1/8″ pieces. If you would like slightly smaller metal balls, use two 1/8″ pieces.
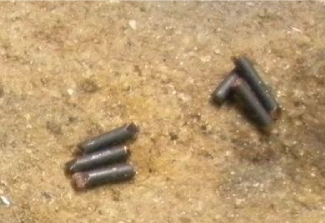
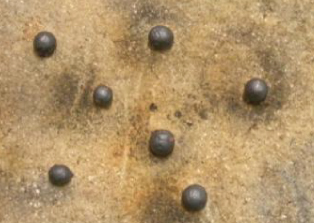
Step 14: After the balls have cooled, hold them with your chain nose pliers and un the back of the ball over the sandpaper. This will remove the fire scale and any bits of brick they may have picked up.
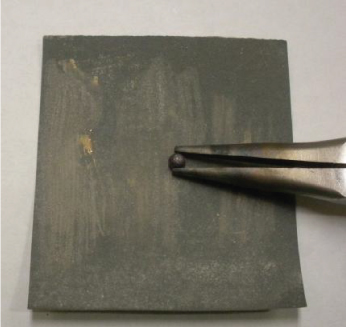
Step 15: Solder the balls in place using your preferred method.
Step 16: Pickle the pieces to remove fire scale.
Step 17: Tumble the pieces in steel shot to shine them up or use 0000 steel wool to polish them.
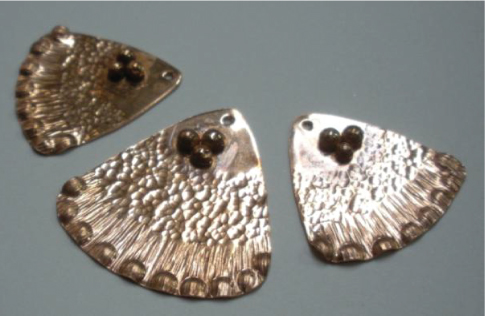
Your pieces will look like these below.
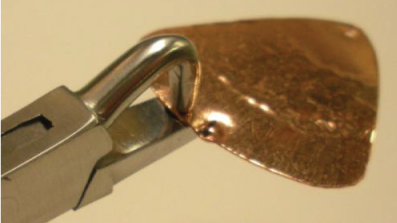
Step 18: Optional: Use a nylon bracelet bending pliers to shape each triangle, being careful to not flatten the dimples.
Step 19: Attach ear wires to the earrings and the bail to the pendant.
Step 20: You can leave your pieces bright and shiny or use liver of sulfur to patina them. Buff with 0000 steel wool to bring out the dimension of your texturing.
Congratulations! You’ve made your first Triangle Shield Earrings, Pendant and Bail.
For more great tips and FREE patterns from Judy Larson – CLICK HERE!
Happy Wrapping!
![]()
Click to Receive Daily Tips by Email
Related Posts


Wire Jewelry Ideas
-
 See Yourself as a Creative Thinker-Part IV By Karen Meador, PhD
Wire Jewelry Article for September 27th, 2017 If...
- September 27, 2017
-
 See Yourself as a Creative Thinker-Part III By Karen Meador, PhD
Wire Jewelry Article for September 20th, 2017 If...
- September 20, 2017
-
 See Yourself as a Creative Thinker-Part II By Karen Meador, PhD
Wire Jewelry Article for September 13th, 2017 If you...
- September 13, 2017
-
 See Yourself as a Creative Thinker By Karen Meador PhD
Wire Jewelry Article for September 6th, 2017 This is...
- September 6, 2017

Design & Inspiration
-
 Free Pattern: Smile Cluster Necklace by Karen Meador
by Judy Ellis, Wirejewelry.com Wire Jewelry Pattern for August...
- August 7, 2017
-
 Free Pattern: Long crystal round maille earrings by Kylie Jones
by Judy Ellis, Wirejewelry.com Wire Jewelry Pattern for August...
- August 3, 2017
-
 Free Pattern: Stone Twist Wrap by Karen Meador
by Judy Ellis, Wirejewelry.com Wire Jewelry Pattern for July...
- July 31, 2017
-
 Free Pattern: Floating Bead Earrings By Kimberly Newman
by Judy Ellis, Wirejewelry.com Wire Jewelry Pattern for July...
- July 27, 2017
Featured Tools
-
 Get to Know Your Hand Tools – Tube-Cutting Jig By Helen I. Driggs
by Judy Ellis, Wirejewelry.com Wire Jewelry Tip for August...
- August 4, 2017
-
 Wire Jewelry Video: Using Punch Pliers by Judy Freyer Thompson
by Judy Ellis, Wirejewelry.com Wire Jewelry Tip for August...
- August 2, 2017
-
 Wire Jewelry Video: Aligning a Hole Punch by Judy Freyer Thompson
by Judy Ellis, Wirejewelry.com Wire Jewelry Tip for July...
- July 26, 2017
-
 Get to Know Your Hand Tools – Wire Cutters – Helen I. Driggs
by Judy Ellis, Wirejewelry.com Wire Jewelry Tip for July...
- July 25, 2017
0 comments