


- NEW DVD Series – Stone Setting with Bezels
- Tube Set Charm by Kim St. Jean
- Prong Basket Pendant by Kim St. Jean
- NEW DVD Series – Stone Setting with Cold Connections
- New DVD Series – Stone Setting with Wire
- NEW DVD Series: Introduction to Stone Setting by Kim St. Jean
- Featured Tool: Bracelet Bending Plier
- NEW Dvd by Eva Sherman
- Fun, Fast Fold Forming DVD Series
- Double Band Ear Cuff from Alex Simkin
Kate Richbourg’s Top Ten Tips

by Judy Ellis, Wire-Sculpture.com
January 8, 2014
Kate Richbourg’s Top Ten Tips for a Wiretastic New Year’s!
(You get the first 5 today, and 5 next week!)
I love working with wire. It’s the perfect medium for a variety of projects large and small. The simplest bead can be transformed into a fancy drop or component with just a bit of wire adornment. This year one of my resolutions is to work more with this versatile material. I do so much soldering and metalwork in my jewelry making that sometimes I forget that WIRE is almost instant gratification. Since the old adage is true, “The right tool for the right job makes everything easier” I wanted to share my top tips and tool choices to make your wirework as easy and as fun as possible. Have fun and go forth and WIRE IT UP!!
1. My top piece of advice about wrangling your wire is from my book Simple Soldering, “Never let the wire see your fear. That alone will keep those coils in line.” Remember, you are in charge of your wire destiny! Confidence and a “can-do-it” attitude is half the battle!
2. When in doubt, make twisted wire. I love to make a twisted piece of wire from a long piece of 18-gauge wire. Loop the wire around a sturdy hook (I have a hook screwed into my worktable just for this purpose) place the ends in the wire twister pull so the wire is taut and press the button. In a few seconds you have a nice, evenly twisted length of wire to use for jump rings or chain links.
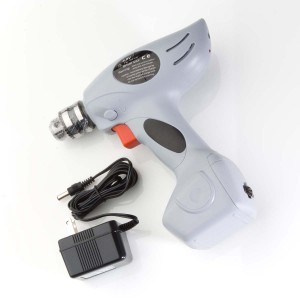
Automatic Wire Twister
3. Measure twice, cut once. And make sure you cut once with a good, sturdy flush cutter. I like these Xuron cutters. I use them to cut up to 10-gauge SOFT wire (copper, sterling silver, brass, gold filled.) Seriously. Mine have been in heavy use for several years and I still get a good, clean flush cut every time.
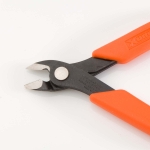
Xuron Flush Cutter
4. Bent, twisted and kinked wire is just sad. Plus it makes it hard to string beads on when wrapping. Run a wire-straightening plier over your bent wire and you’ll be ready to wrap!
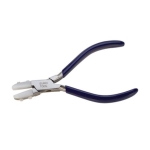
Premium Nylon Jaw Pliers
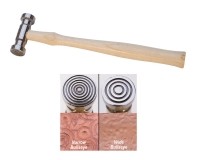
5. A smooth and shiny bench block is the perfect thing to use when hammering wire flat. I like to hammer the end ¼” or so of 20-gauge wire to make a simple paddle head-pin. The bench block helper is the perfect hard surface for hammering. I show you all about it in this product video.
Make sure you you read next week to get the rest of Kate’s Wiretastic Tips!

Click to Receive Daily Tips by Email
Related Posts


3 Comments

Wire Jewelry Ideas
-
 See Yourself as a Creative Thinker-Part IV By Karen Meador, PhD
Wire Jewelry Article for September 27th, 2017 If...
- September 27, 2017
-
 See Yourself as a Creative Thinker-Part III By Karen Meador, PhD
Wire Jewelry Article for September 20th, 2017 If...
- September 20, 2017
-
 See Yourself as a Creative Thinker-Part II By Karen Meador, PhD
Wire Jewelry Article for September 13th, 2017 If you...
- September 13, 2017
-
 See Yourself as a Creative Thinker By Karen Meador PhD
Wire Jewelry Article for September 6th, 2017 This is...
- September 6, 2017

Design & Inspiration
-
 Free Pattern: Smile Cluster Necklace by Karen Meador
by Judy Ellis, Wirejewelry.com Wire Jewelry Pattern for August...
- August 7, 2017
-
 Free Pattern: Long crystal round maille earrings by Kylie Jones
by Judy Ellis, Wirejewelry.com Wire Jewelry Pattern for August...
- August 3, 2017
-
 Free Pattern: Stone Twist Wrap by Karen Meador
by Judy Ellis, Wirejewelry.com Wire Jewelry Pattern for July...
- July 31, 2017
-
 Free Pattern: Floating Bead Earrings By Kimberly Newman
by Judy Ellis, Wirejewelry.com Wire Jewelry Pattern for July...
- July 27, 2017
Featured Tools
-
 Get to Know Your Hand Tools – Tube-Cutting Jig By Helen I. Driggs
by Judy Ellis, Wirejewelry.com Wire Jewelry Tip for August...
- August 4, 2017
-
 Wire Jewelry Video: Using Punch Pliers by Judy Freyer Thompson
by Judy Ellis, Wirejewelry.com Wire Jewelry Tip for August...
- August 2, 2017
-
 Wire Jewelry Video: Aligning a Hole Punch by Judy Freyer Thompson
by Judy Ellis, Wirejewelry.com Wire Jewelry Tip for July...
- July 26, 2017
-
 Get to Know Your Hand Tools – Wire Cutters – Helen I. Driggs
by Judy Ellis, Wirejewelry.com Wire Jewelry Tip for July...
- July 25, 2017
Kay
January 13, 2014 at 10:49 am
I prefer visual learning to auditory so I really like the videos you use. In the case of this video I wish you had actually used samples to show what you saying, especially with the white disc. Thanks
Maggie
July 20, 2014 at 8:14 am
Your video tutorials are very helpful. I look forward to them because I always learn something new. Thank you, Kate, for being so generous with your experience & knowledge. As I have a new bench block, just like the one in the video, I was very keen to see what Kate had to show us. Very helpful in the details of the distinct ways to use the components–some I’d thought of already, some not. But, like Kay says, it would’ve been so much more useful if Kate had showed us those functional components in the context of actually working on wire pieces. And I’m more a kinaesthetic learner! I know you cannot please everyone, but I think showing specific examples while demonstrating the various tools and techniques would help a wide range of wire artists. Thanks again for the videos, and the opportunity to provide feedback.
Larry Dallas
December 4, 2014 at 4:01 pm
I enjoyed the video on the bench block. I need to get me a round bench block. There is nothing that I dislike about Wire-Sculpture. Thank you, Larry Dallas