


- NEW DVD Series – Stone Setting with Bezels
- Tube Set Charm by Kim St. Jean
- Prong Basket Pendant by Kim St. Jean
- NEW DVD Series – Stone Setting with Cold Connections
- New DVD Series – Stone Setting with Wire
- NEW DVD Series: Introduction to Stone Setting by Kim St. Jean
- Featured Tool: Bracelet Bending Plier
- NEW Dvd by Eva Sherman
- Fun, Fast Fold Forming DVD Series
- Double Band Ear Cuff from Alex Simkin
Free Pattern: Scarab Bracelet

by Judy Ellis, Wirejewelry.com
Wire Jewelry Pattern for August 3rd 2016
Scarab Bracelet
by Judy Larson
Do you love everything Egyptian? Well, today we have another Free Pattern called the Scarab Bracelet that will go very well with some of our previous post about Egyptian Coil Jewelry and history. Enjoy!
Judy Says:

Scarabs were popular talismans in ancient Egypt. Modeled upon the “Scarabaeidae” family dung beetle that rolls dung into a ball for the purposes of eating and laying eggs that are later transformed into larva, the scarab was seen as an earthly symbol of the cycle of the sun god Ra rolling across the sky each day and transforming bodies and souls. It became the icon of Egyptian understanding of death and resurrection.

While playing around with the love knot one day, I decided it needed a bead in the center. I found these scarab beads languishing in one of my bead boxes and knew this was the perfect project for them.
Using the materials listed in the tutorial, a five bead finished bracelet will be 7″ long and a six bead finished bracelet will be 8″ long. Each wire wrapped bead section is 5/8″ wide and 1-1/8″ long. The length of the bracelet can be adjusted by changing the size or style of the clasp or by using larger jump rings to connect the bead sections.
Materials:
- 26 gauge round wire
- 20 gauge round half hard wire
- 18 gauge round half hard wire. Note: How much 18, 20 and 26 gauge wire you need depends upon how many wire wrapped bead sections you need.
- Five or six 14x10mm carved scarab stones Hint: 14x10mm up to 16x12mm oval gemstones, puffed or barrel shaped, will also work
- One 15mm closure set
Tools:
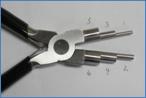
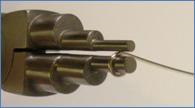
Note: For the purposes of this tutorial, the 6 plier steps have been labeled in ascending order. These numbered steps will be referred to and where possible, mandrel sizes will be given as well.
Directions:
It is important to read through the directions before starting.
Step 1: Straighten and cut two 3″ pieces of 20 gauge wire for each wire wrapped bead you need. These will be called core wires. Steps 2 through 10 show you how to make one wire wrapped bead link.
Step 2: Make an eye loop on each end of the core wires using Step 2 (or 1/8″ mandrel) on the 6 step barrel pliers. Make sure both eyes are going in the same direction.

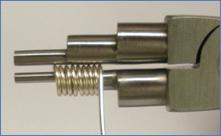
Step 3: Straighten and cut a 20″ piece of 26 gauge wire. Leaving a 1″ tail and starting at one loop, wrap the 26 gauge wire around the 20 gauge core wire component created in Step 2 until you are about 1/16″ from the other loop. Trim the wire tails. Center the wrapped wire between the eyes. Tap the wrap wire ends into the core wire using the tips of your chain nose pliers. Repeat the process with another core wire and 26 gauge wire. Hint: To conserve wire, work from the 26 gauge wire spool.
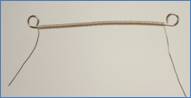


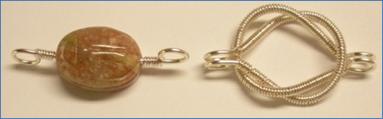
Step 4: Center and hold a wrapped wire on a ½” mandrel. Bend the wrapped wire around the mandrel until the loops meet. Note: It is important that the loops meet and that one side is not longer than the other. Repeat the process with another wrapped wire.
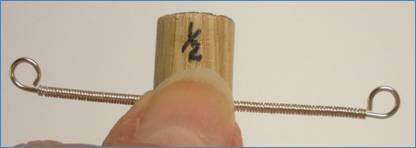
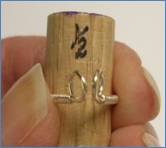
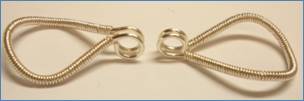
Step 5: While still holding the wrapped wire unit on the mandrel, use the tips of your flat nose pliers to bend the loops perpendicular to the mandrel. Repeat the process on another wrapped and shaped wire.
Step 6: Place the rounded end of a shaped wrapped wire piece on top of the ½” mandrel with the eye loops facing up. Push the rounded end over the mandrel, making a slight bend in the end. Repeat with another wrapped and shaped wire.

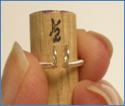
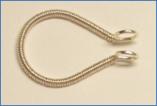
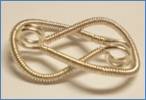
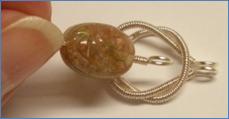
Step 7: b Follow the photo steps to slide the two shaped wrapped pieces together. This is the most difficult step in making this bracelet. Make minor adjustments when the links are together. Note: It is very important that you put all the links together in the same manner.

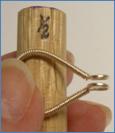
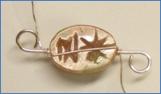
Step 8: Straighten and cut a scant 1-7/8″ piece of 20 gauge wire. Make an eye loop one end of the wire using Step 2 on the 6step barrel pliers. Slide a bead on the wire. Using Step 2 on the 6-step barrel pliers, make a loop going in the opposite direction on the other end of the wire.

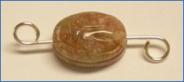
Step 9: Note: You do not need to do this step if you are using a round bead. This step keeps flat beads from spinning in the wire wrapped unit. Straighten and cut a 3½” piece of 26 gauge wire. Center the 26 gauge wire on the back of the scarab bead. Wrap the 26 gauge wire three times around the core wire on either side of the bead. Keeping the bead centered on the core wire, continue to add one wrap at a time to each side until you reach the eye loop. Trim the wrap wires. Using the tips of your chain nose pliers, tap the ends tightly to the core. The loop should face down on the head end of the scarab bead.
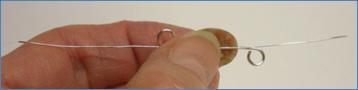
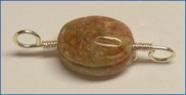
Step 10: The bead wrap wire sits diagonally across the back of the bead. This wire keeps the bead from spinning. If you find that the wrap wire is a bit loose, you can tighten it up by grasping it in the center with the tips of your flat nose pliers and giving it a slight twist. Use the photo directions to insert the bead into the wire wrapped unit. Make sure that all the scarab heads are facing in the same direction.
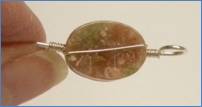

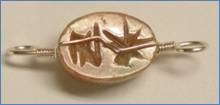
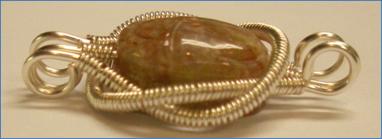

Step 11: Repeat Steps 2 through 10 for the other bead units. Using the materials listed in the tutorial, a five bead finished bracelet will be 7″ long and a six bead finished bracelet will be 8″ long.
Step 12: Optional: Gently curve each bead unit on a 1″ mandrel. You may want to push the sides of the wire wrapped core wires in toward the bead at this point if the bead seems to be too narrow and/or loose.

Step 13: Using Step 3 (or 3/16″ mandrel) of the 6step barrel pliers and 18 gauge wire, make enough jump rings to connect the bead units and attach your closure with two jump rings each.
Step 14: Connect the links with two jump rings each. You could use one jump ring, but since the jump rings are not soldered, the links will be more secure with two.
Step 15: Attach the closure pieces on either end of the bracelet using two jump rings.


I hope you enjoyed this great pattern from Judy. If you’d like to read more of Judy’s blog posts – CLICK HERE!
Happy Wrapping!
![]()
Click to Receive Daily Tips by Email
Related Posts


Wire Jewelry Ideas
-
 See Yourself as a Creative Thinker-Part IV By Karen Meador, PhD
Wire Jewelry Article for September 27th, 2017 If...
- September 27, 2017
-
 See Yourself as a Creative Thinker-Part III By Karen Meador, PhD
Wire Jewelry Article for September 20th, 2017 If...
- September 20, 2017
-
 See Yourself as a Creative Thinker-Part II By Karen Meador, PhD
Wire Jewelry Article for September 13th, 2017 If you...
- September 13, 2017
-
 See Yourself as a Creative Thinker By Karen Meador PhD
Wire Jewelry Article for September 6th, 2017 This is...
- September 6, 2017

Design & Inspiration
-
 Free Pattern: Smile Cluster Necklace by Karen Meador
by Judy Ellis, Wirejewelry.com Wire Jewelry Pattern for August...
- August 7, 2017
-
 Free Pattern: Long crystal round maille earrings by Kylie Jones
by Judy Ellis, Wirejewelry.com Wire Jewelry Pattern for August...
- August 3, 2017
-
 Free Pattern: Stone Twist Wrap by Karen Meador
by Judy Ellis, Wirejewelry.com Wire Jewelry Pattern for July...
- July 31, 2017
-
 Free Pattern: Floating Bead Earrings By Kimberly Newman
by Judy Ellis, Wirejewelry.com Wire Jewelry Pattern for July...
- July 27, 2017
Featured Tools
-
 Get to Know Your Hand Tools – Tube-Cutting Jig By Helen I. Driggs
by Judy Ellis, Wirejewelry.com Wire Jewelry Tip for August...
- August 4, 2017
-
 Wire Jewelry Video: Using Punch Pliers by Judy Freyer Thompson
by Judy Ellis, Wirejewelry.com Wire Jewelry Tip for August...
- August 2, 2017
-
 Wire Jewelry Video: Aligning a Hole Punch by Judy Freyer Thompson
by Judy Ellis, Wirejewelry.com Wire Jewelry Tip for July...
- July 26, 2017
-
 Get to Know Your Hand Tools – Wire Cutters – Helen I. Driggs
by Judy Ellis, Wirejewelry.com Wire Jewelry Tip for July...
- July 25, 2017
0 comments