


- NEW DVD Series – Stone Setting with Bezels
- Tube Set Charm by Kim St. Jean
- Prong Basket Pendant by Kim St. Jean
- NEW DVD Series – Stone Setting with Cold Connections
- New DVD Series – Stone Setting with Wire
- NEW DVD Series: Introduction to Stone Setting by Kim St. Jean
- Featured Tool: Bracelet Bending Plier
- NEW Dvd by Eva Sherman
- Fun, Fast Fold Forming DVD Series
- Double Band Ear Cuff from Alex Simkin
Coiled Wire Jewelry Series – Part 3: Focal Bead Bracelet

by Judy Ellis, Wirejewelry.com
Wire Jewelry Tip for May 13th, 2016
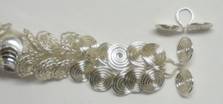
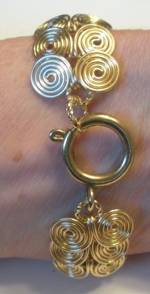
Egyptian Coil Focal Bead Bracelet
Coiled Wire Jewelry Series – Part 3 by Judy Larson
Today we finish up our 3 Part Series called Coiled Wire Jewelry from Judy Larson. In today’s post we are going to use the Egyptian Coil Pattern and create a bracelet and add a focal bead. This pattern is beautiful and I know you will love making it.
Judy Says:

You bought those large beads because you could not resist them. But when you got them home, you could not figure out how to use them. These bracelets may be just what you are looking for!

Materials:
- 20 gauge round wire
- 26 gauge round wire
- Large single or double hole bead
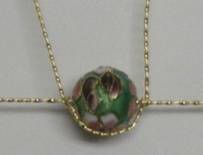
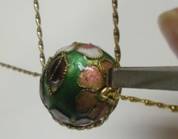
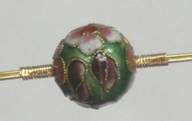
- 15mm round single hole cloisonné
- 15mm spring ring clasp
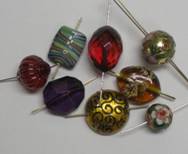
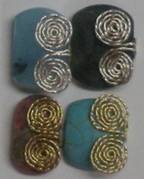
Beads shown above – left to right:
- 28x15mm flat double hole blue quartz
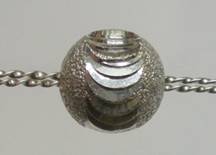
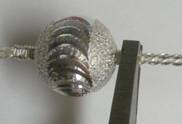
- 15mm round single hole silver
- 22x18mm double hole puffed flat turquoise magnesite
- 25x22mm shaped dichroic glass
Tools:
- Flat, chain and 2 round nose pliers
- Soft jaw pliers
- Flush cutter
- Ultra fine point Sharpie marker
- Hammer
- Bench block
- Wire twister
Directions:
Hint: Once you’ve decided which version you want to create, just follow the numbered steps.
Twisted Wire Version
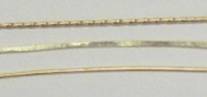
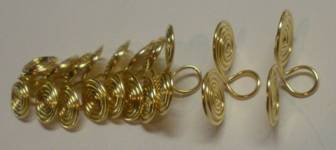
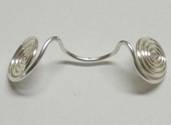
Step 1: Straighten and cut two 10″ pieces, two 9″ pieces and two 8″ pieces of 20 gauge wire. Hammer each of these pieces flat. Twist each piece. A 20 gauge piece of wire, flattened, and twisted are shown in the photo to the left. Note: If you have trouble with your hammered wire breaking, use 21 gauge twisted square wire instead.
Step 2: NOTE Read Step 9 before making these links. Make Egyptian coil links with each of the 8″ and 9″ twisted pieces from Step 1. The 9″ pieces should be cut to 4″ in length after the eyes are made. The 8″ pieces should be cut to 3½” in length after the eyes are made.
Plain Wire Version:
Step 1: Straighten and cut two 11″ pieces, two 10″ pieces and two 9″ pieces of 20 gauge wire.
Step 2: Note: Read Step 9 before making these links. Make Egyptian coil links with each of the 9″ and 10″ pieces from Step 1. The 9″ pieces
should be cut to 4¼” in length after the eyes are made. The 10″ pieces should be cut to 4¾” in length after the eyes are made.
All Versions:
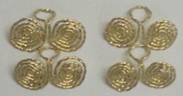
Step 3: Cut 7¼” pieces of 20 gauge wire and make into Egyptian coil links. For size small, you need 16-18 links; for size medium you need
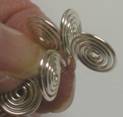
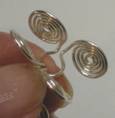
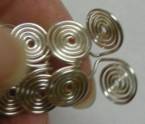
18-20 links; and for size large you need 20-22 links. Cut each unit to 3½” in length after the eye is made. To the right is a twisted and a plain link made with this 3½” length. Notice that the twisted spiral is looser and therefore larger than the plain wire.
Center Bead-Double Hole Version:

Step 4: Slide the bead onto the two longest wires (twisted or plain), centering the bead.

Step 5: Bend the wires coming out one hole to the opposite side of the bead, over the other hole and wire.

Step 6: Using the tips of your round nose pliers, pinch the crossed wires together.

Step 7: Cut a 4″ piece of 26 gauge wire. Starting with a 1½” tail, make 8 wraps going out from the bead, binding the two wires together. End with both wires on top. Repeat for the other side. Pull on the wrap wire tails to tighten the wraps. Trim the wrap wire tails off on top of the wires. Tighten the wrap wires down with your chain or flat nose pliers.
Center Bead-Single Hole Version:

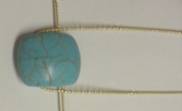
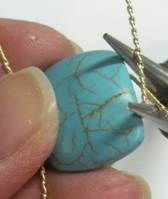
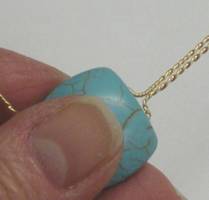
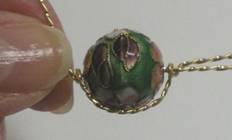
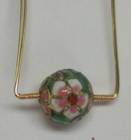
Step 4: Shown to the left are just a few of the beads that will work with this design. The large gold round one is 30mm in diameter. If the two 20 gauge wires fit through the hole, great! Just go to Step 6. If both wires will not fit through the hole, you will have to add the second wire outside the bead.
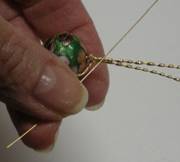
Slide the bead onto the one of the longest wires (twisted or plain), centering the bead. Place the center of the other wire on the center of one side of the bead. Shape the wire around the bead. Wrap the wire ends around the wire going through the center of the bead. Try to keep those wraps as close to the bead as possible.
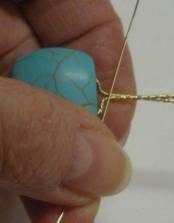
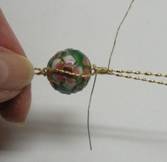
Step 5: Using the tips of your flat nose pliers, grasp one wrap wire as close to the wrap as possible. Bend the wrap wire out parallel to the wire going through the center of the bead. Repeat on the other side.
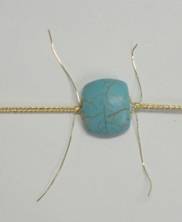
Step 6: Cut two 4″ pieces of 26 gauge wire.
If a wire was added outside the round bead: Starting with a 1½” tail, make 8 wraps starting outside the 20 gauge wire wrap and going out from the bead, binding the two wires together.
If wire was added outside a flat bead: Starting with a 1½” tail, make 8 wraps going out from the bead, binding the two wires together.
If both wires fit through the bead: Starting with a 1½” tail, make 10 wraps if both wires fit through the bead.
End with both wrap wires on top. Repeat for the other side.
Step 7: Pull on the wrap wire tails to tighten the wraps. Trim the wrap wire tails off on top of the wires. Tighten the wrap wires down with your flat or chain or nose pliers.
Next Steps-All Beads:
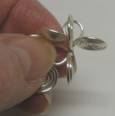
Step 8: Using your flat nose pliers, grasp the two wires at the end of the wire wrap coming out from the bead. Bend the two wires at a 90 degree angle up toward the top of the bead. The wire wrap section must be bent down at a 45 degree angle only if you are using a round bead.


Step 9: If the bead with the wire added on the outside seems to be loose, carefully tighten the wire by bending it on the back of the bead, as shown.

Step 10: Measure out from the corner of the bend 3¾” for twisted wire or 4½” for plain wire and cut the ends of both wires on both sides of the bead.
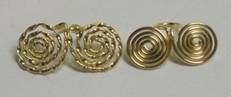
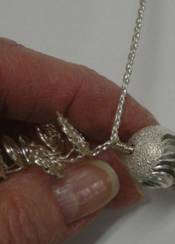
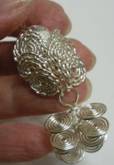
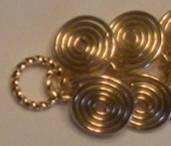
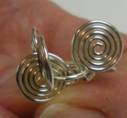
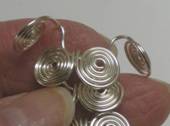
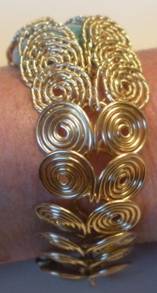
NOTE: The design element of all the bracelets except purple dichroic glass bracelet is of links graduating larger in size as they get closer to the focal bead. You can see how much width the last coil covers on various size flat double hole beads in the photo to the left.

HINT:The largest coil constructed in Steps 1 and 2 is the same size as the coil you will make coming out of the bead. You can change how far into the bead the coils will go by where you make the bend, but the width of the coil cannot be changed unless you cut the wire lengths shorter. Therefore, for the purple dichroic glass bead bracelet, all the links were cut to 3½” after the eye was made, including the twisted ones. The length of the wire coming out of the bead was cut 3-1/8″ long from the bend.
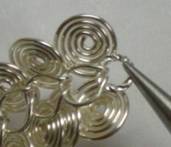
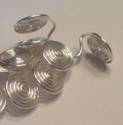
Step 11: Connect all the links as shown. starting with the plain smaller ones and ending with the twisted or plain second largest and then the largest link. Half the links will be used for one side, and half for the other side of the bead. For size small, you need 16-18 links; for size medium you need 18-20 links; and for size large you need 20-22 links. Cut each unit to 3½”in length after the eye is made. If you want, you can start to bend down the links after you have 8 links connected, but it is not necessary as the section is very short. Do not bend down the last two larger links at this time.

Step 12: Slide the eye of the last link onto the two wires coming out of the bead. Make sure that the links will be right side up when bent down.
Step 13: Coil both bead wires to the outside, stopping when the coil reaches the bend.

Step 14: For Round Beads: Press the coils coming out of the bead toward the bead, shaping them to the curve of the bead. Bend the next coils in toward the bead. These will not flatten out, but with each successive link bent in, the links will become flatter.

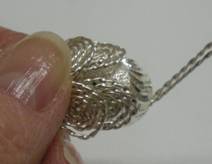

For Flat Beads: Press the coils coming out of the bead toward the bead, shaping them to the curve of the bead. Bend each successive link in toward the bead.


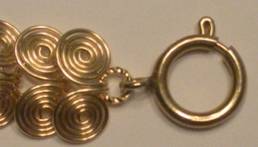
Step 15: Attach a small jump ring and the spring ring clasp to one end of the bracelet. Attach a small jump ring and then the large jump ring to the other end of the bracelet.

Step 16: If the bracelet is too long, remove links equally from each end until the desire length is reached. Hint: Cut the eye loops to remove the links and make the spirals into to charms.
Adding Links:
If the bracelet is too short, you will need to add links to the outer ends. This is a little trickier. If you already have a few links made, follow the photo directions for either of the next two methods. The easiest way to add links is Method 3.
Method 1: Open the outer link to a pre-bent down position. Slide on a new link as shown. The eye loop should remain below the spiral coils of the link being slid onto. Once the new link can go no further, push its spirals down below the level of the one being slid onto and twist the new link outward. Repeat as many times as needed. Bend the spiral links down.

Method 2: Pull a new link open. Note: The wire has a “memory” so it will be easy to bend it back into shape. Slightly lift up the last coils on the bracelet. Slide the new link under the coils. Reshape the new link. Press the links into place. Repeat as many times as needed.
Method 3: Make a new link through Step 10 in the Egyptian Coil Bracelet-The Basics tutorial. Slide the new link onto the last link. Coil the ends. Bend the new link down.

To read Part 1 of this series CLICK HERE. To read Part 2, CLICK HERE!
Happy Wrapping!
![]()
Click to Receive Daily Tips by Email
Related Posts


Wire Jewelry Ideas
-
 See Yourself as a Creative Thinker-Part IV By Karen Meador, PhD
Wire Jewelry Article for September 27th, 2017 If...
- September 27, 2017
-
 See Yourself as a Creative Thinker-Part III By Karen Meador, PhD
Wire Jewelry Article for September 20th, 2017 If...
- September 20, 2017
-
 See Yourself as a Creative Thinker-Part II By Karen Meador, PhD
Wire Jewelry Article for September 13th, 2017 If you...
- September 13, 2017
-
 See Yourself as a Creative Thinker By Karen Meador PhD
Wire Jewelry Article for September 6th, 2017 This is...
- September 6, 2017

Design & Inspiration
-
 Free Pattern: Smile Cluster Necklace by Karen Meador
by Judy Ellis, Wirejewelry.com Wire Jewelry Pattern for August...
- August 7, 2017
-
 Free Pattern: Long crystal round maille earrings by Kylie Jones
by Judy Ellis, Wirejewelry.com Wire Jewelry Pattern for August...
- August 3, 2017
-
 Free Pattern: Stone Twist Wrap by Karen Meador
by Judy Ellis, Wirejewelry.com Wire Jewelry Pattern for July...
- July 31, 2017
-
 Free Pattern: Floating Bead Earrings By Kimberly Newman
by Judy Ellis, Wirejewelry.com Wire Jewelry Pattern for July...
- July 27, 2017
Featured Tools
-
 Get to Know Your Hand Tools – Tube-Cutting Jig By Helen I. Driggs
by Judy Ellis, Wirejewelry.com Wire Jewelry Tip for August...
- August 4, 2017
-
 Wire Jewelry Video: Using Punch Pliers by Judy Freyer Thompson
by Judy Ellis, Wirejewelry.com Wire Jewelry Tip for August...
- August 2, 2017
-
 Wire Jewelry Video: Aligning a Hole Punch by Judy Freyer Thompson
by Judy Ellis, Wirejewelry.com Wire Jewelry Tip for July...
- July 26, 2017
-
 Get to Know Your Hand Tools – Wire Cutters – Helen I. Driggs
by Judy Ellis, Wirejewelry.com Wire Jewelry Tip for July...
- July 25, 2017
0 comments