


- NEW DVD Series – Stone Setting with Bezels
- Tube Set Charm by Kim St. Jean
- Prong Basket Pendant by Kim St. Jean
- NEW DVD Series – Stone Setting with Cold Connections
- New DVD Series – Stone Setting with Wire
- NEW DVD Series: Introduction to Stone Setting by Kim St. Jean
- Featured Tool: Bracelet Bending Plier
- NEW Dvd by Eva Sherman
- Fun, Fast Fold Forming DVD Series
- Double Band Ear Cuff from Alex Simkin
Product Photography

by Judy Ellis, Wirejewelry.com
Wire Jewelry Tip for February 3rd 2016
Product Photography
by Olena Bugrimenko
We always love hearing new ideas from our contributors. Today Olena shares a few tips on how to create striking photos of your products.
Olena says:

I’m currently selling most of my jewelry online, which means my customer cannot touch or wear the product. That is why a good product image is so important – it is the only way for me to show how good it is. I’m constantly looking for a better way of making pictures; I want my customer to feel the beauty of the product just by looking at it’s image.
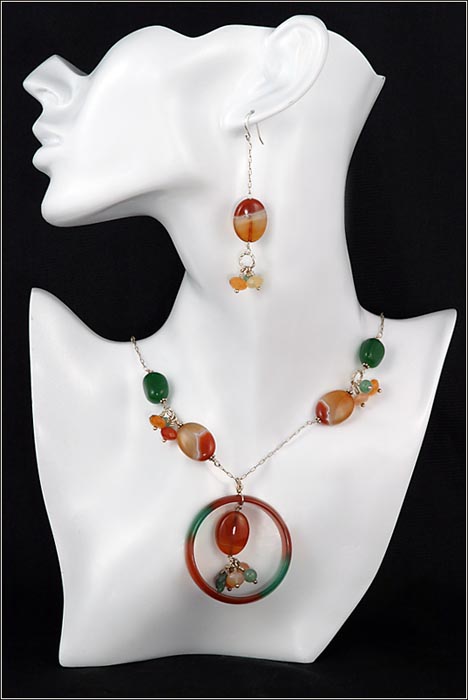
The following image I had when I just started. I like it. However, it does not give the whole picture. For instance, looking at this image I have no idea what clasp looks like or what the real length of the chain.
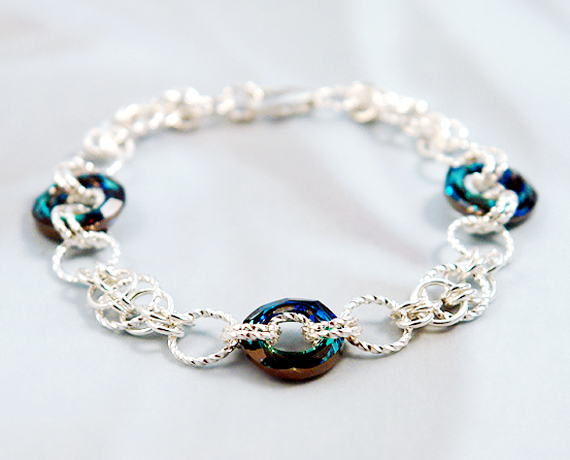
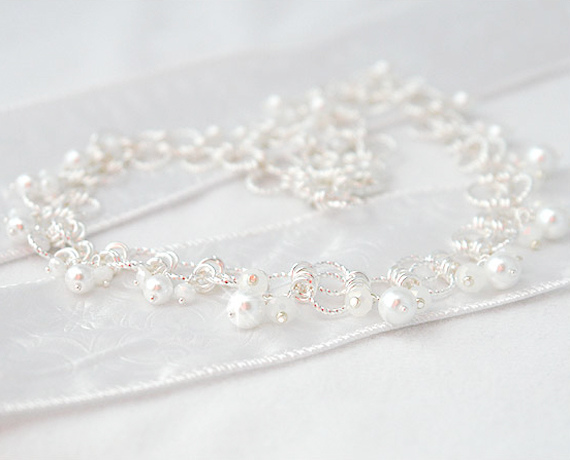
I’m selling my jewelry on Etsy and it gives me ability to add up to 5 images per piece of jewelry. I almost always utilize all of them and try to show my product from different angles with as much detail as possible.
I think pictures on a model are good. Based on my Facebook statistics, I always get more views for the model images. Working with a model is not as easy as it looks like. I hope the 21 Sample Poses for Photographing Women article may give you some insights on the poses and angles that work the best.


Lighting is very important for a good picture. I have experimented with different types of lights and so far the best pictures are in the natural sun light. I have to admit though, that I do not have professional equipment (except a light box) and have no plans to invest a lot of money into it. But if you do, take a look to the Table Top Studio site – this is quite an interesting guide on how to use artificial lighting in jewelry photography. For more information on how to make a simple light box yourself – CLICK HERE to read the article by Mike Ault and to download a pattern to build your own.
Using natural light is a bit difficult for me because there are only so many sunny days in the year (I’m in New Hampshire). Usually, I perform a photo session only once in a while, when the weather is cooperative and I have a good light. Sometimes several of my items are sitting and waiting for a good weather to be photographed. I make 20-30 images of the same product using different angles, and different backgrounds.
Background is another complex question. It is better to have a monotone background, but a plain white is too boring to me. I love more some sort of a texture, maybe a piece of fabric, where each pleat adds shadow.
I also try to avoid making all images look alike. It is easy to fall into this trap. When I found a nice angle and a contrast background and the picture look just right, I try to use the same “environment” for several of my products. And each of them look very good, but when I’m posting those images on Etsy and they place all of them on the single page, all my nice looking images become one mediocre image where the eye cannot recognize individual objects. I think it is better to use slightly different angle and position, so every image is recognizable even on a page with a dozen similar images.
If you’d like to learn more about photographing your product and getting amazing images, click the article for more great details – How to take photos using a light box.
Happy Wrapping!
![]()
Click to Receive Daily Tips by Email
Related Posts


One Comment

Wire Jewelry Ideas
-
 See Yourself as a Creative Thinker-Part IV By Karen Meador, PhD
Wire Jewelry Article for September 27th, 2017 If...
- September 27, 2017
-
 See Yourself as a Creative Thinker-Part III By Karen Meador, PhD
Wire Jewelry Article for September 20th, 2017 If...
- September 20, 2017
-
 See Yourself as a Creative Thinker-Part II By Karen Meador, PhD
Wire Jewelry Article for September 13th, 2017 If you...
- September 13, 2017
-
 See Yourself as a Creative Thinker By Karen Meador PhD
Wire Jewelry Article for September 6th, 2017 This is...
- September 6, 2017

Design & Inspiration
-
 Free Pattern: Smile Cluster Necklace by Karen Meador
by Judy Ellis, Wirejewelry.com Wire Jewelry Pattern for August...
- August 7, 2017
-
 Free Pattern: Long crystal round maille earrings by Kylie Jones
by Judy Ellis, Wirejewelry.com Wire Jewelry Pattern for August...
- August 3, 2017
-
 Free Pattern: Stone Twist Wrap by Karen Meador
by Judy Ellis, Wirejewelry.com Wire Jewelry Pattern for July...
- July 31, 2017
-
 Free Pattern: Floating Bead Earrings By Kimberly Newman
by Judy Ellis, Wirejewelry.com Wire Jewelry Pattern for July...
- July 27, 2017
Featured Tools
-
 Get to Know Your Hand Tools – Tube-Cutting Jig By Helen I. Driggs
by Judy Ellis, Wirejewelry.com Wire Jewelry Tip for August...
- August 4, 2017
-
 Wire Jewelry Video: Using Punch Pliers by Judy Freyer Thompson
by Judy Ellis, Wirejewelry.com Wire Jewelry Tip for August...
- August 2, 2017
-
 Wire Jewelry Video: Aligning a Hole Punch by Judy Freyer Thompson
by Judy Ellis, Wirejewelry.com Wire Jewelry Tip for July...
- July 26, 2017
-
 Get to Know Your Hand Tools – Wire Cutters – Helen I. Driggs
by Judy Ellis, Wirejewelry.com Wire Jewelry Tip for July...
- July 25, 2017
Maria
February 10, 2016 at 6:43 pm
Very helpful info. I am not yet at the point of selling anything, but hope to be able to soon! Thanks for the tips