


- NEW DVD Series – Stone Setting with Bezels
- Tube Set Charm by Kim St. Jean
- Prong Basket Pendant by Kim St. Jean
- NEW DVD Series – Stone Setting with Cold Connections
- New DVD Series – Stone Setting with Wire
- NEW DVD Series: Introduction to Stone Setting by Kim St. Jean
- Featured Tool: Bracelet Bending Plier
- NEW Dvd by Eva Sherman
- Fun, Fast Fold Forming DVD Series
- Double Band Ear Cuff from Alex Simkin
Coiled Wire Daisy Bracelet

by Judy Ellis, Wire-Sculpture.com
Wire Wrapping Tutorial May 21, 2014
The Coiled Wire Daisy Bracelet
Today I wanted to give you a fun and inspirational pattern that you can make over and over again!
This Coiled Wire Daisy Bracelet is the only accessory you’ll want on your wrist all spring and summer long and this simple tutorial puts a new twist on the classic daisy chain pattern. Enjoy!
Coiled Wire Daisy Bracelet
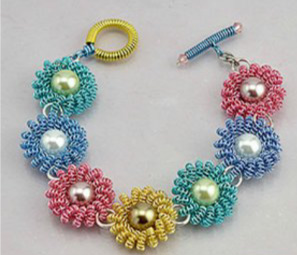
Bead Type: Pearl, Miscellaneous
Time to complete: In an evening
Bead Technique Used: Chainmail/Wirework
Difficulty Level: Intermediate
Materials:
- Coiling Gizmo Deluxe Winder
- Jewelry pliers- Flat nose, Chain Nose, Round Nose, Flush Cutters, Nylon Jaw Pliers
- Various colors of 24-ga and 22-ga Artistic Wire
- 10mm beads, for the centers of your daisies (Make sure that 22-ga wire can go through the beads)
- 8mm – 10mm jump rings
- Clasps
- Extension chain if needed
Instructions:
Make a Coiled-Coil:

- Using a length of approximately 60 inches of 24-ga wire, make a 4.5-inch long coil on the 1.6mm diameter mandrel (second to smallest mandrel in the Coiling Gizmo Deluxe Winder).
- Take the coil off the mandrel and trim off excess wire.
- Cut a 15-inch length of 22-ga wire of the same color.
- Using the same mandrel as in step 1, secure the 22-ga wire onto the mandrel and make one coil.
- Thread the 4.5-inch coil you made in step 1 onto the 22-ga wire still attached to the mandrel.
- Push the coiled wire up to the mandrel and coil it (with the 22-ga wire inside of it) approximately 16 times around the mandrel.
- Remove the coiled-coil off the mandrel. DO NOT CUT the wires yet.
Create the Daisy’s Petals:

- Trim off the excess wire (the wire tail attached to the mandrel), leaving the longer remaining wire on the opposite side of the coiled-coil intact.
- Thread the remaining 22-ga wire through the opposite side of the coiled-coil you just created.
- Pull and tighten the wire thus, forming a circle of coiled-coil wire. This is the “petals” of your daisy.
- Adjust the coils so that they are evenly distributed throughout the circle.
Complete the Daisy:

- For the center of the daisy, thread a 10mm bead onto the remaining 22-ga wire and carry the wire over to the opposite side of the daisy.
- Wrap the wire once around the opposite side.
- Secure the remaining wire by wrapping it twice around the wire that the bead is strung onto (inside the coiled-coil circle).
- Trim off any excess wire.
Making the Bracelet:

If you’re interested in receiving more FREE Jewelry Patterns like this one, CLICK HERE to sign up TODAY!
Happy Wrapping!
![]()
Click to Receive Daily Tips by Email
2 Comments

Wire Jewelry Ideas
-
 See Yourself as a Creative Thinker-Part IV By Karen Meador, PhD
Wire Jewelry Article for September 27th, 2017 If...
- September 27, 2017
-
 See Yourself as a Creative Thinker-Part III By Karen Meador, PhD
Wire Jewelry Article for September 20th, 2017 If...
- September 20, 2017
-
 See Yourself as a Creative Thinker-Part II By Karen Meador, PhD
Wire Jewelry Article for September 13th, 2017 If you...
- September 13, 2017
-
 See Yourself as a Creative Thinker By Karen Meador PhD
Wire Jewelry Article for September 6th, 2017 This is...
- September 6, 2017

Design & Inspiration
-
 Free Pattern: Smile Cluster Necklace by Karen Meador
by Judy Ellis, Wirejewelry.com Wire Jewelry Pattern for August...
- August 7, 2017
-
 Free Pattern: Long crystal round maille earrings by Kylie Jones
by Judy Ellis, Wirejewelry.com Wire Jewelry Pattern for August...
- August 3, 2017
-
 Free Pattern: Stone Twist Wrap by Karen Meador
by Judy Ellis, Wirejewelry.com Wire Jewelry Pattern for July...
- July 31, 2017
-
 Free Pattern: Floating Bead Earrings By Kimberly Newman
by Judy Ellis, Wirejewelry.com Wire Jewelry Pattern for July...
- July 27, 2017
Featured Tools
-
 Get to Know Your Hand Tools – Tube-Cutting Jig By Helen I. Driggs
by Judy Ellis, Wirejewelry.com Wire Jewelry Tip for August...
- August 4, 2017
-
 Wire Jewelry Video: Using Punch Pliers by Judy Freyer Thompson
by Judy Ellis, Wirejewelry.com Wire Jewelry Tip for August...
- August 2, 2017
-
 Wire Jewelry Video: Aligning a Hole Punch by Judy Freyer Thompson
by Judy Ellis, Wirejewelry.com Wire Jewelry Tip for July...
- July 26, 2017
-
 Get to Know Your Hand Tools – Wire Cutters – Helen I. Driggs
by Judy Ellis, Wirejewelry.com Wire Jewelry Tip for July...
- July 25, 2017
Pam W
May 21, 2014 at 6:11 am
Lovely bracelet! Please can we have instructions on how to make the clasp? Many thanks, Pam
Leslie
May 22, 2014 at 5:48 am
Nice Tutorial. Why do you have every kind of social media except Pinterest – or am I missing it?