


Make Your Own Chains Part 3
Jump to a Section:
Getting Started
We all have certain preferences when it comes to chain. Because I am not in the business of selling what I make or charging for the classes I teach, I have had the freedom over the years to play with many different designs and types of chain.
Some pieces were made purely for practice, knowing I probably would not care for them when finished, yet they have become stars in my personal jewelry collection.
Strength, Stability, and Knowing When Closed Rings Matter
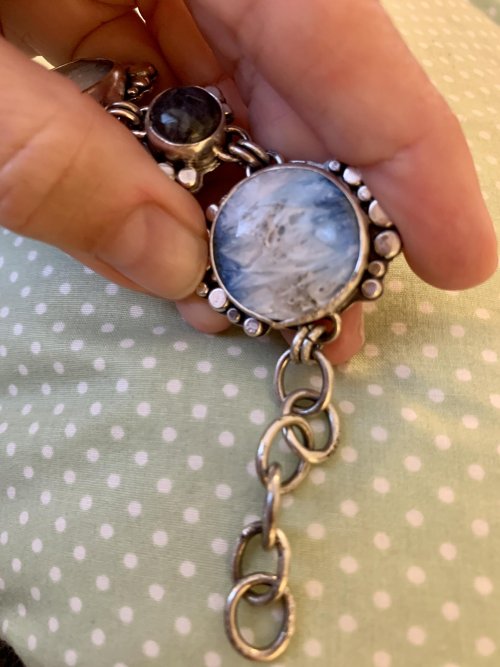
Many of the chains I make require closed rings for strength and stability, but not every chain needs soldered links to be strong. The links in a bracelet made with a magnetic clasp can be connected using wire-wrapped crystal bead links, creating a chain that is extremely strong without soldered jump rings.
Going back to basics makes this easy-peasy bracelet possible by using wrapped loops and links to attach gemstone bezel connectors.

Practical Tip
Heat from soldering the jump rings that connect a clasp to a bracelet can cause magnets to lose their magnetism. For this reason, full-hard 18-gauge jump rings can be used as break-away links. Shock from dropping a magnetic clasp can also weaken the magnetism.
Another important thing to keep in mind is that not all rings should be soldered closed. Some men choose to have their wedding rings tattooed on because if a traditional ring is caught on something while working, it could cause serious injury to the finger or hand.
The same concern applies to bracelets. A magnetic clasp can be a great alternative to a standard clasp in situations where safety matters. I recommend reading more about this topic in discussions on open versus closed jump rings.
When Closed Rings Are the Better Choice
Sometimes chains need to be strong in a different way, which makes closed rings necessary.
In the Heirloom Buttons and Beads Bracelet, the design is loaded with buttons and beads that could easily catch on things.

Because of this, the base cable chain was made using closed, twisted square wire jump rings for added strength.
Gold-filled twisted square wire rings of the same size were added to make the base chain appear heavier, but those rings did not need to be soldered closed.
Since I work mostly with Argentium silver and fine silver, I may approach things differently than someone working with base metals, sterling silver, or gold.
I rarely solder rings closed because Argentium and fine silver fuse so smoothly and beautifully.
Fusing does take a lot of practice, though, and you may find soldering easier, especially when using sterling silver wire, which tends to melt and "glob" when heated to a fusing temperature.
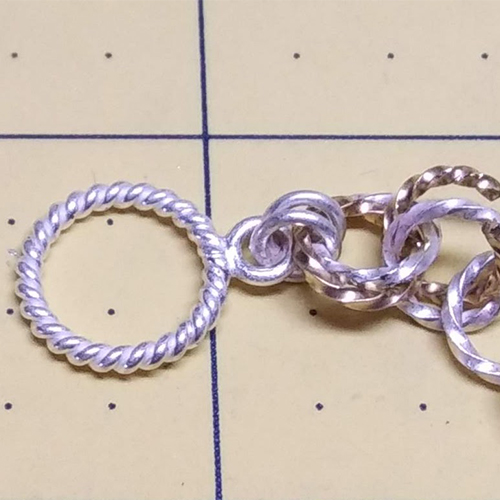
Shaped Links and Learning Through Practice
Fusing or soldering jump rings closed takes practice. A good first soldered or fused chain to make is a paper clip style chain. This style combines several techniques, including making closed rings, connecting them, and shaping them, even if the finished join is not perfect.
The traditional Paper Clip Chain-A Classic is constructed with soldered links. A fused version made with Argentium silver rings creates a classic chain that will stand the test of time.

Make A Fused Paper Clip Chain using Argentium rings to make a classic chain that will stand the test of time.

Practical Tip
Recently, a former neighbor who was once my daughter's best friend stopped by with her family. Earlier that same day, I had pulled out three adjustable Argentium silver paper clip chain bracelets from my stash and left them on my workbench.
As it turned out, they fit her daughters perfectly. They now have a special reminder of where their mom used to live. My advice is to make a few paper clip bracelets to keep on hand. They take very little time and minimal supplies, and you never know when a small gift will brighten someone's day.
You can also create a heavier-duty paper clip style chain, such as those used in closure focal necklaces that feature unique links connecting to the clasp. Heavier link chains are often something the men in your life may gravitate toward.

Texture as Design and Problem Solver
Jen's Chain is made the same way as a paper clip chain but with shorter links. Soldering and fusing can sometimes result in imperfect joins.
While the joins should always be cleaned and refined during construction, they may still not look perfect.
Adding texture to the links, as in Jen's Chain, can cover a multitude of imperfections.

With a chain like Hammered Luxury, texturing adds extra facets that reflect light and create more sparkle.
This type of gold-filled chain set is designed to be passed down from generation to generation.
I know this because I am now in year six of rarely removing my own gold-filled bracelet.

I know this because I am now in year six of rarely removing my own gold-filled bracelet.

If purchasing gold-filled supplies for an entire set feels too expensive, consider designs where only half the wire is gold-filled.
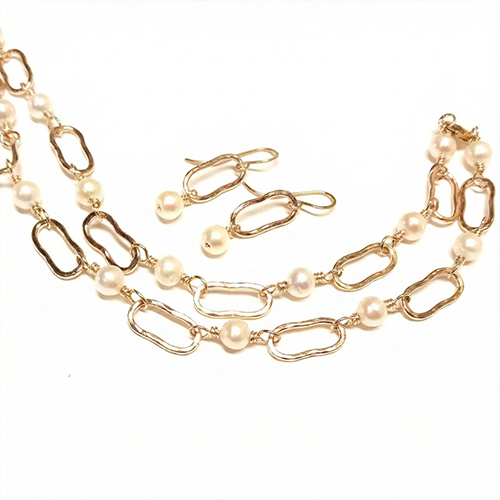
Adding pearls and very slight shaping to the textured links creates an updated classic look.
You can also swap pearls for faceted crystal beads if you want more sparkle.
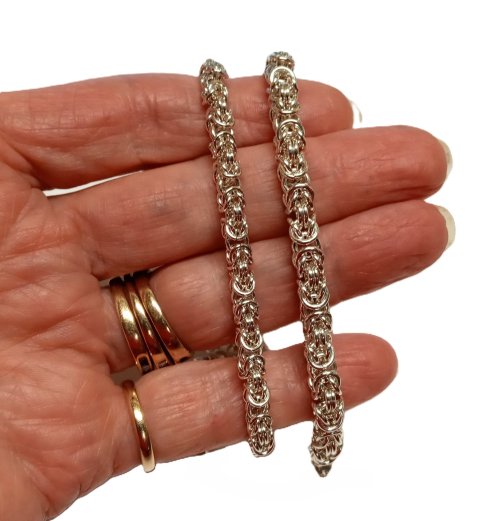
Building Complexity with Foxtail Chains
Try slightly more complicated oval link shaping when making a simple foxtail chain. This is a good chain to master before moving on to a double foxtail chain.

Adding small end caps, charms, extender chains, and swivel lobster claw clasps makes a lovely finishing touch for double foxtail chain bracelets.

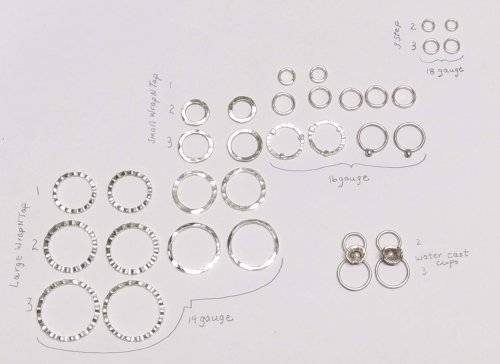
Large Round Links and Playful Experimentation
One of the best things about making chains with large jump rings is that many large ring clasps and toggles are available that fit seamlessly into the design.
Making chain with shaping pliers and wire is especially fun, and these chains make excellent bases for embellishment. They are also a great way to use up scrap wire.
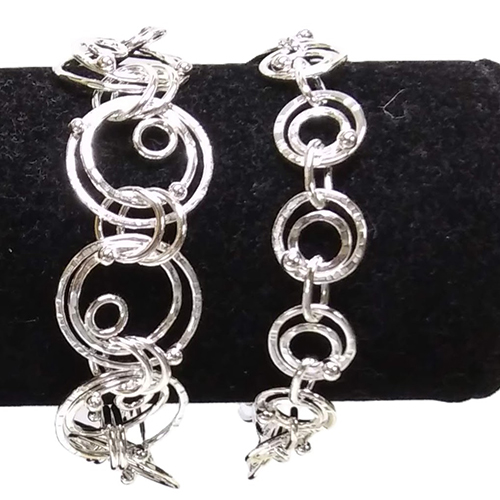
Many of my favorite bracelets are well loved, and they look it. That is why texturing rings appears in so many of my designs.
Texturing disguises dings and scratches that come from wear while also adding a faceted sparkle.
In designs like a Handmade Chunky Chain, the ring clasp continues the large-and-small ring pattern, reinforcing the overall look.

Do not be afraid to experiment with base metal jump rings. This is a great way to learn which sizes work well together and which ones do not.

That kind of experimentation is exactly how the Jumbled Lacy Chain came to be.

Traditional Shapes with a Twist
As your chain-making skills progress, do not be afraid to try something new. A bracelet like A New Take on a Figure-8 Chain uses a non-traditional wire shape to create the base chain.
Does it need to be soldered? Possibly not, since each link is made with 16-gauge square wire.
However, because the charms on this bracelet all carry meaning for the recipients, I chose not to risk their loss.

In Conclusion
Chain making is a balance between strength, beauty, and personal choice.
By understanding when to solder or fuse, when to leave rings open, and how shaping and texturing affect both durability and design, you can create chains that are not only beautiful but meaningful and long-lasting.
The more you experiment, the more confident and creative your chain work will become.
What's Next?
Check out the other parts of this series below!
Start Here: Making Your Own Chains - Part One

Part One lays the groundwork for learning chain maille jewelry, focusing on how to learn the skill effectively and what you need to get started.
This installment covers learning through videos, books, and classes, along with essential tools, jump rings, and best practices for opening and closing rings correctly.
You'll also be introduced to basic chain construction, including the single cable chain, and gain practical tips to help you build strong habits before moving on to more complex designs.
Making Your Own Chains - Part Two
In Part Two, we move beyond basic cable chains and begin exploring more complex and visually striking chain maille structures.
You'll be introduced to chains like the Byzantine, learn why jump ring accuracy becomes increasingly important, and see how wire gauge and ring size dramatically affect the strength, weight, and appearance of a finished chain.
This installment focuses on building confidence with denser weaves, understanding construction patterns, and making thoughtful design choices that elevate chain maille from simple to sophisticated.
Materials

Tools

- DUR-1312
- Lesson Quantity: 1.00 pieces
- Purchase Quantity: 1.00 each
- Price: $388.00
- Gold Club Price: $291.00

- G25-1-KITSS
- Lesson Quantity: 1.00 pieces
- Purchase Quantity: 1.00 each
- Price: $182.60
- Gold Club Price: $136.95

- G7-13
- Lesson Quantity: 1.00 pieces
- Purchase Quantity: 1.00 each
- Price: $5.95
- Gold Club Price: $4.46

- G15-4
- Lesson Quantity: 1.00 pieces
- Purchase Quantity: 1.00 each
- Price: $58.95
- Gold Club Price: $44.21

- MAT-500.00
- Lesson Quantity: 1.00 pieces
- Purchase Quantity: 1.00 each
- Price: $24.95
- Gold Club Price: $18.71
Supply Detail
Purchase quantity:
Price: $
Gold Club Price: $
- Category: Teaching
- Technique(s): Chain Making, Making Jump Rings, Butane Torch Techniques, Design, Teaching, General Education

Judy Larson
Other Articles by Judy Larson
 What is Druzy
 Coiled Wire Jewelry Series Part 1 - Everything New is Old
 Where do you create
 Soldering on Copper
 Charting Your Creations
 Design Process with 3 Earrings
 All About Rolling Mills
 How to Use Disc Cutters to Make Metal Washers
 Disc Cutter Basics and How to Make Metal Washers
 I Am Not a Hoarder
 The Beauty of Druzy
 Design Process with 3 Different Earrings
 Think Outside the Box - Alternative Metal Texturing
 Fall Leaves for Your Designs
 Cholula "Folk Art" Charms
 Lemons to Lemonade
 Why You Should Take a Class
 Bead, Shell, and Rock Cabochons
 What Tools Do I Need for Wirework and Bead Stringing - Start With The Basics
 Choosing Pliers
 Saving, Storing, Using Tutorials
 Flop to Flip
 The Story of Turquoise
 Non Marring Tools
 Using Lower Quality Beads
 Differences in Gold Plating
 Inventorying Your Supplies
 Engineering the Multi-chain Necklace
 Benefits of Extender Chains
 My Most Often Used Embellishments
 Sliding Gauges and Calipers
 Wire and Sheet Gauge Measuring Tool
 Silver Plated Copper Craft Wire
 Jewelry from Other Cultures
 Conversation Starters
 Well, That Didn't Work, Now What
 Water Casting for the Weekend Jeweler
 A Few Thoughts on Multi-Strand Beading Wires
 How to Downsize Your Earring Projects Without Losing Style
 Celebration Jewelry
 Moonstone- A Flash of Light
 Make Your Own Chains Part 1
 Make Your Own Chains Part 2
![]()
The premier place for all your jewelry making needs. The best in wire, tools, cabochons, gemstone beads and more. As well as a superior resource for educational support to help build your jewelry making skills and techniques.
Connect With Us

® 2007 - 2026 Wirejewelry.com Powered by ClaimTheWeb Cart