


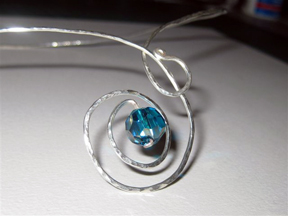
River Eddy

Designed by Tracey McKenzie © 2011
Skill Level: Beginner/All
Technique: Heavy wire manipulation and hammering
While playing around with some of my favorite heavy-gauge wire, I came up with this simple but elegant design. A river eddy is similar to a small whirlpool, usually found near small waterfalls. The silver wire swirls represent an eddy and my choice of an AB blue crystal bead symbolizes cool, clear water. I use a lot of what Dale Armstrong calls "found" items that may give you an idea of what to look for in your garage, basement or shop that could be recycled into your jewelry making space.
Materials
- 16-gauge round half hard wire, 24" (60cm)
- Focal bead (example uses a 10mm round faceted AB blue Swarovski® crystal)
Tools
- Flat nose pliers
- Round nose pliers
- Wire cutters
- Metal file
- Ruler
- Small round mandrel or pencil (8mm diameter)
- Steel neck mandrel or round metal shaping item, such as a tow ball (see step 8)
- Rawhide mallet
- Ball peen or chasing hammer
- Bench block
- Optional: Crimping pliers
Instructions
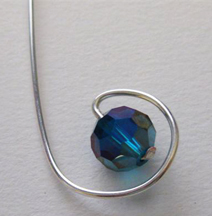
- Measure and cut, but do not straighten, the needed length of 16-gauge wire. On one end, use the flat head on either a ball peen or a chasing hammer, and a bench block to flatten about 3/16" (4mm) into a paddle shape. File the hammered end smooth and slide the 10mm bead onto this wire end. About halfway up the flattened wire, use chain nose pliers to make a 90° bend, forming a "bead stop."


- Slide the bead down to the bead stop. Use the tips of round nose pliers to hold the wire immediately above the bead. Use your fingers to carefully bend the wire around the bead, leaving about a 3mm space between the bead and the first wire swirl around the bead.


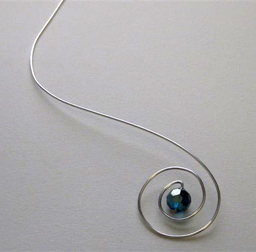
- Continue swirling the wire around the bead again, this time leaving about 5mm of negative space between it and the first wire swirl. Stop after the second swirl has been completed and the bead stop is located at the bottom of the pendant.

- Use your fingers and your hands to begin forming the "neck" section of the collar. Work slowly, inch-by-inch, until the neckpiece curves completely around in an oval-shaped circle and the plain end almost meets the swirled end.

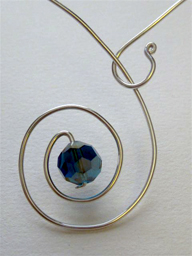
- To make the hook/clasp end: place the tips of round nose pliers at the very end of the un-swirled wire and working toward the inside of the main collar circle, roll this wire end back toward itself, forming a small circle.
Note: I prefer to have my loops fit flush, so I always trim and file the ends of my loops flush, and then I use crimping pliers to close the end tightly.


- Place the 8mm diameter mandrel, or found item, on the wire side that is opposite of and just above the loop just made. Use your fingers to bend the wire 80% of the way around the mandrel, completing the hook.
- Use your hands and fingers to work the collar into the shape you desire, and then use a rawhide mallet to firmly tap the wire, all the way around, to help retain this shape.

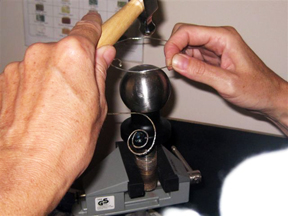
- Now it is time to take the collar and a ball peen or chasing hammer to either a steel neck mandrel or a tow ball. Using the round hammer head, begin hammering the wire as close to the bead as possible, and working from the outside of the wire, continue to hammer until you get the textured look you desire.
Note: As you hammer, you will find that your collar will take on a life of its own and will twist in whatever direction it wants to! To counter this effect, about every 3 or 4 inches (10 cm) stop, realign the collar, and hammer away.

- Once you have finished hammering and texturing the collar and you are happy with the look, use your hands to manipulate the collar back into its original shape. Try the collar on and if necessary, tweak the hook/clasp a bit so that it goes under and then over the main wire, above the "eddy" swirls.
 Free Wire Jewelry Patterns
Did you find this pattern through a link from a friend? This Free Wire Jewelry Pattern is just one of dozens of free wire jewelry patterns we send via email. Get patterns like this one straight to your inbox - click here!
![]()
The premier place for all your jewelry making needs. The best in wire, tools, cabochons, gemstone beads and more. As well as a superior resource for educational support to help build your jewelry making skills and techniques.
Connect With Us

® 2007 - 2026 Wirejewelry.com Powered by ClaimTheWeb Cart