


Wrecking Ball Earrings

Designed by Sonja Kiser © 2012
Skill Level: Advanced Beginner
Technique: Involved components
These earrings incorporate the use of the rosettes and wrapped loops. One rosette is used wrapped tightly to keep the bead on the wire. The other rosette is wrapped loosely just for decoration and balance of the earrings. The bead used is 12mm but other sizes could be used, or more could be added to the bead wire.
Tip: to create a mirror-matching pair of earrings, make both earrings at the same time, repeating each step in reverse on the second earring.
Materials
- 22-gauge square half hard wire, 15"
- 2 12mm round beads
- 2 4mm sterling silver round beads
- 1 pair ear wires
Tools
- Flat nose pliers
- Round nose pliers
- Needle-nose chain nose pliers
- Wire cutters
- Pin Vise
- Ruler
- Tape
Instructions
- Straighten, measure and then cut two pieces of 22-gauge wire each 5" long and two pieces each 2 1/2" long. On each 5" wire, measure 2" from one end and mark. At each mark, use round nose pliers to form a full circle; bending the wire completely around the pliers until it almost forms a U, with the circle on the inside of the bottom.

- Carefully remove the wire from the pliers. From the shorter end of the wire, measure and mark at 1". At this mark, bend the wire 90° away from the circle and use the 1" to make a wrapped loop.
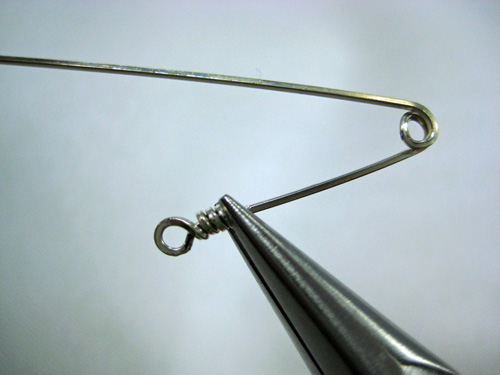
- Use flat nose pliers to hold the center circle and a pin vise to twist the longer, straight wire.

- Check both earrings, making �sure the long twisted wires are the same length, trim if necessary. From the bottom of the top loop on the long wire, measure down and mark at 1 1/4". Using chain nose pliers to begin and flat nose pliers to roll, start at the bottom of this wire and working away from the unit, loosely rosette the wire upward, stopping at the 1 1/4" mark.

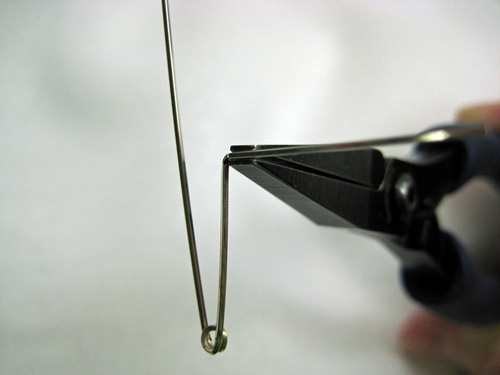
- To make the bead drop component, use a 2 1/2" wire. From one end, measure and mark at 1". Begin to make a wrapped loop, but before closing the loop, slip it into the previously made wrapped loop on the first component. Then wrap this new loop closed.
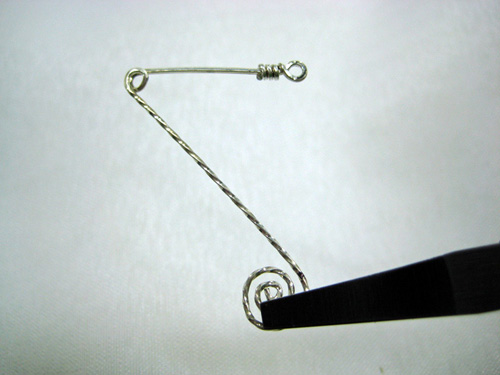
- Measure and mark 1/2" from the bottom of this new wire, and then slide a 4mm metal bead and a 12mm round bead onto this wire. At the 1/2" mark, make a 90° bend to lock the beads on. Rosette the wire end up, completing the earring. Attach the center circle to an ear wire.

 Free Wire Jewelry Patterns
Did you find this pattern through a link from a friend? This Free Wire Jewelry Pattern is just one of dozens of free wire jewelry patterns we send via email. Get patterns like this one straight to your inbox - click here!
![]()
The premier place for all your jewelry making needs. The best in wire, tools, cabochons, gemstone beads and more. As well as a superior resource for educational support to help build your jewelry making skills and techniques.
Connect With Us

® 2007 - 2026 Wirejewelry.com Powered by ClaimTheWeb Cart