


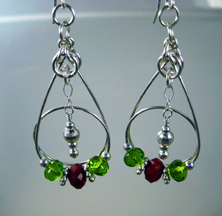
Sky Twirls Earrings

Designed by Sonja Kiser © 2011
Skill Level: Advanced
Technique: Very Involved Components
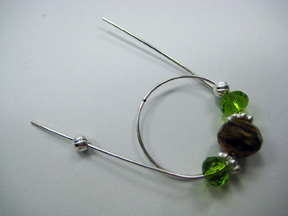
A uniquely different earring design that is created by using a combination of round wire, rondelle beads and jump rings. The top of this earring has just a hint of chain maille to create interest. I specifically used stepped pliers to create the circles for this design; and of course, the bead and/or wire colors can be changed to alter the finished "look."
Tip: If you make one earring according to the pattern while making another in its mirror image, you will create a matching pair.
Materials
- 20-gauge round dead soft wire, 14"
- 2 10mm rondelle beads
- 4 6mm rondelle beads
- 4 6mm daisy spacer beads
- 4 4mm round beads
- 2 3mm round beads
- 2 4mm pearl beads
- 12 4mm OD 20-gauge round jump rings
- 4 5mm OD 18-gauge round jump rings
- 2 2" 24-gauge headpins
- 1 pair ear wires
Tools
- Flat nose pliers
- Chain nose pliers
- Round nose pliers
- Wrap & Tap Forming Pliers (size 13, 16, 20mm)
- Wire cutters
- Ruler
- Extra-fine point marker
Instructions
- Using the 20-gauge round wire, straighten, measure, and then cut two pieces each 7 inches in length. Measure and mark the center of each wire. Place the center of one wire at the largest step on the Wrap & Tap pliers.


- Bend both wire ends completely around and halfway back again. Remove the wire from the pliers, making note of which wire is on top, as it was bent around.

- Place second wire on step pliers; and repeat Step 2 with the opposite wire on top. This will create a matched pair. Remove from pliers.

- Slide beads on the front wire (the one on top of the stack) in this order: 4mm round, 6mm rondelle, 6mm daisy spacer, 10mm rondelle, 6mm daisy spacer, 6mm rondelle, 4mm bead. (If the holes of the beads are too small, the beads will not slide on the curved wire.)
- Pull the ends of the wires to top center, and trim so they are the same length.

- Using round nose pliers, on each earring and in opposite directions, make an outward loop at the end of each wire as shown.

- Using flat and chain nose pliers, open two 4mm jump rings. Using your hand, press the two loops made on the unit, together. Insert one 4mm jump ring through these loops and close it firmly.

- Add the second jump ring and close. (Check to make sure the top wire is still on the top after the jump rings have been closed.)
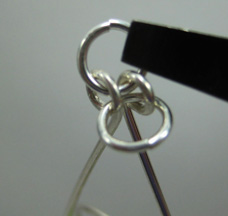
- Close another 4mm jump ring. Insert a different 4mm jump ring through the closed one.

- Now put the open 4mm jump ring through the loops of the unit, between the two previous jump rings.

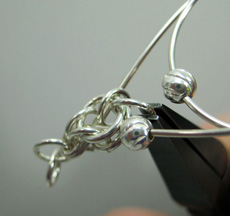
- Open two 5mm jump rings. Now the 4mm jump rings on the outside of the unit need to be pushed downward. Insert one of the 5mm jump rings into the two downward 4mm jump rings on the front and close. Repeat on the back side with the other 5mm jump ring and close.

- Open two 4mm jump rings. Push the two previous 5mm jump rings downward, insert one of the 4mm jump rings into the 5mm jump rings and close. Repeat with the other 4mm jump ring. Set the unit aside.

- Prepare the headpin charm by using a 24-gauge 2" headpin. Slide a 4mm bead and a 3mm bead on the headpin. Immediately after the last bead, begin a wrapped loop. Make the loop wide enough to be able to fit the last two jump rings into. Put the loop onto the two jump rings and finish wrapping the loop closed. Trim and tuck. Note: This component should have some movement.

- Attach an ear wire to the top jump ring. Finish the second earring.

 Free Wire Jewelry Patterns
Did you find this pattern through a link from a friend? This Free Wire Jewelry Pattern is just one of dozens of free wire jewelry patterns we send via email. Get patterns like this one straight to your inbox - click here!
![]()
The premier place for all your jewelry making needs. The best in wire, tools, cabochons, gemstone beads and more. As well as a superior resource for educational support to help build your jewelry making skills and techniques.
Connect With Us

® 2007 - 2026 Wirejewelry.com Powered by ClaimTheWeb Cart