


Tiny Bubbles Earrings

Designed by Rebecca Rudaski © 2013
Skill Level: Beginner
Technique: Working with jump rings
These quick earrings are part of my Easy Earrings class in Tucson, and a much scaled down version of the Marquise Chainmaille earrings. Beginner difficulty and under an hour to make. I also think they look like trefoils when made in green, so make some earrings (or take this project to the next level with the bracelet variation) for your local Girl Scout troop. (No guarantee that they'll let you swap jewelry for cookies, but it's always worth a try.) :)
These earrings come from the Japanese family of weaves. What sets this family apart is the distinct horizontal (green) and vertical (aluminum) rings. The Japanese family is known for the interesting geometric patterns that can be created by varying the inner diameter of the horizontal rings. This is a beginner pattern to get your feet wet with the concept of Japanese. Remember that horizontal rings ONLY connect to vertical rings and vertical rings ONLY connect to horizontal rings.
Materials
- Jump Rings:
- Tiny: 20g (SWG) 7/64" (5 for each earring)
- Small: 18g (SWG) 5/32" (4 for each earring)
- Large: 18g (SWG) 1/4" (4 for each earring)
- Tiny: 20-gauge (AWG) 3/32"
- Small: 19-gauge (AWG) 5/32"
- Large: 19-gauge (AWG) 1/4"
- One pair of ear wires
Note on Jump Ring Gauges: Precious metal wire is commonly measured in AWG (American Wire Gauge), whereas some base metal jump rings are measured in SWG (Standard Wire Gauge, also used to measure guitar strings and some electrical wiring). All wire and jump rings on wirejewelry are measured in AWG. If you have precious metal jump rings, use
Tools
- Two pairs of flat nose or chain nose pliers - whichever is more comfortable for you
Instructions
-
Separate your rings into two equal piles for your two earrings. There should be 5 tiny rings, 4 small rings and 4 large rings for each earring (as well as an ear wire).
Start by closing all the tiny rings.
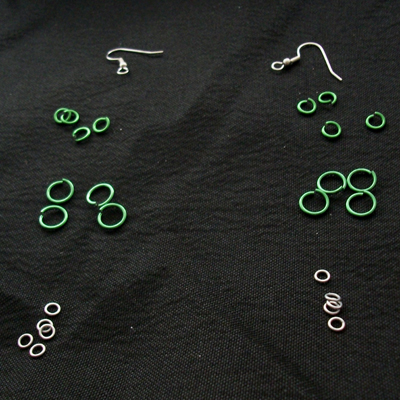

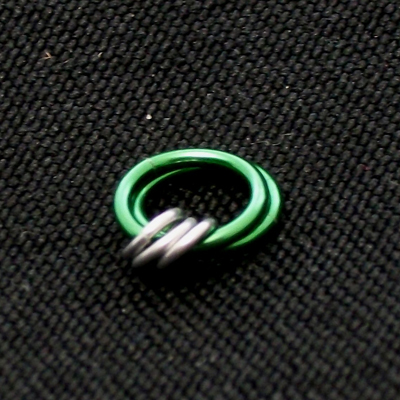
- Open one of the large rings and link it through 3 tiny rings.
Double your large ring by opening another large ring and threading it through the 3 tiny rings, but not the first large ring. Your large rings will lie parallel to each other.
-
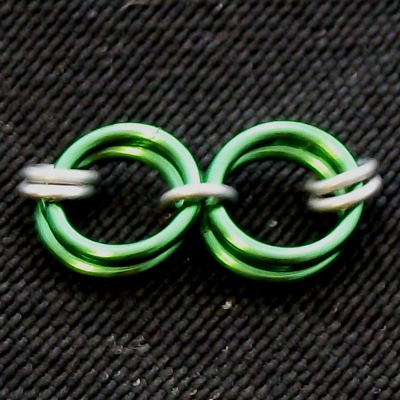
Open another large ring, thread it through 1 of the tiny rings already woven into your earring, then add 2 loose tiny rings to the ring you just added. Close this ring, and double it like the other large ring.
-
Open a small ring and link it through 2 tiny rings, one attached to each big ring. Double this small ring.

-
On the other side, link another small ring to the last 2 hanging tiny rings. Before closing this ring, add the earring hook just like another ring. Close this ring, then double it with another small ring.
Repeat for the second earring. Celebrate by wearing your new pair of tiny bubbles!
-
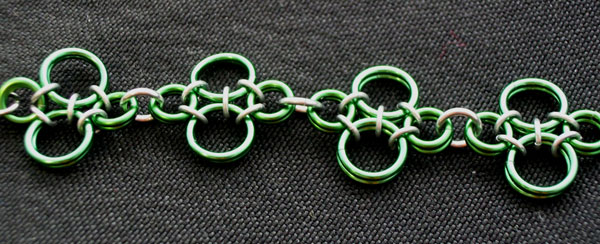
For a matching bracelet, just chain together these bubble units (I used 19g 5/32" rings, but anything with an ID bigger than 1/8 will work just fine).
Click the image to view larger:

Happy weaving!
 Free Wire Jewelry Patterns
Did you find this pattern through a link from a friend? This Free Wire Jewelry Pattern is just one of dozens of free wire jewelry patterns we send via email. Get patterns like this one straight to your inbox - click here!
![]()
The premier place for all your jewelry making needs. The best in wire, tools, cabochons, gemstone beads and more. As well as a superior resource for educational support to help build your jewelry making skills and techniques.
Connect With Us

® 2007 - 2026 Wirejewelry.com Powered by ClaimTheWeb Cart