Beautiful Barrels Earrings


Designed by Rebecca Rudaski © 2012
Skill Level: Advanced Beginner
Technique: Working with jump rings: double barrel weave
Work up these quick earrings in the afternoon and wear them in the evening! Match the colors to your wardrobe or your mood. The shorter earrings can be done by a beginner, but if you're looking for a challenge, add more units together for the longer earrings, or just keep going until you have a bracelet or a necklace!
This weave is called "Double Barrel." It gets its name from the doubled rings in the middle of the rope. This weave is a unit weave, which means the weave is a series of repeated units; in this case, the barrels. These directions will tell you how to do the longer purple earrings, but if you prefer shorter earrings, stop when they are the right length and add a bead on a headpin or any charm on the end.
Materials
- Jump Rings:
- Short earrings use 18-gauge (SWG) 5/32" rings.
This makes a little stiffer of an earring because there's not a lot of weight to pull it down
If you'd like to use silver rings instead of base metal, use 17-gauge (AWG) 5/32" - Long earrings use 18-gauge (SWG) 3/16" rings
There's enough weight with the length to pull the rings down and make a bigger, bolder earring.
If you prefer silver, use 17-gauge (AWG) 3/16" - So that the jump rings photographed better, for this tutorial, Rebecca used 16-gauge (SWG) 1/4" rings. You can certainly use this size for bigger earrings, and it also is a great size to make a barrel bracelet! (If you're working in silver, use 15-gauge (AWG) 15/64")
- 2 10mm round beads
- 2 22-gauge headpins, 1", or make your own
- One pair of ear wires
Tools
- Two pairs of flat nose or chain nose pliers - whichever is more comfortable for you
Instructions
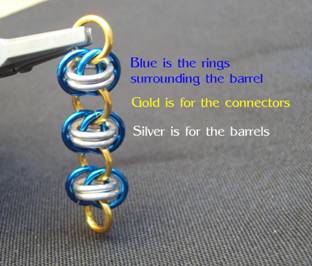
I am using three colors to help you understand how this weave works. They're all the same size, but the colors help show where the different rings go. You don't have to use my colors, you can use all one color, or match an outfit, but to help you plan, this is how my colors are going to work. Silver is for the barrels, blue is going around the barrels, and the gold rings connect the barrels together.
- Start by opening two blue rings and closing two silver rings.


- Take one of those blue rings, and scoop both the silver rings on it. Close the blue ring.


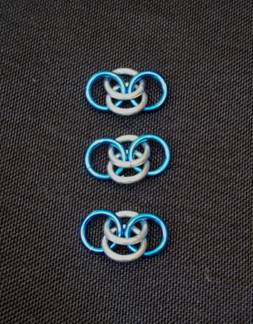
- Take your second blue ring and hook it on both silver rings, just like the previous step, but don't hook it through your other blue ring. When it looks like the picture below, close that blue ring.


- Congrats! You've got the start to a barrel! Make three more just like that. (If you're making a shorter earring, you only need one barrel, so hang tight.)

- Now we're going to connect our barrels. Open a gold connector ring and loop it through one (just one!) of your blue rings.


- This is a bit tricky, so bear with me. You're going to take that second blue ring that's dangling at the bottom there and slide it up and on to the gold ring. You're not flipping it up like a book; you're sliding it like a piece of paper across a table. Do not put the silver rings on the gold ring.
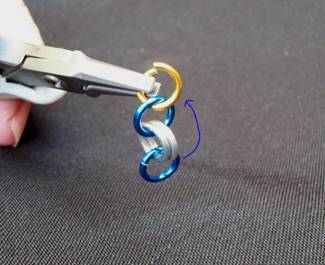

- Another way to think about this step is considering rings like beads with very large holes. In the picture above, the gold ring is strung on the blue ring from the back to the front. The other blue ring needs to be strung on that gold ring back to front as well (not front to back!). Once it looks like the picture below, close that gold ring.


- Okay, this is the (slightly) trickier part. Not only are you going to add a connector to the other side of your barrel, you're going to add a SECOND barrel. We'll go ring by ring and even explain it twice. (If you're making that shorter earring, you're just going to add this second connector and stop.)
Open a gold connector ring and hook it on to the two blue rings just like you did in the last step, but on the opposite side of the silver ring barrel. This should be a lot easier than last time because the blue rings are already in the right orientation. Just make sure you go through both blue rings and DO NOT go through the silver rings. (If you're making shorter earrings, close the connector ring, and skip to the bottom for some finishing tips.)


- Before you close your gold ring, add the first blue ring of a second barrel on the gold ring.


- Slide the second blue ring up and on to the gold ring. Not like a flipped book page, but like a playing card sliding across a table. If you totally understand this step, great! Close the gold ring.
If you're still a little confused (this is a confusing step!), here is another view to help wrap your mind around it.


- You have the second gold connector ring connected to the two blue rings from the first barrel. The picture above shows one blue ring from the second barrel on the gold ring. The yellow arrow shows where the second ring slides around to connect to that gold ring. If you're working directly on the table as shown in this picture instead of in the air with pliers, you literally can slide the ring around on the table and lift it on to the gold ring. Do not flip the blue ring over; you won't make a nice barrel.

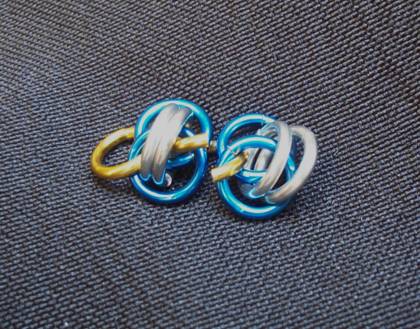

- If your weave looks like the picture above, close that gold ring!
- We're in the home stretch now. Connect your third barrel in the exact same way you just connected the second one. It's going to be easy to get the gold ring through the opposite side of the second barrel because the blue rings are already in the right position, then add the third barrel one blue ring at a time.


- Add your last connector ring to the bottom of the weave exactly like you did the very first connector ring. Put it through the two blue rings that are already in the right position, and you're done! See finishing tips below for tips on reversing your second earring, and making a matching bracet.


Finishing Tips and Variations
I'm stickler and like to reverse my earrings. When you're making your second earring, pay attention to the directionality of your barrels. I've enlarged the small earring photo so you can see what I mean.
Experiment with different sizes and colors of beads; make pendants using the same method.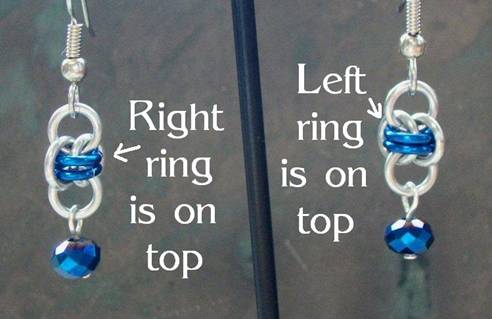
The deciding step for reversing your barrel is step 6. You'll notice that my little blue arrow goes to the right to indicate swinging the bottom ring counter clockwise.

If you instead swing the bottom ring to the left (counter clockwise) you'll have the other barrel direction. Make sure that all connected barrels all go the same direction (alternating reversed barrels turns the whole pattern 90 degrees!)
You can also use this technique to make a whole bracelet! If you use 16-gauge 1/4" rings, you'll need about 14 barrels to make a 7 inch bracelet. (but, like anything, all wrist sizes vary!) If you use 30-40 barrels, you'll get a nice necklace.
Happy weaving!
 Free Wire Jewelry Patterns
Did you find this pattern through a link from a friend? This Free Wire Jewelry Pattern is just one of dozens of free wire jewelry patterns we send via email. Get patterns like this one straight to your inbox - click here!


