


Dragonskin Earrings

Click the image to view additional earrings!
Designed by Marty Blu © 2012
Skill Level: Intermediate
Technique: Wire weaving
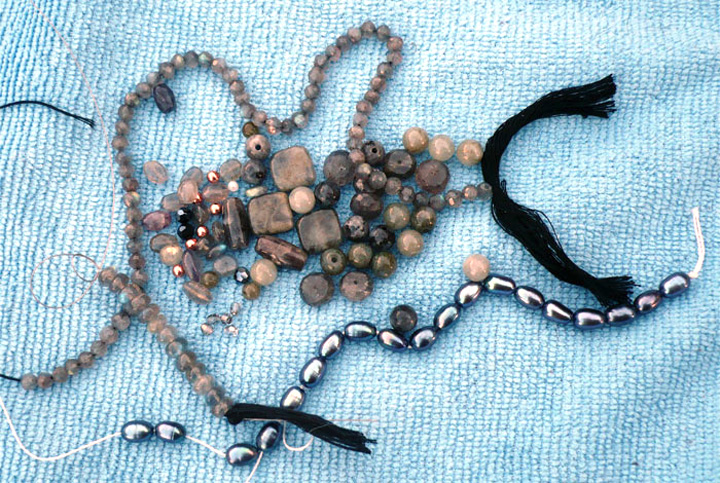
Creating my Dragonskin earring design is a bit more challenging than the pendant you have probably seen before from our Free Email Patterns, because you will be using smaller beads and you probably want them to match (sort of)! To help, choose a mixed assortment of monochromatic colored (light to dark) beads; labradorite, pearls, smaller Swarovski crystals and 3mm round metal (same as your wire, copper preferred). Having at least two of each bead choice will help you make a mirror image, for the matching second earring.
Labradorite makes up the majority, and is the star, of this piece. Choose for the best labradorescence and fire as you are working. Some of the beads may shift on the wire, losing the best view of its labradorescence, so be aware and place and reposition each bead as necessary. When you later add the “veining" wire on top of your bead mosaic, this will also help tighten some of your beads in place, to prevent shifting. The more labradorescence on the final piece, the better! The pearls, crystal, and metal beads are to be used sparingly as a subtle accent, to give a little more interest and fire to each earring.
 Download this Page for Easy Printing (2.83MB)
Materials
- 18- or 20-gauge round half hard wire, two 6 1/2" pieces
- 24-gauge round dead soft wire, two 18" pieces
- 22-gauge round dead soft wire, two 5" pieces
- Variety of small beads of your choice
- 2 ear wires
Tools
- Flat nose pliers
- Chain nose pliers
- Round nose pliers
- Wire cutters
- Ruler
- Tape
- Fine point marker
Instructions
- Choose your bead palette.

- Straighten, measure and cut two 6 1/2" lengths of 20-gauge or 18-gauge half hard wire. Bundle them together and tape as many times as necessary to hold the two wires together. From one end, measure and mark this frame bundle at intervals of 2", 1/4 " 1 1/8", 1/2", 1 1/8", and 1/4". (To make earrings slightly lighter and shorter, change the 1 1/8" measurements to 1" or 7/8".

- Working with the two taped wires as thought it was one wire, use flat nose pliers to bend a right angle at each mark, eventually making a rectangular frame; with the end wires pointing out from center top of each rectangle. One end will be shorter than the other. Remove the tape. Now you have two earring frames.

- On each frame, wrap the shorter wire around the longer wire two times and trim, leaving the long wire straight.
Add a bead to longer wire and finish off end in a rosary link style; used later to attach an ear wire.
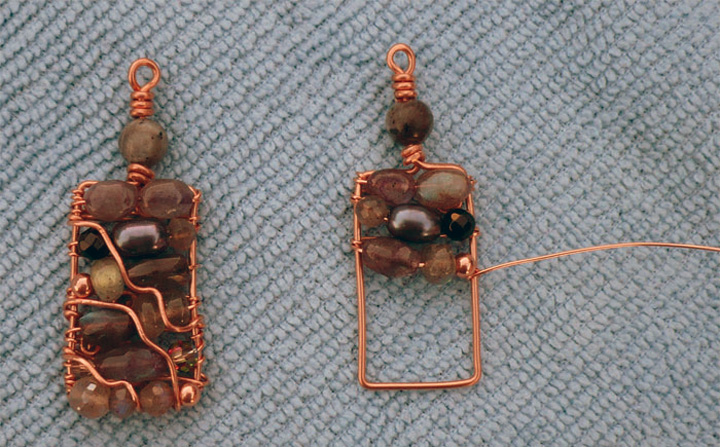
Attach the 24-gauge wire to the frame by wrapping twice around top of frame side. Leave 3/4" tail to coil and tuck into frame area. The beading will go in one direction across the front of the frame. Choose beads in a randomly planned order.


- At the end of each row, wrap the 24-gauge wire once around the frame wire to secure. Now bring the 24-gauge wire across the back side and wrap it once around the frame and begin a new row of beads. Repeat the procedure until the earring frame is a mosaic full of beaded rows. Bead the other earring in mirror image. Trim remaining 24-gauge wire at 3/4" to coil and tuck into frame.

- “Veining": Attach the 22-gauge wire with one wrap to the bottom frame wire; coil and tuck the tail into frame. Using your fingers and careful gentle tweaking with the tips of round nose pliers, guide a path up through the rows of beads, creating a veining effect, to the top frame wire. Wrap once to secure.
Now guide this wire through the frame behind the rows of bead wires. If that proves too tricky, then guide it along the rows of the back wires and poke the 22-gauge wire up through the mosaic to meet with the path of the veining already done. Pull the vein wire snug and then lay this wire over the first veining wire and begin a new path of veining, to create a branch. Finish off at desired (tuck coil) edge or add another vain. Now repeat the process, making as close to a mirror image of the veining on the first earring, on the second. Add your favorite ear wires.
 Free Wire Jewelry Patterns
Did you find this pattern through a link from a friend? This Free Wire Jewelry Pattern is just one of dozens of free wire jewelry patterns we send via email. Get patterns like this one straight to your inbox - click here!
![]()
The premier place for all your jewelry making needs. The best in wire, tools, cabochons, gemstone beads and more. As well as a superior resource for educational support to help build your jewelry making skills and techniques.
Connect With Us

® 2007 - 2026 Wirejewelry.com Powered by ClaimTheWeb Cart