


Twisted Chainmaille Bracelet and Earrings

Designed by Lena Bugrimenko © 2011
Skill Level: Beginner/All
Technique:Chainmaille
Making jewelry from jump rings is almost instant gratification! Especially if you use a basic weave with fancy or twisted jump rings for a little added sparkle. In my design, I used gold-plated jump rings; however, you can use any metal you enjoy working with. Change out the color of the donut bead and crystals for different looks and have fun playing with this basic 3-in-3 weave.
Materials
- 26 16-gauge 8mm ID fancy round jump rings
- 52 18-gauge 7mm ID round jump rings
- 22 16-gauge 6mm ID fancy round jump rings
- 5 20mm donut beads
- 10 4mm bicone Swarovski® crystal beads
- 5 2" eyepins
- 1 clasp of your choice
- 2 ear wires
Tools
- Flat nose pliers
- Chain nose pliers
- Round nose pliers
- Wire cutters
- Jump Ring Opener
- Ruler
- A twist-tie (from a bag of bread, for example), or a piece of thin scrap wire or string
Instructions
- To make the bracelet, open two 8mm fancy round and four 7mm round jump rings. Add three 8mm closed fancy jump rings and six 7mm closed round jump rings; lay them out as shown.


- Use these rings to create a 3-in-3 chain, 5 segments long. This means that 3 rings are connected to three more, and three more and so on.
- Using the photo layout below, from left to right, begin by placing a twist-tie through the first row of closed jump rings, to hold them together while you work.
- Now insert the bottom 7mm open jump ring through all 3 of the closed rings in row one as well as the bottom 7mm closed ring in the third row. Close the open 7mm jump ring firmly.
- Repeat the above procedure using the middle open fancy jump ring in the second row, adding the 3 closed rings from row 1 and the closed fancy jump ring in row 3. Firmly close the 8mm fancy jump ring.
- Next, use the last 7mm open jump ring in the second row to repeat the procedure, sliding it through the first 3 closed rings and adding the closed 7mm ring from the third row before closing it firmly.
- For a 7 ½" bracelet, make four more segments of the 3-in-3 x 5 weave and set them aside.
Tip: for smaller bracelets, reduce the number of 3-in-3 chain links from 5 to 3.
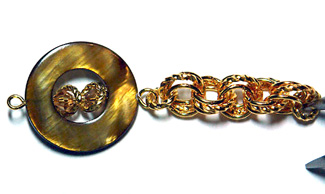
- Take one 2" eyepin and slide it through ONE hole of the shell donut, followed by one 4mm Swarovski crystal, two 6mm closed twisted rings, and another 4mm Swarovski crystal. Then slide the eyepin through the other hole of the donut bead. Use the remaining eyepin wire to make a simple loop. Follow the same procedure to make two more donut bead connectors.

- Put the bracelet together: Using a 6mm open twisted jump ring, insert it through all 3 jump rings on one side of a chain segment and one eye of a donut connector bead. Close the 6mm fancy jump ring firmly.
- Continue using 6mm fancy jump rings to connect chain segments and donut bead connectors until the bracelet length is finished. Add either a lobster claw clasp with a jump ring closure, a toggle, or your favorite clasp.
Tip: Add onto the chain segments on each side, by using either a 3-in-3 or a 2-in-2 weave, until the chain is long enough to be a necklace!
- Bonus: To make matching earrings, make two 3-in-3 chain lengths each 3 segments long. Instead of using an eyepin for the donut connector, use a headpin. Hang the headpin charm from one end of the chain segment, using a 6mm fancy jump ring. Connect each earring to an ear wire with another 6mm fancy jump ring.


 Free Wire Jewelry Patterns
Did you find this pattern through a link from a friend? This Free Wire Jewelry Pattern is just one of dozens of free wire jewelry patterns we send via email. Get patterns like this one straight to your inbox - click here!
![]()
The premier place for all your jewelry making needs. The best in wire, tools, cabochons, gemstone beads and more. As well as a superior resource for educational support to help build your jewelry making skills and techniques.
Connect With Us

® 2007 - 2026 Wirejewelry.com Powered by ClaimTheWeb Cart