


Heart Link Bracelet and Earrings

Designed by Judy Larson © 2013
Skill Level: Intermediate
Technique: Hammering and forming wire, jump rings
Judy taught this project to her students, and she says, "Everyone made the earrings and went home to make the bracelet. They liked the bracelet because of the lacy look and the earrings because they look "Bali" inspired." This simple link is very versatile and can be used in a number of ways for different looks. Enjoy making your Heart Link Bracelet & Earrings!
Materials
Bracelet:
- 20-gauge dead soft round wire
- 18-gauge dead half hard round wire
- Clasp (used large closed jump ring and a lobster claw)
- 20-gauge half hard round wire (Hint: twist dead soft wire to make it half hard)
- Six 4mm round beads
- Six head pins
- Pair of ear wires
Tools
- Flat nose pliers
- Chain nose pliers
- 6-Step Barrel Pliers
- Flush cutter
- Chasing Hammer
- Bench block
- Ultra fine point Sharpie marker
- Ruler
Instructions
Note: It is important to read through the directions before starting. The first portion of this tutorial is for the link only.
- Cut several 2" pieces of 20 gauge dead soft round wire. Mark the
center of each.


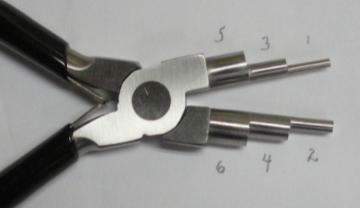
- Note: For the purposes of this tutorial, the 6 plier steps have been
labeled in ascending order. These numbered steps will be referred to and
where possible, mandrel sizes will be given as well.
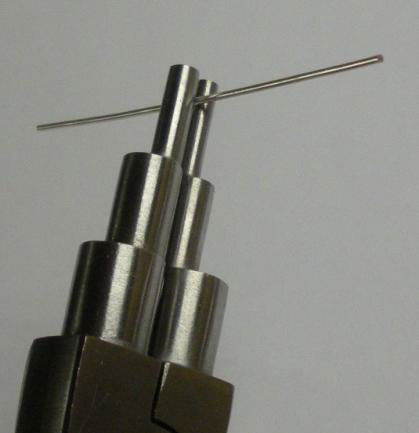
Center the wire mark between the jaws of the 6 step pliers and bend it over step 1 (or 3/32" mandrel), matching the top cut ends. Then cross the wires to a 45 degree angle.
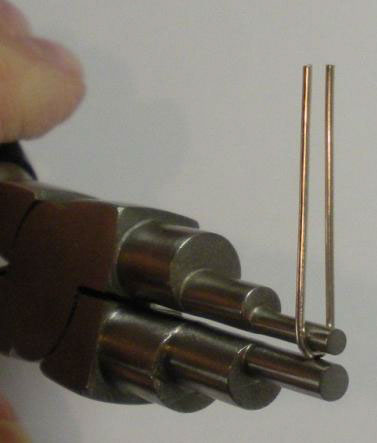
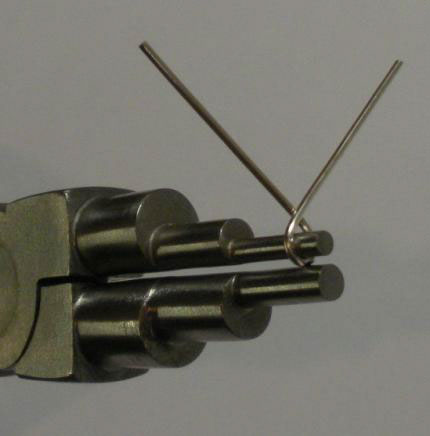
- Use step 2 (or 1/8" mandrel) to make a full loop toward the center on each wire end.


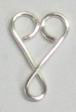
- Hammer the upper outer curves until they have a flattened appearance. Use the ball end of the hammer to flatten the lower portion of the lower loop. After flattening those sections, adjust the heart so the top curls are touching. Then, lightly tap the front side once and back side once.

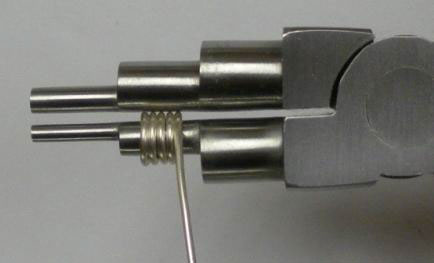
- For jump rings, use step 3 (or 3/16" mandrel) with 18 gauge round half hard wire for the bracelet or 20 gauge round half hard wire for the earrings. For each pair of earrings, you need four jump rings. The number of jump rings you need for the bracelet depends upon how long you need to make it.
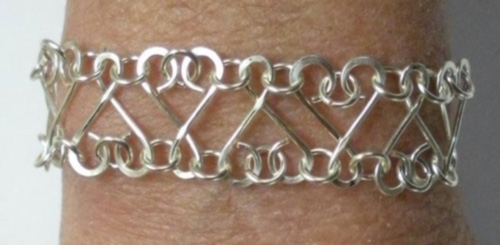
Making the Bracelet
- You may wish to make a simple chain with your heart links and that way you do not need to make very many of them. Just set them end to end, and connect with jump rings.

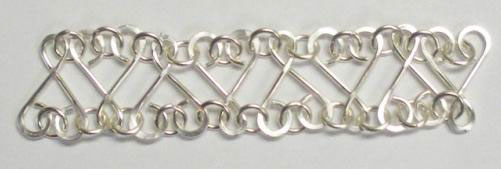
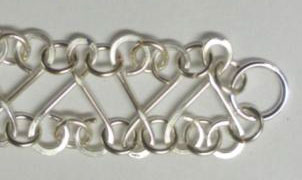
However, for a more metal intensive look (below), lay them side by side. After linking the pieces together in this meaner, you will find that eight links make a 3" section and sixteen links make a 6" section. The closure shown here adds another 3/4".
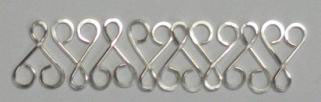
- Using the 18 gauge jump rings you made, connect the top loops of each heart together. Then link the bottom loop of one heart to the top loop of another. Repeat for the other side.

- Continue connecting the links until you reach the length needed for your bracelet. Note: It is important that the heart on one end of the chain is right side up and on the other end it is upside down. The closure may not lay properly if you do not do this.
- For this tutorial, a lobster claw and large closed ring were used. However, you can use any closure you wish if you connect it to the chain in the same manner as shown.
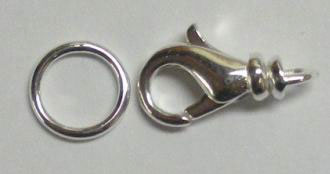
Attach a jump ring in the upper and lower loop. Slide another jump ring through both jump rings on the heart and the loop on the closure.

Attach a jump ring to the upper heart loop and the large closed jump ring. Attach a jump ring to the lower heart loop and the large closed jump ring.
Making the Earrings
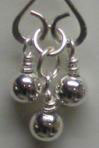
- Attach the lower loop of the heart to the loop on the earring finding.
- Make six bead drops with the headpins and 4mm beads. Note: Make sure that the wire wrapped loop is just large enough to slide over the hammered wire.
- Carefully bend the heart loops forward and slide a wire wrapped loop bead on each side. Bend the loops back into place.
- Using the 20 gauge jump rings you made, connect the top loops of each heart together.
- Slide a wire wrapped loop bead onto another jump ring and then attach that jump ring to the front of the jump ring connecting the heart loops.
 Free Wire Jewelry Patterns
Did you find this pattern through a link from a friend? This Free Wire Jewelry Pattern is just one of dozens of free wire jewelry patterns we send via email. Get patterns like this one straight to your inbox - click here!
![]()
The premier place for all your jewelry making needs. The best in wire, tools, cabochons, gemstone beads and more. As well as a superior resource for educational support to help build your jewelry making skills and techniques.
Connect With Us

® 2007 - 2026 Wirejewelry.com Powered by ClaimTheWeb Cart