


Transformer Ring

Designed by Brenda Sigafoos © 2012
Skill Level: Intermediate
Technique: Wire wrapping a ring, coiling wire, capturing a cabochon with a drawstring-like technique
I am really close to my 14-year old son. I asked him what he thought I should name my ring, and he said, Transformer. I thought, that is perfect, because all and all, I am transforming my life. I am making my dreams come true. I am transforming myself into what I always wanted to be and that is an artist. So I hope you enjoy making this very cool science-fiction kinda new Steampunk ring.
Materials
- 20-gauge round wire, 27 inches 5 pieces 5 1/2 inches long (example used black wire)
- 18-gauge half round wire, 6" (example used black wire)
- 20-gauge half hard round wire, 5" (used as a dowel for making coils)
- 22-gauge or 24-gauge dead soft wire for coiling (finished examples used 3 or 4 different colors, 5 inches; will be making 10 small coils)
- 28-gauge dead soft round wire, approx. 2-1/2 feet (example used sterling silver wire)
- 12 size 14/0 delica or seed beads
- 10 size 12/0 sterling silver tube beads (or delicas); can use more if desired
- One 14mm round cabochon
Tools
- Flat nose pliers
- Round nose pliers
- Chain nose pliers
- Wire cutters
- Ring Mandrel
- Rawhide Mallet
- Automatic wire twister or Pin vise
- Tape
- Ruler
Instructions
-
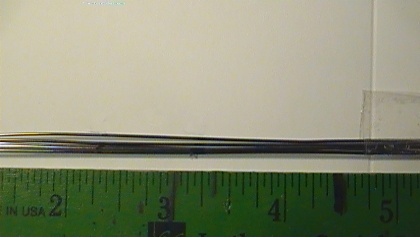
Make sure your five 20-gauge wires are straight. Tip: If they are not straight, simply twist each piece in the automatic wire twister to straighten them. Then make a bundle with the five wires and tape at both ends.


- Line the bundle up next to the ruler. Mark the bundle at 2-1/4", and 3-1/4". Wrap with 18-gauge half round wire starting at the 2-1/4" mark and wrap until the 3-1/4" mark, making sure that the wraps are tight.

- Wrap your bundle around the ring mandrel at the size desired. Bend each bundle end out at a 90° angle with flat nose pliers where the bundle starts to overlap.


- Take the tape off and re-tape so that the straight wires form a trunk, or a round bundle of round wires. Slightly fan out the outer wires of the ring shank, if desired.

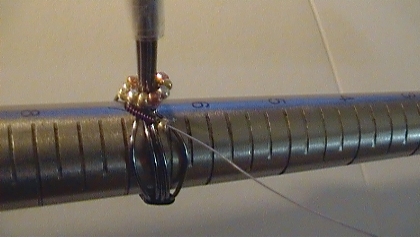
Take the 28-gauge wire and wrap it tightly around the bundle, leaving about a 2" tail. Tie a granny knot with the 2" tail and the long wire.

Wrap the wire around the base of the ring 5 or 6 times and tie another knot. Wrap again to hide the knot and tail, trim the tail off.
Slide the 14/0 seed beads on the 28-gauge wire and wrap around the round wire bundle, using just enough beads to go around the round bundle. When you reach the first bead on the wire, slide the wire through the beads again. Repeat until the wire has filled the bead holes; trim after going through the last bead.


Note: if you like, you can fan out the sides of the ring, as shown, with pliers or a flat tool like a butter knife; be sure to keep the bundle wires in formation!
Note: For a more "gears and springs" effect, you can coil some wire and wrap it around the bundle, too:

- Making coils: Coil the 22- or 24-gauge wire around the 20-gauge half hard round core wire to make 5" of coils. When done, slide the coiled wire off the core wire, and cut ten individual 1/2" coils.

If your wire starts to space out, wrap tightly, and use pliers or fingers to press the coil together.
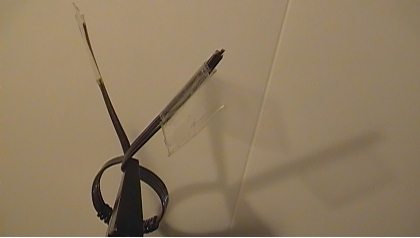
- Now we are going to finish the ring. Take all the tape off now and fan the wires out. Place your cabochon in the center of the bundle and bring your wires up and around, as shown.
Hint: You can place a piece of tape under the cabochon to keep it in place.
Once the wires are shaped around the cabochon base, remove the cabochon. Place your coils on each wire and slide them down.


- Once the coils are on the wires, flush cut each wire end to 1/4" above the top of the coil. Make a loop at each end, inward toward the cabochon, with the tip of your round nose pliers, making sure each loop is closed.
Form the wires around the dome of the cabochon.

- Take the remaining 28-gauge wire and slide it through one of the loops, leaving a 2" tail. Tie a knot around one of the cab-framing wires to anchor the wire, hiding this down by a coil. Slide a 12/0 tube bead on the wire, then slide the wire through the next loop. Repeat all the way around, cinching the wires snug around the cabochon dome.

To finish, slide the wire through two beads again. Then loop the wire end around the beaded wire, pull the wire end through to knot. Trim with flush cutters and crimp with chain nose pliers. And there you go, a Transformer Ring.

Experiment with different wire colors and beads!

 Free Wire Jewelry Patterns
Did you find this pattern through a link from a friend? This Free Wire Jewelry Pattern is just one of dozens of free wire jewelry patterns we send via email. Get patterns like this one straight to your inbox - click here!
![]()
The premier place for all your jewelry making needs. The best in wire, tools, cabochons, gemstone beads and more. As well as a superior resource for educational support to help build your jewelry making skills and techniques.
Connect With Us

® 2007 - 2026 Wirejewelry.com Powered by ClaimTheWeb Cart