


Lighting the Way Angel Pin

Designed by Anita Russell © 2012
Skill Level: Advanced Beginner
Technique: Wrapping a wire bundle, gluing components
Making this angel should be a labor of love. Pick out a vintage earring in a color you love or button with rhinestones then pick out a chandelier drop of the same color. Find a butterfly that allows your stones to shine. Adding a bow gives it a professional finish. You can use silver, gold, or copper wire to make your treasure. As I tell my classes, sometimes the thrill of the hunt for the items makes it even more special.
Materials
- 20-gauge round half hard wire, four 10" pieces
- 21-gauge half round half hard wire, 8"
Note: you can substitute 20-gauge round wire if using craft wire that isn't available in half round. - 30x50mm chandelier dangle or drilled bead
- 15x20mm approx. component or stone for the face and halo combination
Note: this can be oblong or round with rhinestones surrounding it. Try a favorite fancy button with the shank cut off. - 45x40mm butterfly wings. Think out of the box. Try an appliqué, magnet, or any of the beautiful wings that reside in the thrift store or craft store.
- Bow, approximately 20x40mm
- Tie tac finding
Tools
Instructions
-
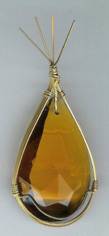
Lay out your wire and form to the shape of the chandelier. Use the half round wire for stability as you form the wire. Measure from the center of the wire 1 ¼" to the left and right. Make 3 wraps each. Then measure up the sides from that wrap 2" and make 3 wraps on the left and right. Then take all 8 wires and wrap them together using 3 more wraps. It should look like the picture.


-
Now insert the chandelier making sure the cage is secure. Take the end of the top wrap wire and insert it through the hole at the top of the chandelier. Bring the end up and just under the other wraps at the top. Secure the end with another wrap. Don't worry, they won't show. This will ensure the chandelier will not pop out of the cage.

-
In this step you will do two things. Take the 7 wires left at the top and cut 3 away close to the top wrap. The 4 remaining wires will be used to mount the earring or button. Then take the flat nose pliers and make a bend in the front wire at the bottom on both sides. (Sort of a horseshoe design.) Perform this on the front and back wire. This adds the final touch to the cage and will help hold the chandelier secure.
-
Glue the earring or button to the four wires at the top of the chandelier with E6000 glue. Place it as close to the top wrap wires as possible. Let rest to dry according to glue directions.

-
Now glue the head and body to the wings as shown below. Allow glue to dry.

-
You are almost there. Glue the bow you have chosen just under the face of the angel.
-
For the final step, take the tie tac and glue it just behind the head. It should be centered for balance and will wear beautifully. Wear and enjoy!

Our thanks again to Anita Russell for this pattern! Anita's angels are her signature design, which she created while caring for her father. Her handmade angels are so popular that she even teaches classes on making them at her local community college in Oregon, and also has published a book about her angels. You can explore Anita's collection of angels and read her story here: The Angel Lady
 Free Wire Jewelry Patterns
Did you find this pattern through a link from a friend? This Free Wire Jewelry Pattern is just one of dozens of free wire jewelry patterns we send via email. Get patterns like this one straight to your inbox - click here!
![]()
The premier place for all your jewelry making needs. The best in wire, tools, cabochons, gemstone beads and more. As well as a superior resource for educational support to help build your jewelry making skills and techniques.
Connect With Us

® 2007 - 2026 Wirejewelry.com Powered by ClaimTheWeb Cart