


Big Bad Pearl Necklace

Designed by Marilyn Gardiner © 2016
Skill Level: Beginner
The basic chain for this 19″ necklace is a super easy - one ring linked to the next - all the way to the end of the necklace. The real fun starts with using headpins to add a wrapped loop to the pearls and adding them to the basic chain. It’s awesome - check out the slang meaning of “bad”.
Materials:
- 136 jump rings,16 gauge AWG, 3.25 mm ID (inner diameter) to make the chain
- 28 jump rings, 18 gauge AWG, 3 mm ID (inner diameter) to attach the wrapped pearls to the chain
- 1 jump ring, 16 gauge AWG, 4.5 mm ID (inner diameter) for the clasp
- 1 lobster clasp
- 25 of 10 mm glass pearls
- 28 headpins, 24 gauge, 1.5″ long (3 extras)
Notes:
- Choose the jump rings, lobster clasp and headpins in the same metal.
- Choose a color for the pearls that will blend with or contrast the metal color. I have used copper metal with bright gold Swarovski pearls, and silver metal with cream or platinum pearls.
Tools:
- 2 pairs of smooth jawed jewelers' pliers to make the chain (I prefer flat nose)
- 1 pair of round nose pliers and 1 pair chain nose pliers to wire wrap the pearls
- 1 pair of wire cutters to trim the wire
Make the Chain:
- We'll start with the 16 gauge 3.25 mm jump rings. You will need an equal number of open rings and closed rings - so open a bunch of rings and close an equal number of rings. See my previous tip on how to open and close jump rings.
- Pick up an open ring with your pliers, go through the ring at the end of the lobster clasp, and then add one of the closed rings. Close the ring. You will have 2 rings attached to the clasp.
- Pick up another open ring with your pliers, go through the end ring of your chain, and then add one of the closed rings. Close the ring. You will now have 4 rings attached to the clasp.

- Keep repeating until you have used up all the 3.25 mm rings.
- At the end, add the single 4.5 mm. The chain should be about 19 inches in length. You can shorten/lengthen it later it you find that would suit you better.

Wire Wrap the Pearls:
Directions:
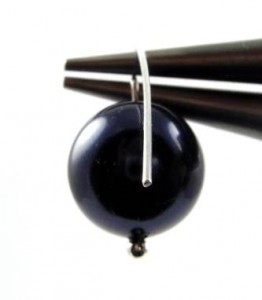
- Take your round nose pliers and make a mark with a permanent fine-tip marker at a spot for making a small loop that a jump ring will fit through. You could test the loop size with a piece of scrap wire. Take another look at the first photo.
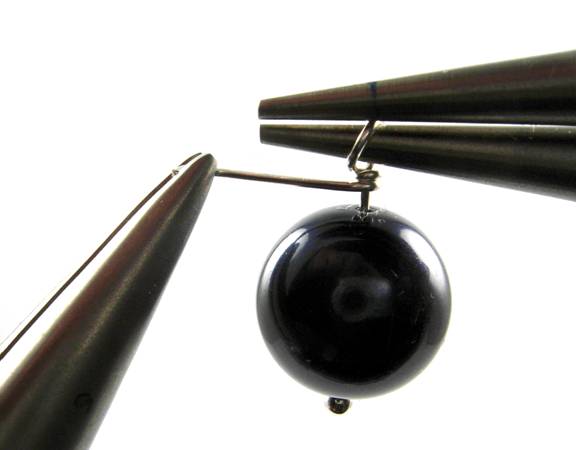
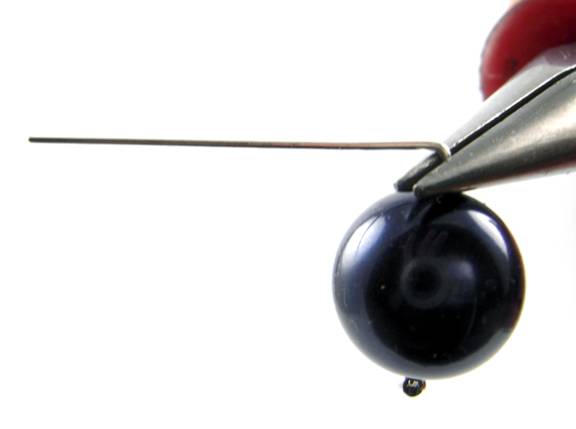
- Put a pearl on a headpin. With chain nose pliers grab the headpin at the top of the bead. Bend the wire across the top of the pliers to make a sharp bend.

- Replace the chain nose pliers with your round nose pliers. Hold the pliers at the mark and always keep them parallel to the work surface. The end of the wire points away from you.

- Grab the wire with your fingers, lift it up and around the top jaw, and then downwards until it's pointing to the floor.
- Pull the pliers out of the loop. Put the lower jaw of the pliers back into the loop at the mark.

- Grab the wire end with your fingers and swing it under the lower jaw and up until it points away from you (90 degree angle).

- Swing the wire under the pliers and around the stem to make the first wrap. Continue to wrap the wire around the stem. Make about 3 wraps. Use a pair of chain nose pliers to help make a nice tight wrap.
- Use wire cutters to cut off the excess wire. Use chain nose pliers to carefully press the tip of the wire in against the stem.

- Wire wrap all 25 pearls.


Attach the Pearls to the Chain:
- You bought 18 gauge 3 mm rings to attach the pearls to the basic chain. Open them now.
- Fold the chain in half to find the center ring. Pick up an open jump ring, go through that center ring, add a wrapped pearl, and close the jump ring.

- One-by-one, add one pearl to every second link. (Have another look at the first photo.)
- Add 12 pearls on one side of that center pearl. Repeat with 12 more pearls on the other side of the center pearl.
- Make Adjustments
- Try on your necklace. If you want it shorter, remove the two parts of the clasp, and then remove an equal number of jump rings from each end. Add the clasp parts back on.
- To make a longer necklace, remove the clasp parts, add an equal number of jump rings to each end, and then replace the clasp. Wear it and enjoy the compliments! Yes, you can wear this with jeans.


-
Congratulations! You've made your first Big Bad Pearl Necklace!
 Free Wire Jewelry Patterns
Did you find this pattern through a link from a friend? This Free Wire Jewelry Pattern is just one of dozens of free wire jewelry patterns we send via email. Get patterns like this one straight to your inbox - click here!
![]()
The premier place for all your jewelry making needs. The best in wire, tools, cabochons, gemstone beads and more. As well as a superior resource for educational support to help build your jewelry making skills and techniques.
Connect With Us

® 2007 - 2026 Wirejewelry.com Powered by ClaimTheWeb Cart