


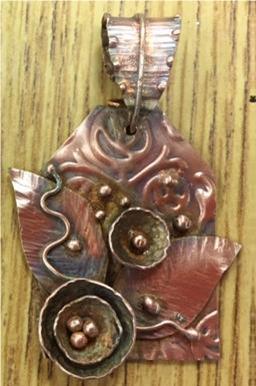
Tab Style Pendant

Designed by Judy Larson © 2016
Skill Level: Intermediate
Soldering and riveting experience necessary to make this pendant.
Materials:
- 24 gauge sheet metal - Use the tab shape, two leaves, one bail and one small circle templates Note: An extra small circle was cut from scrap to use in the finished design. Judy's templates can be found HERE.
- Up to 6″ of 20 gauge round dead soft wire
- Two 16 gauge rivets
- One purchased bail or make your own (shown)3/4" flat circular decorative element with center hole (shown) or cut and texture your own
Tools and Other Supplies:
- Tools for your preferred method of cutting out sheet metal shapes
- Mini TruStrike Sharp Designer Hammer
- Mini TruStrike Designer/Texture
- Mini TruStrike Embossing Hammer Riveting hammer
- Sizzix Big Shot Embossing Machine
- Vintaj Deco Etch daisy Swirl
- Rubber or plastic mallet
- Bench block 1.5mm hole punch
- Round, flat and chain nose pliers
- Flush cutter
- Dapping punch set and hammer
- Ultra fine point permanent marker
- Tools and solder for your preferred method of soldering 340 grit sandpaper
- File
- Pickle pot and pickle
- Butane torch and fire brick
- Liver of sulfur and 0000 steel wool
Directions:
Step 1: Copy the tab shape, two leaves, one bail and one small circle templates.
Step 2: Transfer the designs to your sheet metal.
Step 3: Cut the pieces out using your preferred method for cutting sheet metal.
Step 4: File any sharp edges.
Step 5: Use a 1.5mm hole punch to make holes in the center top of the tab pendant back plate and the center of each circle.
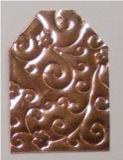
Note: Step 6 and 7 are optional. If you do not own or have access to a Sizzix Big Shot Embossing Machine, texture the tab pendant back plate in any many you wish.
Step 6: Anneal the tab pendant back plate and pickle to remove fire scale.
Step 7: Place the tab pendant back plate on the DecoEtch plate. Run it through the Sizzix Big Shot Embossing Machine to achieve the background texture.
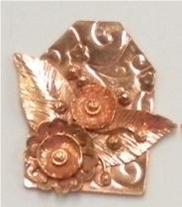
Step 8: Using an ultra fine point permanent marker, draw a curved line on each leaf.

Step 9: Place each leaf shape on a bench block. Use the narrower side of the Mini TruStrike Sharp Designer Hammer to texture each leaf out from the drawn line. For a more realistic appearance, angle the texture lines toward the tip of each leaf.

Step 10: The metal piece will no longer be flat after texturing. Place each piece on a bench block and use a rubber or plastic mallet to flatten it
. 
Step 11: Remove marker lines with an alcohol soaked pad.
Step 12: Round the pointed tips of each leaf with a file.
Step 13: Use the Mini TruStrike Designer/Texture Hammer to texture the edges of each circle. Try to make slightly wavy edges when you are texturing. Use the Mini TruStrike Embossing Hammer to texture the smaller circles.


Step 14: Use the Dapping Punch Set to cup the textured circles and the 5/8" decorative circle element. To preserve the texture when cupping each piece, consider placing a piece of felt between the dap and the circle shape.


Step 15: Decide on a pleasing arrangement of the leaves. Solder in place. Step 16: Pickle the piece to remove fire scale.

Step 17: Place the large domed piece on the pendant back plate. Use an ultra fine point permanent marker to mark where the rivet hole needs to be punched. Use a 1.5mm metal hole punch to make the hole. Rivet the stacked cupped flower pieces to the back plate.


Note: As with all designs you make, you make changes on the fly. Here it was decided that another cup flower needed to be added. It was cut from a piece of scrap, textured, cupped and riveted in place. When that was still not enough, balls and bud stems were added for more interest.
Step 18: Cut two 1/4" pieces of 20 gauge wire. Ball the ends using the butane torch.
Step 19: Cut 1/8" pieces of 20 gauge wire. Lay them side by side on a fire brick. Use your butane torch to melt them into balls. If you want to use all large metal balls as decoration, use three 1/8" pieces. If you would like slightly smaller metal balls, use two 1/8" pieces.


Step 19: Let the balls cool. Hold each with the tips of your chain nose pliers and run the back of the ball over the sandpaper to remove the fire scale and any bits of fire brick that may be sticking to them.

Step 20: Trim the two balled wire pieces made in Step 16 so they will fit in place under the cupped flowers. Place the balls and bud stems on the pendant in the desired position. Solder these elements in place using your preferred method. Notice that balls were even soldered to the top of the flower rivets.
Step 21: Use round nose pliers to curve the leaves and the bud stems to add dimension to them.
Step 22: Pickle the pendant to remove fire scale.
Step 23: Tumble the pendant in steel shot to shine it up or use 0000 steel wool to polish it.
Step 24: Attach the bail to the pendant.
Step 25: You can leave your pieces bright and shiny or use liver of sulfur to patina them. Buff with 0000 steel wool to bring out the dimension of your texturing.
Left to right - tab pendants, featuring three different backgrounds by Deb Carlson, Monica Buegler, Carol Erickson


-
Congratulations! You've made your first Tab Style Pendant!
 Free Wire Jewelry Patterns
Did you find this pattern through a link from a friend? This Free Wire Jewelry Pattern is just one of dozens of free wire jewelry patterns we send via email. Get patterns like this one straight to your inbox - click here!
![]()
The premier place for all your jewelry making needs. The best in wire, tools, cabochons, gemstone beads and more. As well as a superior resource for educational support to help build your jewelry making skills and techniques.
Connect With Us

® 2007 - 2026 Wirejewelry.com Powered by ClaimTheWeb Cart