Take Photos of your Wire Jewelry using a Lightbox - Part 2
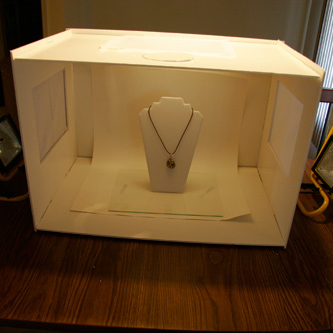
In Part 1 we demonstrated how you, as a wire jewelry maker can make a Lightbox for photographing your pieces for displaying on the Internet. Part 2 is about how to use it.
Once you are ready to begin, see if your camera allows adjustment of white balance. White balance will either be done as preset types of light (incandescent, tungsten, sunlight, cloudy, florescent, etc) or as temperature. Using the 500 watt halogen work lights you will want to use the incandescent/2800-3500K setting. If you use a manual capable camera, play with the exposure settings. I like to use a f/11 setting to give a good depth of field and an exposure setting that yields close to the proper white. You may find you need to really over-expose the image to get whites truly white and this will blow out the highlights on silver or gold. Set to get as close as possible without blowing out the high lights. Do not despair!

There are many editing programs available that allow you to adjust levels, I use Photoshop version 5.5 (PS). In PS you can remove dust, clone out unwanted lines and shadows, sharpen and adjust levels. In a point and shoot type camera, as long as you keep the lens clean you shouldn't have dust issues, since I use a DSLR I have to periodically clean the sensor or use PS to remove the dust that invariably shows up after a few lens change outs. My usual workflow in PS goes something like this:
1. Rotate (I like portrait, unfortunately the default in most cameras is landscape)
2. Crop (if needed)
3. Resize to standard size (if needed)
4. Adjust Levels
5. Clone out dust and unwanted lines/shadows
6. Show grid (if needed)
7. Free Transform(CTL-t) -rotate (to get it aligned up and down) (if needed)
8. Hide grid (if needed)
9. Clone out transform artifacts (if needed)
10. Adjust brightness/contrast
11. Adjust sharpness with Unsharp Mask(I use Amount 100%, radius 5.0 pixels, threshold of 9, adjust amount up and down to get the level of sharpness you desire)
12. Save under different name (do not over-write the original!)
13. Save for web appending size to name, in save for web you can adjust the size of file at a specific pixel dimension set (1024×682 for example) by adjusting the Quality setting.
The best way I have found to get your background white (if that is the color it is!) is to bring up the manual level adjustment and follow these steps:
1. Under the level graph will be three sliders, one on the left, one on the right and one in the middle, after selecting what part of the image should be the whitest white, using a shift-click, grab the one on the left and slide it all the way to the right, the image should go nearly all black.
2. Select the dropper on the right, it should be white.
3. Using the dropper place it where your whitest white occurs and click, your image should come back with whites where they are supposed to be.
4. (Some times the next steps are optional, you can stop at 3 if the picture looks good!) Decide where the blackest black should be. Now slide the right hand slider all the way to the left.
5. Select the left hand dropper (it should be black inside) and then place it where the blackest black should be and click. This should set the blacks to black.1.
If step five messes up your picture use a CTL-z to get back to the previous step and try again.
Practice with camera settings and in Photoshop (or your editor) until you feel comfortable. I found using a tripod really helps keep the picture in focus and helps with camera shake. Three wooden TV trays work great to hold the light box and the two work lights.
Once you are done, simply disassemble the light box and stow it in the back of a closet until you need it again.
Materials
No materials listed
Tools

Displays
- Category: General Education
- Technique(s): Design, Tools, Selling, General Education





 Building and Using a Lightbox - Part 1
 How to Edit a Jewelry Picture Using Photoshop
