How to Create a Print-out from a Video Tutorial
There are thousands of 'DIY' tutorials, on every subject, on YouTube, and in websites or blogs on the Internet. You can search for video tutorials like this: Google for 'wire wrapping tutorials'.
Continuing A Series on 'Sharing' Our Knowledge
Through the generosity of jewelry-makers around the world, we are able to 'learn from each other' - as at no other time in history. While the Internet has made this remarkable and seemingly 'bottomless well' of information possible, please remember to thank the author/contributor of video and written tutorials. An extraordinary amount of time is spent on photographing or videoing, discussing and writing this information - often hours and hours of composition. Be generous in your praise, for these people are 'sharing' from their heart, and, please patronize their art if possible.
NOTE: Please refer to my previous article, "HOW TO COPY, SAVE AND COMPACT TUTORIALS", for detailed instructions on how to create a document, how to copy and move graphics, how to re-size graphics/photos, etc.
These same instructions apply to saving a video as a printable article. I suggest you copy, paste & save that article in a document, then print it out, so you will have it on hand for easy reference.
You've searched for "wire wrapping tutorials" on Google.
Note that search has returned 14,000,000 tutorials of all kinds! You want only videos - so click on the 'videos' link, underlined in red above, and you will receive a list of videos only. There is another, more direct way to find tutorials. Google will automatically suggest other search phrases. Note that you could have directly searched for 'wire wrapping tutorials YouTube'.
'Pinterest' also has 'pins' of tutorials, as well as many other things related to jewelry making and other topics. You can sign up with Pinterest, and receive updates on information of interest.
'Pinterest' also has 'pins' of tutorials, as well as many other things related to jewelry making and other topics. You can sign up with Pinterest, and receive updates on information of interest.
For this tutorial, I've chosen to use Yvonne Williams "Fractal Wire Wrap Tutorial", which you can find on her YouTube channel. (Click on her name, under the video, and it will take you to her channel.)
Though most of you are already familiar with how to watch videos online, here are the two important controls, used for creating a 'print out' of a video, that you will use the most (shown by the red lines): The first is the 'time line', now showing a small red dot. The grey portion of the line shows the amount of video that has been 'streamed' or 'pre-loaded', so you can watch without stops and starts in the streaming process. As the video progresses, you'll note the red line moves further to the right - and it coincides with the minutes and seconds underneath the line.
We're starting this video at 11:52 - 11 min 52 sec. You begin the video by clicking on the 'right arrow'. When the video is running, this symbol turns to a double bar. You can click on the time line and move it forward, to the right, or back, to the left, to position the exact moment that you want to capture. You can also write down the minutes/seconds of important instructions, so you can quickly move the line to that time, instead of seeing many minutes of video you don't want to re-watch.
Let's begin! Create a new document in your word processing program. Name it "Fractal Wire Wrap, Yvonne Williams". This will allow you to search for it later by the subject, and the artist's name. Set up your document using the 'Page Layout' selection, choosing 'narrow margins' and 'two columns'. (Specific details are in my previous article - please print it out and refer to it as we work.)
I also choose the 'ruler' option, so I can see how much paper length is left, as I add photos and text. This allows me to adjust the size of the photos/graphics, if needed, to keep the article as compact as possible.
Add the title to the document: "FRACTAL WIRE WRAP, BY YVONNE WILLIAMS", and save it. Now we're ready to start 'copying' the video.
During this process, we'll be working with two windows - the one with the video, and the word processing document window. Close all other windows or programs you might have running, to avoid confusion. 'Grab' the sides of each window and narrow it, so you can easily access both video and document windows; allow one to slightly protrude from behind the other, so you can easily click on it to see it fully.
You may also be able to have the windows side by side - but they often 'disappear' temporarily as you work on one or the other. Ideally, you will show only one half of the document - one column. As you fill the first column with photos/graphics and text, you will automatically be moved to the top of the second column.
Begin to view the video and 'practice' starts and stops: As you know, all movies or videos are actually made of many 'single shot' photos. Commercially photographed movies may use dozens of these 'single shots' or 'frames' to show only the motion of one finger. This allows a great deal of clarity.
However, most videos on the Internet are made up of viewer 'frames' to show a motion. This means that when you stop a video, you will quite likely see a blurred image. You can stop it more precisely, to get a fairly sharp image - with a little 'tippy tapping' - rapidly tapping the start arrow so the video frames move v-e-r-y slowly, and you can hopefully capture just the unblurred instant needed to clearly show what you want to illustrate.
Begin viewing the video, and practice this 'tapping' for a few minutes, so you can see how it is possible to better control the resulting images. Having a 'quick finger' will help you capture just that millisecond that shows the best angle of that particular frame.
Practice, also, the ability to move the timeline in very, very tiny increments, to get the photo you want. This is a little trickier than 'tapping', as the timeline moves much more quickly. But, you'll quickly find your own method as you work.
The 'most valuable tool' for copying and pasting the images from the video into the document, we'll be using the 'Snipping Tool'. It is the 'scissors' icon on your Tool Bar. I keep it next to the 'Word' document icon, for quick access.
To use this tool, click on the icon; a window opens. Choose 'New'. The 'page' or video will dim, and you can use the '+' tool to outline the portion that you want to 'snip'. Snip as small an amount as you can that allows you to capture the 'story' you want to tell with the image. To copy the image, click on the 'double pages'; this copies and saves the snip, so you can move to the document and use the Ctl-V (or paste) command to place the photo.
Refer to the previous article for more details on 'fine tuning' this process, moving the photos, adding text, etc. The remainder of this article will be 'basic' instructions, as all specific information is contained in the "HOW TO COPY, SAVE AND COMPACT TUTORIALS" article.
When you're comfortable that you have 'reasonable' control of the video controls, you can begin to copy the video. I like to start with a photo of the item that is made in the project. Begin the video, and watch until you come to a good photo of the item.
This is when you need to start 'fine tuning'. You want to see all the objects - without the hand covering up one of them. Back up the video a tiny bit, using the 'timeline'. Then, begin 'tap,tap,tapping' very quickly until you come to a 'handless' frame:
Now, use the snipping tool to copy only the portion of the video that you want - the little portion that shows a closeup of the jewelry variations. Then click on the 'copy' icon, and position your cursor where you want the photo - then use the 'Ctl-V' or 'paste' command to place it in the document.
Place the photo under the title - but, to save space, make it just big enough to easily see, smaller than the full 3.5" width of the column. You can add a sentence or two of explanatory text, if you'd like, but 'technique' photos are the only ones that really require explanation.
From now on, you'll be 'ttt-ing' (tap,tap,tapping) to get the best 'shot' of the image. These are my choices, showing the individual rotations of the piece from all sides. Replace any images if you get a clearer view in succeeding taps - as I did with the first photo. When positioning photos in the document, be sure you space one time between photos - so you can get your cursor between the photos and move them as desired. SAVE AFTER EVERY ADDITION OR CHANGE YOU MAKE!!!
From now on, you'll be 'ttt-ing' (tap,tap,tapping) to get the best 'shot' of the image. These are my choices, showing the individual rotations of the piece from all sides. Replace any images if you get a clearer view in succeeding taps - as I did with the first photo. When positioning photos in the document, be sure you space one time between photos - so you can get your cursor between the photos and move them as desired. SAVE AFTER EVERY ADDITION OR CHANGE YOU MAKE!!!
Note that four small photos have been combined, to save vertical space on the page. I have added a brief note of explanation. See the previous article for details on how to move and resize photos to position them properly.
As you go through the video, you can choose to add one photo at a time, with explanatory sentence, and plan on going back after 'copying' the entire video to adjust sizes and text. This is probably the quickest way. Just remember to save, save, SAVE!!! after every little change you make!
You can also make adjustments, as I did above, combining multiple 'steps' of a process into one line of photos, with several sentences, explaining each step, under the photos. Keep in mind that you want to minimize the photos as small as possible, though still be able to see them clearly, to minimize pages of paper and the use of ink.
There are many variations of this design, and you may wish to 'capture' all of them, or just one or two. The important thing is that you have a detailed record of how it was done. This means that you will have to stop the video, after hearing an explanation, and slightly're-think' what was said - so you can minimize it to 'basic' instructions. Fortunately, you have the option of replaying the video to hear what you might have missed. Feel free to word the instructions in your own 'voice', to make it easier to understand when you read it later.
Makes notes of the tools used, the size of findings and stones, and the type and gauge of wire used for the projects. You may wish to revise the beginning of the 'print-out', to have this information immediately following the title.
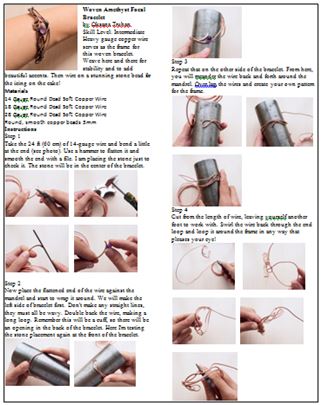
The photo shows a sample of a brief explanation of the steps I had seen on the video. Continue in this manner throughout the video. If there are particular 'tricky parts', try as hard as you can to clearly capture an illustration of the 'move', even though it might take numerous 'tries'. A year or so from now, you'll be glad you did!
FORMATTING A PHOTO: There are times when the photo is too dark, too light. This can be corrected by using the 'format' command. Right click the photo, and you will see a 'format' window pop up:
FORMATTING A PHOTO: There are times when the photo is too dark, too light. This can be corrected by using the 'format' command. Right click the photo, and you will see a 'format' window pop up:
As you can see by the illustration above, the video tutorial is being shown in a 'step by step' manner, with explanations that will be useful to you when replicating the project. Continue like this throughout the video, filling both columns on each sheet, until you have finished the video. Don't forget to SAVE AFTER EVERYTHING YOU DO!
I always like to have a photo of the finished product - front and back, if possible. Once you have completed these instructions, save one last time.
CONGRATULATIONS! You've just created your own personal tutorial!
Now, print it and save it in a 'Special Ideas' File! ....And don't forget to write a brief 'Thank You!' to the artist who created the tutorial for you - at no charge!
-Linda Gale
CONGRATULATIONS! You've just created your own personal tutorial!
Now, print it and save it in a 'Special Ideas' File! ....And don't forget to write a brief 'Thank You!' to the artist who created the tutorial for you - at no charge!
-Linda Gale
Materials

24 Gauge Round Dead Soft .925 Sterling Silver Wire
H8-24D
- Lesson Quantity: 10.00 feet
- Purchase Quantity: 1.00 10FT
- Price: $11.76
- Gold Club Price: $8.82
Tools

WireJewelry - Ultimate Wire-Pliers Jewelry Pliers with Case, Set of 5
G15-20
- G15-20
- Lesson Quantity: 1.00 pieces
- Purchase Quantity: 1.00 each
- Price: $170.72
- Gold Club Price: $128.04
- Category: General Education
- Technique(s): General Education






 creating a tutorial
 How to Copy, Save, and Compact Tutorials
 Three Ways to Keep Weaving Railroad Straight
 How to Determine the Correct Height of a Bezel
 Permanent Marker - the Tool You Love to Hate
 Create an 'Instant Memory Jogger' for Weaves, Techniques and Tips
  An Unusual Wire Weave
 Necklaces - How to Choose the Correct Length
