Design Process with 3 Earrings
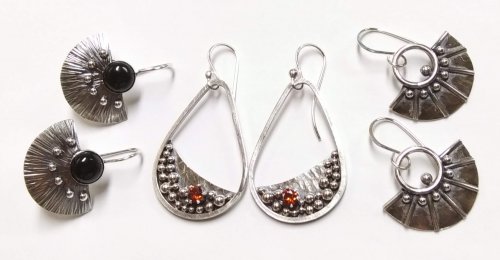
When I am designing earrings, I usually make several pairs at a time starting with the same basic shape. In this case, that shape was a half circle. I start with sketches, and go from there. Changes almost always happen along the way.By the way, that is the excuse I use to justify the size of my stash and the fact that I am always adding to it!
Start with a sketch that is close to actual size. Make notes of sizes, gauges, embellishments, etc., next to each design. Try to be as specific as possible because who knows what will be remembered tomorrow.


Use a millimeter circle template to determine the approximate size sketched and to make templates. In this case, a 24mm circle template was used.

Make copies of the templates for each earring and cut them out. Run them through a Xyron repositionable sticker maker. Using an ultra fine point Sharpie marker to trace around the templates on the sheet metal will also work.

Position the stickers on the sheet metal in a way to conserve metal. In this case, a rolling mill texture was to be added to four of the sections, so that piece was cut off and put through the mill before attaching the stickers. Light weight earrings pull less on the ear lobes, so 24 gauge sheet metal is used here. 26 gauge is lighter yet, but does not take as deep a texture. In retrospect, the center and the right earrings shown in the first photo would have been better if made with 26 gauge sheet, especially considering how much metal weight was added with the change in design.


Cut the shapes out with metal shears or a saw with a #3/0 blade. The original designs were with fluted and/or textured edges so shears were fine to use here. The jagged edge of bump outs in the lower design where a bezel cup will be attached will be filed away after attaching the bezel cup. Using a saw will leave a straight flat edge where shears squish the metal when cutting leaving more cleanup.
Important Note: Remember to pickle the pieces after each soldering step.

The original plan was to use the texture on the front and cut a wavy edge. It just did not seem quite right after laying the pieces out together, so on to another design idea. With the roller printed side down on a bench block covered with a thick piece of plastic, such as from the lid of frozen whipped cream substitute, lightly texture the smooth side with a favorite texture hammer. The plastic will help save the roller printed texture.
Form 14 gauge round wire into an 8mm ID ring. Hint: One step down from the largest barrel on a 6 step barrel pliers will make rings of this size. If Argentium wire is used, the seam can be fused. If not, use hard solder to close the seam.
Place the ring in the position desired on the back of the half circle. Use an ultra fine point Sharpie to mark on the half circle on either side of the ring. With the front side down on a bench block covered with a thick piece of plastic, stamp the metal content, in this case .925, between the lines.
Use hard paste solder to attach the ring and 16 gauge half round wire spokes. Since hard solder was used on the ring, make sure the ring seam is placed on the half circle so the seam will remain closed. The photos below do not show what the second idea was for these earrings. Originally, the wire spokes were to be balled up to the edge of the half circle. It did not work out as planned as one fell off during the process. On to the next change in the design.

The wire ends were cut off and each piece cut to the same length before balling. There are 6 spokes, but only 5 balls are needed for each earring.


Medium paste solder was used to attach the balls between the spokes and touching the ring.

The earrings still needed something. The metal inside the ring was filed away and a larger ball was added above the center spoke using easy paste solder.


The pieces were patinated, polished, domed and tumbled.
Attach ear wires.

These started as the center sketch but just did not look right when all the pieces were set out. So, a change in plans again. Cut two 3½" pieces of 14 gauge square wire. File the ends flush. A miter jig works great for this. Form into an oval, making sure the ends are flush.
Use hard paste solder to close the seam. Slide the oval onto a steel hoop mandrel to round it. Place the ring on a bench block and flatten it with another bench block to "square up" the edges.


These are the pliers used to make teardrop shape but there are many ways to make the shape. While shaping, remember that the half circle must fit under the lower end of the teardrop. Also, the 14 gauge wire seam should be at the lower end of the teardrop so it will be attached to the half circle where there is no risk of the seam opening.

The half circle did not look quite right with the teardrop so a slight curve was cut on the straight edge.

Position the teardrop over the half circle. Placing the half circle at an angle had more appeal than straight, as originally planned. Use an ultra fine point Sharpie to mark where the teardrop and half circle edge meet. The second earring will be a mirror image of the first.

Turn the assembly over and mark where a metal content stamp should go. It should be where something will cover it on the front side.

With the front side down on a bench block covered with a thick piece of plastic, stamp the metal content, in this case .925.

Use medium paste solder to attach the teardrop to the half circle. Placing a scrap piece of the same gauge sheet as the half circle under the top of the teardrop wire will help keep the teardrop flat on the half circle, making for a better join.

Trim away the excess half circle metal. File and smooth the seam.

Position various size balled metal pieces inside the teardrop until satisfied with the design. For added sparkle, attach a 4mm sterling snapset basket.

Use easy paste solder to attach all the pieces. Note: The reason the snapset is black and the rest of the metal is white after soldering is because argentium does not get fire scale like sterling silver does. Argentium was used for all three sets of earrings.


Patina the pieces. A soft steel brush and a silicone polishing pin were used to finish the excess patina removal because steel wool and my fingers could not get in the nooks and crannies or inside the snapset.

After tumbling, decide on what stone would look best in the snapset. Originally, a clear CZ was planned, but after patina, colored CZ's looked nice.

Decision made: Garnet CZ. Place the CZ table side down on a bench block. Position the snapset over the CZ and push. It will "snap" into place.
Attach ear wires.


Since the integrated earwire will take up part of the area behind the bezel cup, the metal content, .925 in this case, should be stamped below that area on the back side of the half circle.
The original design called for using a length of beaded chain along the lower edge of the bezel cup and a ruffled half circle edge. The chain available just did not have enough "oomph" so back to the drawing board and box of balled wire pieces. The balls needed to be placed away from the edge of the bezel cup because they would be in the way of pushing the cup edges in when setting the cabochon. The ruffled edge was not going to quite work with the new heavier balls, so a sharp texture hammer was used to make lines radiating out from where the bezel cup would be placed.
Use medium paste solder to attach balls and 10mm bezel cups.

File away the excess metal behind the bezel cups and smooth the area with sandpaper.

To make the ear wire, cut a 3¼" piece of 20 gauge round hard wire. Scroll one end to fit the area on the back side of the bezel cup. Check the fit before making a 90 degree bend in the wire as shown.

Use easy paste solder to attach the ear wire. Hint: Propping the ear wire on pre-1982 pennies will keep the scroll flat on the back of the half circle.

Patina, clean, polish and tumble the earrings. Add a bit of e-6000 glue to the bottom of the bezel cup. Push a 10mm cabochon into each bezel cup. Let the glue set overnight before pushing in the bezel cup edges. Hint: Love my clothe pin bezel pusher!

A flat earring looks nice, but adding just a bit of dimension can add a lot. Use a small rubber or plastic mallet to shape the half circle on a large dome. A large wood ball from a craft store or a shiny trailer hitch both work well for this.

Cut the ear wire 1¾" long out from the bezel cup.

Use a cup bur and a 1500 grit sanding pad to smooth the wire ends.

Bend the ear wires forward about 90 degrees.

Place the ear wire in a 6 step barrel pliers as shown. Bend the wire around the larger of the two middle steps. Make a slight bend at the end of the ear wire.


Materials

24 Gauge Dead Soft Argentium Silver Sheet - 6 Inches
H19-24SM6
- Lesson Quantity: 1.00 pieces
- Purchase Quantity: 1.00 1 Inch
- Price: $83.14
- Gold Club Price: $62.35

26 Gauge Dead Soft Argentium Silver Sheet - 6 Inches
H19-26SM6
- Lesson Quantity: 1.00 pieces
- Purchase Quantity: 1.00 1 Inch
- Price: $68.08
- Gold Club Price: $51.06

16 Gauge Round Half Hard Argentium .940 Silver Wire
H19-16H
- Lesson Quantity: 1.00 pieces
- Purchase Quantity: 1.00 1FT
- Price: $17.51
- Gold Club Price: $13.13
Tools

Wubbers Triangle Mandrel Pliers - Jumbo
PLR-1490
- PLR-1490
- Lesson Quantity: 1.00 pieces
- Purchase Quantity: 1.00 each
- Price: $44.97
- Gold Club Price: $33.73

Basic Soldering Kit
G15-4
- G15-4
- Lesson Quantity: 1.00 pieces
- Purchase Quantity: 1.00 each
- Price: $58.95
- Gold Club Price: $44.21
- Category: Design
- Technique(s): Design





 Coiled Wire Jewelry Series Part 1 - Everything New is Old
 Where do you create
 Soldering on Copper
 Charting Your Creations
 All About Rolling Mills
 How to Use Disc Cutters to Make Metal Washers
 Disc Cutter Basics and How to Make Metal Washers
 I Am Not a Hoarder
 The Beauty of Druzy
 Design Process with 3 Different Earrings
 Think Outside the Box - Alternative Metal Texturing
 Fall Leaves for Your Designs
 Cholula "Folk Art" Charms
 Lemons to Lemonade
 Why You Should Take a Class
 Bead, Shell, and Rock Cabochons
 What Tools Do I Need for Wirework and Bead Stringing - Start With The Basics
 Choosing Pliers
 Saving, Storing, Using Tutorials
 Flop to Flip
 The Story of Turquoise
 Non Marring Tools
 Using Lower Quality Beads
 Differences in Gold Plating
 Inventorying Your Supplies
 Engineering the Multi-chain Necklace
 Benefits of Extender Chains
 My Most Often Used Embellishments
 Sliding Gauges and Calipers
 Wire and Sheet Gauge Measuring Tool
 Silver Plated Copper Craft Wire
 Jewelry from Other Cultures
 Conversation Starters
 Well, That Didn't Work, Now What
 Water Casting for the Weekend Jeweler
 A Few Thoughts on Multi-Strand Beading Wires
 How to Downsize Your Earring Projects Without Losing Style
 Celebration Jewelry

