


Child's Bracelet That Grows with Them
- Category: Contemporary
- Technique(s): Butane Torch Techniques
- Skill Level: Intermediate
Making stretch bracelets with the little ones might placate them for a while, but there will come a time when they will ask for "real" jewelry. Precious metals are not cheap and children are known to outgrow everything before you can blink. Bracelets that grow with them, like these bypass "bangles", can be the answer.
Materials

12 Gauge Round Half Hard Argentium .940 Silver Wire
H19-12H
- Lesson Quantity: 1.00 pieces
- Purchase Quantity: 1.00 1FT
- Price: $25.34
- Gold Club Price: $19.01

Bali Silver Beads 12mm
- Lesson Quantity: 1.00 pieces
- Purchase Quantity: 1.00 each
Bali Silver Beads 7mm
- Lesson Quantity: 1.00 pieces
- Purchase Quantity: 1.00 each
Tools

Blazer ES-1000 Angled Head Micro Torch, Black
TRCH-1002
- TRCH-1002
- Lesson Quantity: 1.00 pieces
- Purchase Quantity: 1.00 each
- Price: $74.95
- Gold Club Price: $56.21

Silver Solder Paste Medium SS70 - 1/4 T.O.
SOL-822.15
- SOL-822.15
- Lesson Quantity: 1.00 pieces
- Purchase Quantity: 1.00 each
- Price: $18.95
- Gold Club Price: $14.21

Solderite Soldering Board 6 Inch by 6 Inch Soft
SOL-421.10
- SOL-421.10
- Lesson Quantity: 1.00 pieces
- Purchase Quantity: 1.00 each
- Price: $12.95
- Gold Club Price: $9.71

Nylon Bracelet Bending Plier
PLR-840.00
- PLR-840.00
- Lesson Quantity: 1.00 pieces
- Purchase Quantity: 1.00 each
- Price: $19.97
- Gold Club Price: $14.98

Soldering Tripod
SOL-730.00
- SOL-730.00
- Lesson Quantity: 1.00 pieces
- Purchase Quantity: 1.00 each
- Price: $13.95
- Gold Club Price: $10.46

Premium Nylon Jaw Pliers
G2-35
- G2-35
- Lesson Quantity: 1.00 pieces
- Purchase Quantity: 1.00 each
- Price: $14.95
- Gold Club Price: $11.21

7 Piece Mini TruStrike Hammer Set with Stand
HAM-520.70
- HAM-520.70
- Lesson Quantity: 1.00 pieces
- Purchase Quantity: 1.00 each
- Price: $140.54
- Gold Club Price: $105.40

Small Rawhide Hammer 1 Inch - Pack of 1
G3-1
- G3-1
- Lesson Quantity: 1.00 pieces
- Purchase Quantity: 1.00 each
- Price: $21.95
- Gold Club Price: $16.46

Pickle Pot, 16 Ounces
CLN-584.00
- CLN-584.00
- Lesson Quantity: 1.00 pieces
- Purchase Quantity: 1.00 each
- Price: $31.95
- Gold Club Price: $23.96

NATURE'S TOUCH CITRIC PICKLE, 2LB PLASTIC JAR
CLN-163.00
- CLN-163.00
- Lesson Quantity: 1.00 pieces
- Purchase Quantity: 1.00 each
- Price: $17.95
- Gold Club Price: $13.46

Premium Steel Bracelet Mandrel - Oval
MAN-217.00
- MAN-217.00
- Lesson Quantity: 1.00 pieces
- Purchase Quantity: 1.00 each
- Price: $42.97
- Gold Club Price: $32.23

WireJewelry Single Barrel Rotary Tumbler, Jewelry and Metal Polishing Kit, Includes 1 Pound of Jewelers Mix Shot and 8 Ounces of Shinebrite Burnishing Compound (2021 Version)
G24-1V2-KITSS
- G24-1V2-KITSS
- Lesson Quantity: 1.00 pieces
- Purchase Quantity: 1.00 each
- Price: $159.93
- Gold Club Price: $119.95
Instructions
Step 1
Read through the instructions before starting the project.
Step 1: Measure a child for a bangle is the same manner as for an adult. The bangle in the photos indicates where a measurements would be taken using a measuring tape. When measuring, the tape should not be too tight or too loose. It should be Golidlocks just right. The first photo, measurement 1, is around the knuckles of the hand with the thumb tucked in toward the fingers. The second photo, measurement 2, is around the knuckles of the little finger and the thumb, with the thumb still tucked in toward the fingers. The right and left hand will probably have measurements that are slightly different so it is advisable to measure both. Use the measurements from the larger hand.
As we age, our knuckles may enlarge as a result of arthritis. Our hands also become less flexible. It is wise to use the larger of the two measurements, measurement 2, for an adult bangle.
If possible, measure the hand of the child lucky enough to be getting a "real" piece of jewelry using measurement 1 as a guide. Use that measurement plus ¼" (because children generally do not like things that are too tight) to cut the wire for a bangle. Add 1½" to 2" to that measurement for a bypass bangle. The younger the child, the more length needs to be added for the bangle to grow with the child. As the child grows, the bangle can be expanded to the point where someday it will become a cuff-third photo. The adult small bone structure cuff wire was cut 7" long with ends melted to make it 6" long before forming.
If measuring cannot be done to determine size, use these measurements. If unsure of size, use the longest measurement in the size the child is thought to be. Remember, these bangles have overlapped ends so precise measurements are not necessary. The measurements are just general
If the child has a small bone structure cut the wire 6¾" to 7½" long.
If the child has an average bone structure, cut the wire 7" to 7¾" long.
If the child has a large bone structure, cut the wire 7¼" to 8" long.
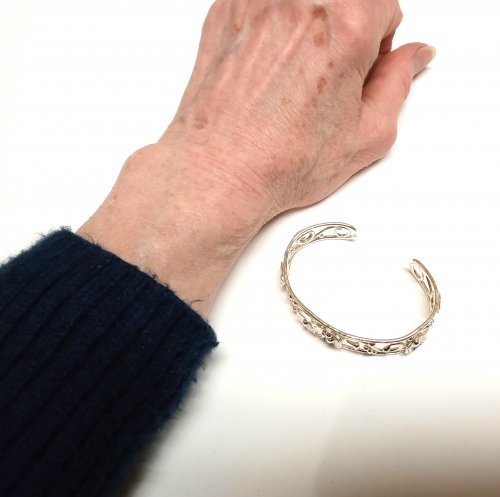
The finished bangles shown on an adult hand are for a 5-year-old child with small bone structure and a bangle measurement of 5½". One quarter inch was added to that measurement to make the ripple bangle. 1¼" was added to the 5¾" to make the bangle with the round beads. 1½" was added to make the bangle with the rectangle bead. The two different lengths were cut to see what difference there would be in the overlap. In retrospect, ¼" more should have been added to each of those lengths to allow for the room the beads take up on the wrist. Another ¼" can be added if more of a bypass is desired.
If the child has a small bone structure cut the wire 6¾" to 7½" long.
If the child has an average bone structure, cut the wire 7" to 7¾" long.
If the child has a large bone structure, cut the wire 7¼" to 8" long.
The finished bangles shown on an adult hand are for a 5-year-old child with small bone structure and a bangle measurement of 5½". One quarter inch was added to that measurement to make the ripple bangle. 1¼" was added to the 5¾" to make the bangle with the round beads. 1½" was added to make the bangle with the rectangle bead. The two different lengths were cut to see what difference there would be in the overlap. In retrospect, ¼" more should have been added to each of those lengths to allow for the room the beads take up on the wrist. Another ¼" can be added if more of a bypass is desired.
Pro Tip: Choosing the Beads: Make sure the hole is large enough for the wire to slide through. If the beads have many open areas like the two on the left, it may be best to avoid them because too much heat used during soldering can cause them to fall apart. The two on the right are better choices because there is more metal on the bead surface and no holes other than the stringing hole.


Step 2:
Choosing Beads
Straighten the end of the wire on the coil to a bit more than the desired length. Measure and mark the length with a Sharpie. Memory wire cutters easily make nice, clean cuts on this heavier gauge wire.

Step 3
Decide on the bead arrangement on the wire. Do not use more beads than will make ¾" in length because the solder joins will break when the bracelet is bent during forming. Of course, beads do not need to be added. The paddled bypass ends are a nice focal which could be stamped with the initials of the recipient or any number of designs.

Step 4
Place the wire on a solderite board. Heat and ball one end. Allow the wire to cool before moving it. A nudge from the side will help release it from the board without taking solderite chunks with it. Move the piece to a bench block, which will act as a heat sink, to cool. Add the beads in the correct order. Place the wire back on the board, cut end on the board and balled end with the beads hanging off the board. Ball the cut end of the wire. Go back and forth, heating the ends, until the ends are evenly balled and the finished balled length is ¾" to 1" less than the length of the wire cut. If the molten ball quits moving up the wire or seems to be stuck, have a solder pick handy in your dominant hand to help nudge it slightly to get it going. Be careful. This process happens in a hurry so it is easy to break the wire above the ball if pushed too hard.


Step 5
After the piece is cool, clean any solderite board residue from the backs of the balled ends. Pickle, rinse and dry the piece.
Step 6
Use soft jaw pliers to twist the wire to align the flat sides of the balled wire ends if they are not both in the same plane.

Step 7
To help center the beads, use a Sharpie to mark the center of the wire and four 1/8" increments out from center to both sides.

Step 8
Place the stainless steel mesh firing rack or kiln bent sides facing up on a solderite board. Center the wire with the beads between the mesh sides of the rack. The flat sides of the balled ends should be facing up. If the soldering is done on the back of the piece, there will be no joins to break on the front if the bracelet is bent too far during forming.

Step 9
Slide the end beads to the side. Center the main bead on the wire. Place a small amount of medium paste solder on either side of the bead, making sure the solder is touching the bead and the wire. Push the next bead into the solder. Add solder outside that bead and push the next bead in. Add a bit of solder outside the last beads.


Step 10
Heat the unit, paying attention to the beads as they have more mass than the wire, until the solder flows. As the solder flows and the wire softens, the weight of the beads may drag the wire down. Immediately remove the heat.

Step 11
Pickle, rinse and dry the piece.
Step 12
Use the flat side of the Mini TruStrike Planishing Hammer to flatten the balled ends and the rounded side to texture them.


Step 13
With the paddled end and the beads hanging off the bench block, use the rounded side of the Mini TruStrike Planishing Hammer to lightly texture the top, bottom and sides of the wire on both sides of the bead center. The texturing is not necessary, but children can be tough on their jewelry and this will disguise any dings.

Step 14
If desired, stamp .925 on the back of one of the paddles. Placing the paddled wire on a thick piece of leather on a bench block will help preserve the texture on the front side of the paddle.

Step 15
Use soft jaw and bracelet bending pliers to form the bangle. An oval shape bangle is easier to put on as well as closer fitting.
The beads make forming difficult on a mandrel. However, the overlap is easier to evenly shape and bend on the mandrel when tapped with a plastic, rubber or rawhide mallet.
The beads make forming difficult on a mandrel. However, the overlap is easier to evenly shape and bend on the mandrel when tapped with a plastic, rubber or rawhide mallet.


Step 16
How to check for size: Form a circle with wire marked the length of the measurement around the hand. Place the formed bangle on the circle to gauge how much larger or smaller the bangle should be.


Step 17
Some beads will be uncomfortable to wear against the wrist. The ball in center of the rectangle bead on the inside of this bangle should be filed flat for comfort. Many children dislike the rub of clothing tags so imagine what that little ball would do!

Step 18
If, during forming, a solder join breaks and one or more beads become loose, use a third hand to hold the bangle upside down. Place medium paste solder between each bead and heat until the solder flows. Pickle, rinse and dry the piece.

Step 19
Do any refining needed, if any, with sanding pads. Tumble for several hours to smooth and polish the piece.

Step 20
Patina with liver of sulfur. Use 0000 steel wool to remove patina from the high areas to bring out the design of the beads and the texture on the wire and paddles ends.
Step 21
Tumble again for half an hour to bring up a shine.

Supply Detail
loading...
Change Metal:
This Pattern requires:
Purchase quantity:
Price: $
Gold Club Price: $
Purchase quantity:
Price: $
Gold Club Price: $

Judy Larson
Other Patterns by Judy Larson
 Beaded Briolette Pendant
 Snail Trail Spiral Earrings
 Heart Link Bracelet and Earrings
 Crazy Hoop Earrings
 Double Delight Jade Bracelet
 Swagged Pearl Pendant
 Heart Earrings with Drops
 Scarab Bracelet
 Birthstone Heart Pendant
 Pearl of the Sea Woven Pendant
 Bead Charm
 Coiled Rosette Link
 Wire Jewelry Component and Swan Hook
 Leaf Bail
  Component Templates with Heart Earrings and Pendant
 Ring Pendant
 Calla Lily Earrings
 Birdhouse Pendant
 Clamshell Earrings and Pendant
 Bracelet Component
 Teardrop Earrings and Pendant
 Tab Style Pendant
 Coiled End Caps
 Freeform Pendant
 French Hook Ear Wires
 Necklace Component
 Triangle Shield Earrings, Pendant and Bail
 How to Make a Wire Coil and Bead
 Egyptian Coil Bracelet
 Focal Bead Egyptian Coiled Bracelet
 Sweetheart Round Cabochon Pendant
 Making Cobblestone Cabochons
 Cupcake Wrapper Earrings
 How to Make Metal Washers
 Baseball Skin Keychain
 Pat's Silver Domed Earrings
 Blaze Your Own Path Pendant
 Semi Snap-on Bail
 Interlocking Faux Twist Wire Bracelet
 Fold Formed Cuff With Faux Roman Glass or Coin Cabochon
 Steampunk Style Leaf Earrings
 Stamped Saucer Beads
 Kat's Wire Hoop Earrings
 Simple Bail on a Coin Pendant
 Wire Bangles
 Rolling Mill - or not - Cuff Bracelet
 Jen's Chain
 Making Neckwires
 Silver Scrap Wire Focals to Embellish
 Splash Ring
 Cobblestone Cab Earrings
 Multi Gemstone Necklace
 Southwest Style Pendant
 Bezels Using Square Wire
 Mixed Metal Sampler Bracelet 1
 Mixed Metal Sampler Bracelet 2
 Mixed Metal Sampler Bracelet 3
 Mixed Metal Sampler Bracelet 4 - Words Matter
 Mixed Metal Sampler Bracelet 5 - River Walk
  Mixed Metal Sampler Bracelet 6 - A Little Bling
 Mixed Metal Sampler Bracelets Series PUTTING IT ALL TOGETHER
  Mixed Metal Sampler Bracelet 7 - Steampunk Space Oddity
 Mixed Metal Sampler Bracelet 8 - Fun Shapes
 Jump Ring Fringe Bracelet
 Easy Artisan Earrings
 Making Chain with Wubbers and Wire
 Heirloom Buttons and Beads Bracelet
  Tiny Silver Charms part 1
 Argentium Silver Scrap Chain
 Sterling Lake Stone Pendant with Twisted Wire
 Smashing Drop Earrings
 Argentium Silver Scrap Nugget Cuff
 Finish Them Your Way Earrings
 Paddle Fringe Earrings
 Seed Bead Earrings
 Bracelet Links 1, 2,3
 Stamped Saucer Beads
 Chaos Scrap Wrap Jewelry
 Maple Leaf Earrings
 Mike's Surpirise Claire's Ripple Pendant
 Angel Ornament
  Diamonds, Emeralds, and Sapphires, Oh My.
  Treasure Bezel Cups
 Three Leaves Earrings
 Silver and Gold Earrings
 Make a Hidden Bail
 Wire Links 4, 5, 6
 Wire Links 7, 8, 9, and 10
 Double Loop Ear Wires
 Balled and Paddled Head Pins
 Textured Stacked Rings
 Cord and Bead Earrings
 Bali Style Adjustable Closures
 Organic Fused Silver Dust Earrings
 Mobius Rings
 Dainty Bead and Wire Bangle with Hook Closure
 Seed Bead and Nugget Necklace
 Love Locks Heart Charm
 Traditional Southwest Style Hook Closures
  Negative Space Earrings
 Jumbled Lacy Chain
 Easy Beaded Post Hoop Earrings
 Rustic Silver Links
 Make a Soldered Paperclip Chain
 Make a Fused Paperclip Chain
 Make Woven Metal Strips to Use in Your Designs
 Leaf Wrap Metal Rings version 1
 Leaf Wrap Metal Rings version 2
 Snowflake Ornaments
 Mitten Ornament
 Gnome Ornaments
 A Partridge in a Pear Tree Earrings
 Two Turtle Doves Earrings
 Three French Hens Earrings
 Four Calling Birds Earrings
 Five Golden Rings Earrings
 Six Geese a Layin' Earrings
 Seven Swans a Swimming Earrings
 Eight Maids a Milking earrings
 Nine Ladies Dancing Earrings
 Ten Lords a Leaping Earrings
 Eleven Pipers Piping Earrings
 Twelve Drummers Drumming Earrings
 Make Your Own Bracelet Button Clasps
 Little Saucer Bells
 Doodads - Fun Findings
 No Measure Hearts, Any Size, Any Gauge
  Cascading Drops Earrings
 WIre Basics - Spiral Charms
 Wire Basics - Wrapped Loops and Links
 Wire Basics - Simple Swan Hook
 Wire Crocheted Necklace
 Wire Basics - Wire Garage Door Spring Link
 Easy Post Hoop Earrings
 Double Wrap Wire Bangle Bracelet
 Organic Wire Pendant
 Coiled, Beaded Slide
 Cone and Chain Earrings
 Embellished Sterling Cones
 Classic Wire Wrap Bezelled Pendant
 Wire Wrap a Coin
 Viking Knit
 Viking Knit Bracelet
 Coiled Wire End Caps
 Bead-Wrapped Hoop Earrings
 Copper Feather Earrings
 Soldering a Dome to a Backplate
  Wire Heart Pendant with Gemstone Drop
 Make Basic Wire Shapes for Jewelry
 Make Simple Wire Slide Bails
 Coiled Bead and Twisted Wire Bracelet
 Wire Triangle Link
 Bali Style Focal Toggle
 Silver Nuggets
 Fun Shapes Fish Hook Earrings
 After the Rain Bracelets
 Dangling Drop Earrings
 Dangling Chain Sticks
 Wire Heart Pendant with Gemstone Drop
  Tropical Leaf Earrings
 Basic Bezel Wire Tutorial
 Dog Tag Style Necklace
 Lacy Washers
 8-Strand Kumihimo
 Closed Loop Ear Wires
 Simple Strip Bails from Scratch
 Anti-tarnish Silver Cloth Bags
 Cotter Pin Style Bail
 Holiday Woodland Fairy Ornament
 Happy Holly Days Wreath Ornament
 Happy Holly Days Leaves and Berries
 Happy Holly Days Bells Ornament
  Art Deco Wire Wrapped Pendant
 Twisted Wire Jump Rings
 Two-tone Beaded Bangle
 Sweetheart Pendant
 Waves on the Beach Earrings
 Any Size Wire Hearts - Any Size, Any Gauge
 Just in Case Heart Pendant
 Small Flower Embellishment
 Making Tiny Dapped Metal Leaves
 Spinner Fidget Bangles
 Small Flower Bud Embellishment
 Three Petal Bud and Layered Embellishment
 Creating a Flower Stem
 Stamped Tube Beads
 Water Cast Scrap Cross
 Sugared Grapes Pendant
 Gemstone Chains Reimagined
![]()
The premier place for all your jewelry making needs. The best in wire, tools, cabochons, gemstone beads and more. As well as a superior resource for educational support to help build your jewelry making skills and techniques.
Connect With Us

® 2007 - 2024 Wirejewelry.com Powered by ClaimTheWeb Cart