


- NEW DVD Series – Stone Setting with Bezels
- Tube Set Charm by Kim St. Jean
- Prong Basket Pendant by Kim St. Jean
- NEW DVD Series – Stone Setting with Cold Connections
- New DVD Series – Stone Setting with Wire
- NEW DVD Series: Introduction to Stone Setting by Kim St. Jean
- Featured Tool: Bracelet Bending Plier
- NEW Dvd by Eva Sherman
- Fun, Fast Fold Forming DVD Series
- Double Band Ear Cuff from Alex Simkin
Wire Jewelry Tip: How to Open and Close Jump Rings

by Rose Marion, Wire-Sculpture.com
Jewelry Resource for
March 27, 2013
Opening & Closing Jump Rings
Today’s Tip is from Rebecca Rudaski, a chain maille artist who taught with us in Tucson at the JOGS Show this February. You may have seen some of her bright, fun chainmaille patterns in our Free Email Patterns series!
Thanks, Rebecca, for this great tutorial about how to work with jump rings!
(Tip: You can click on each picture to see a larger image.)
Working with Jump Rings
by Rebecca Rudaski ©2012
You’ll need: Jump Rings and 2 Pliers: your choice of flat nose or bent nose pliers. Rebecca is using the Lindstrom EX Flat Nose Pliers.
All chainmaille jewelry is made by opening and closing rings. When you open and close so many rings, you want to make sure that you have the right technique for doing so.
Grab on to your jump ring with two pliers, and pull one end towards you, while pushing the other end away. Your ring will be torqued up into a spiral and ready to connect to other rings.
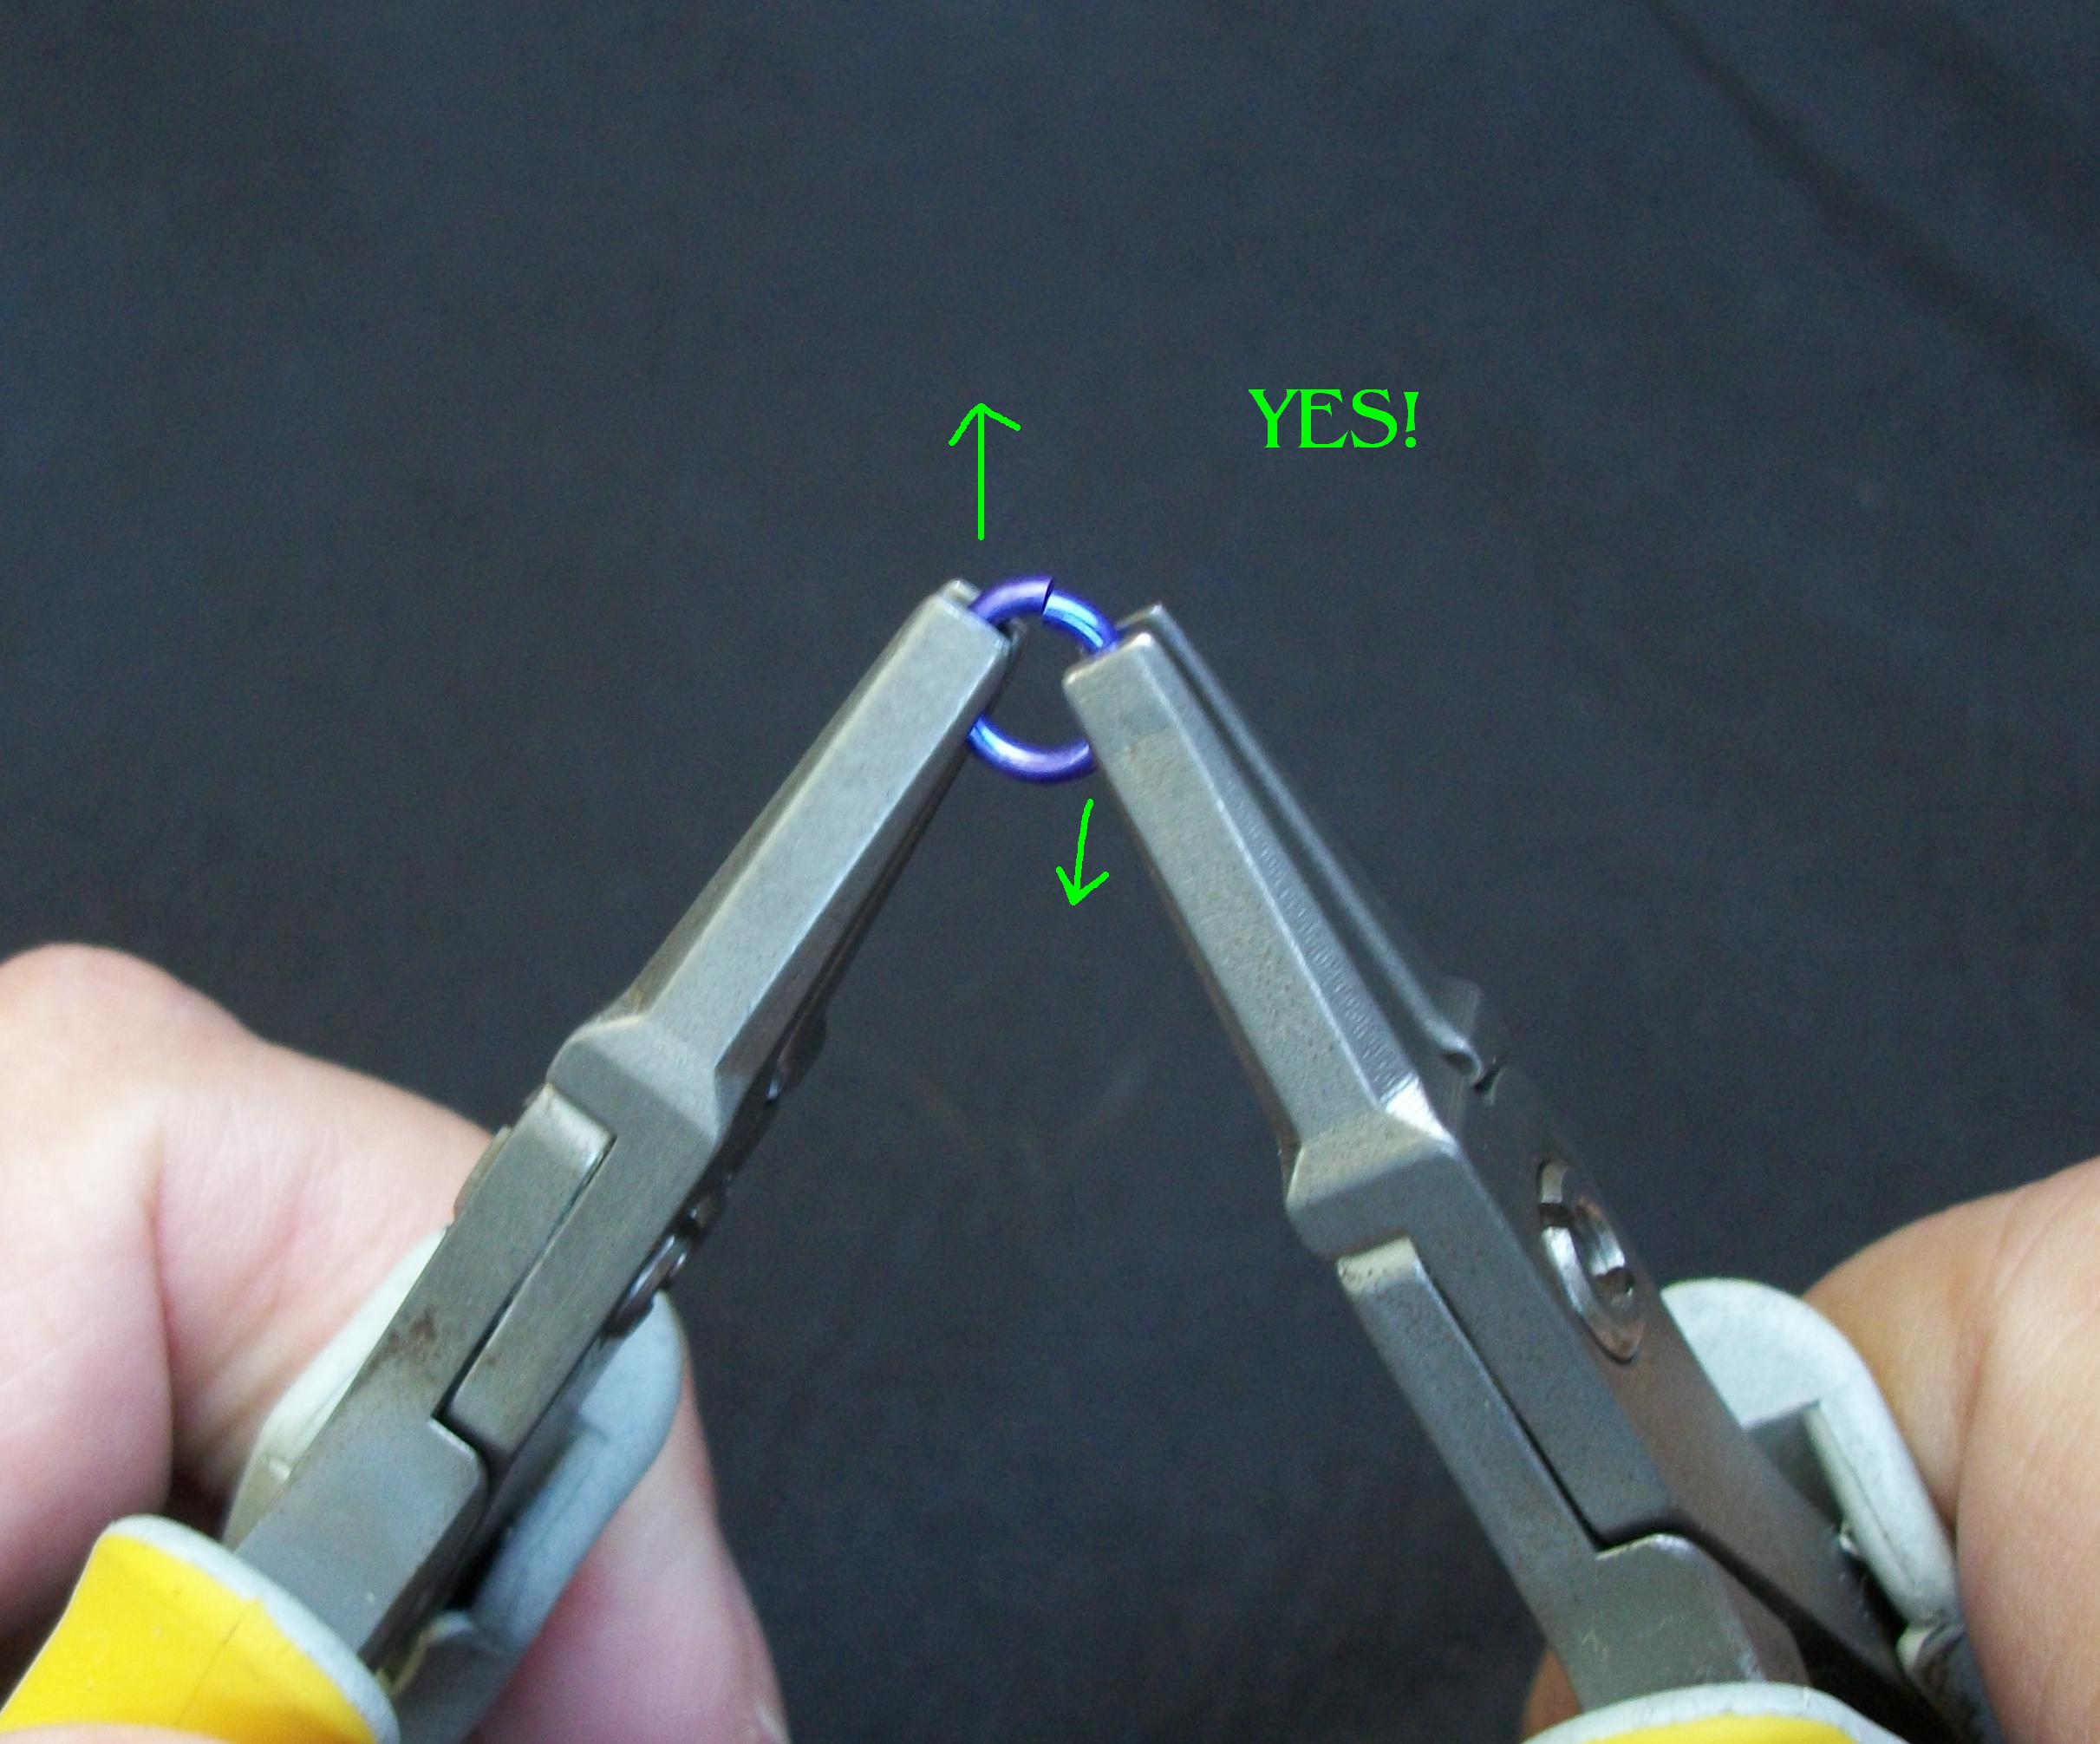

Do not pull the ring open left and right, because that will distort the roundness of the ring. That will make it nearly impossible to get a good closure, making your finished piece MUCH weaker.

Here are the two rings side by side as an example of how a properly opened ring looks next to a-not-so-properly opened ring.
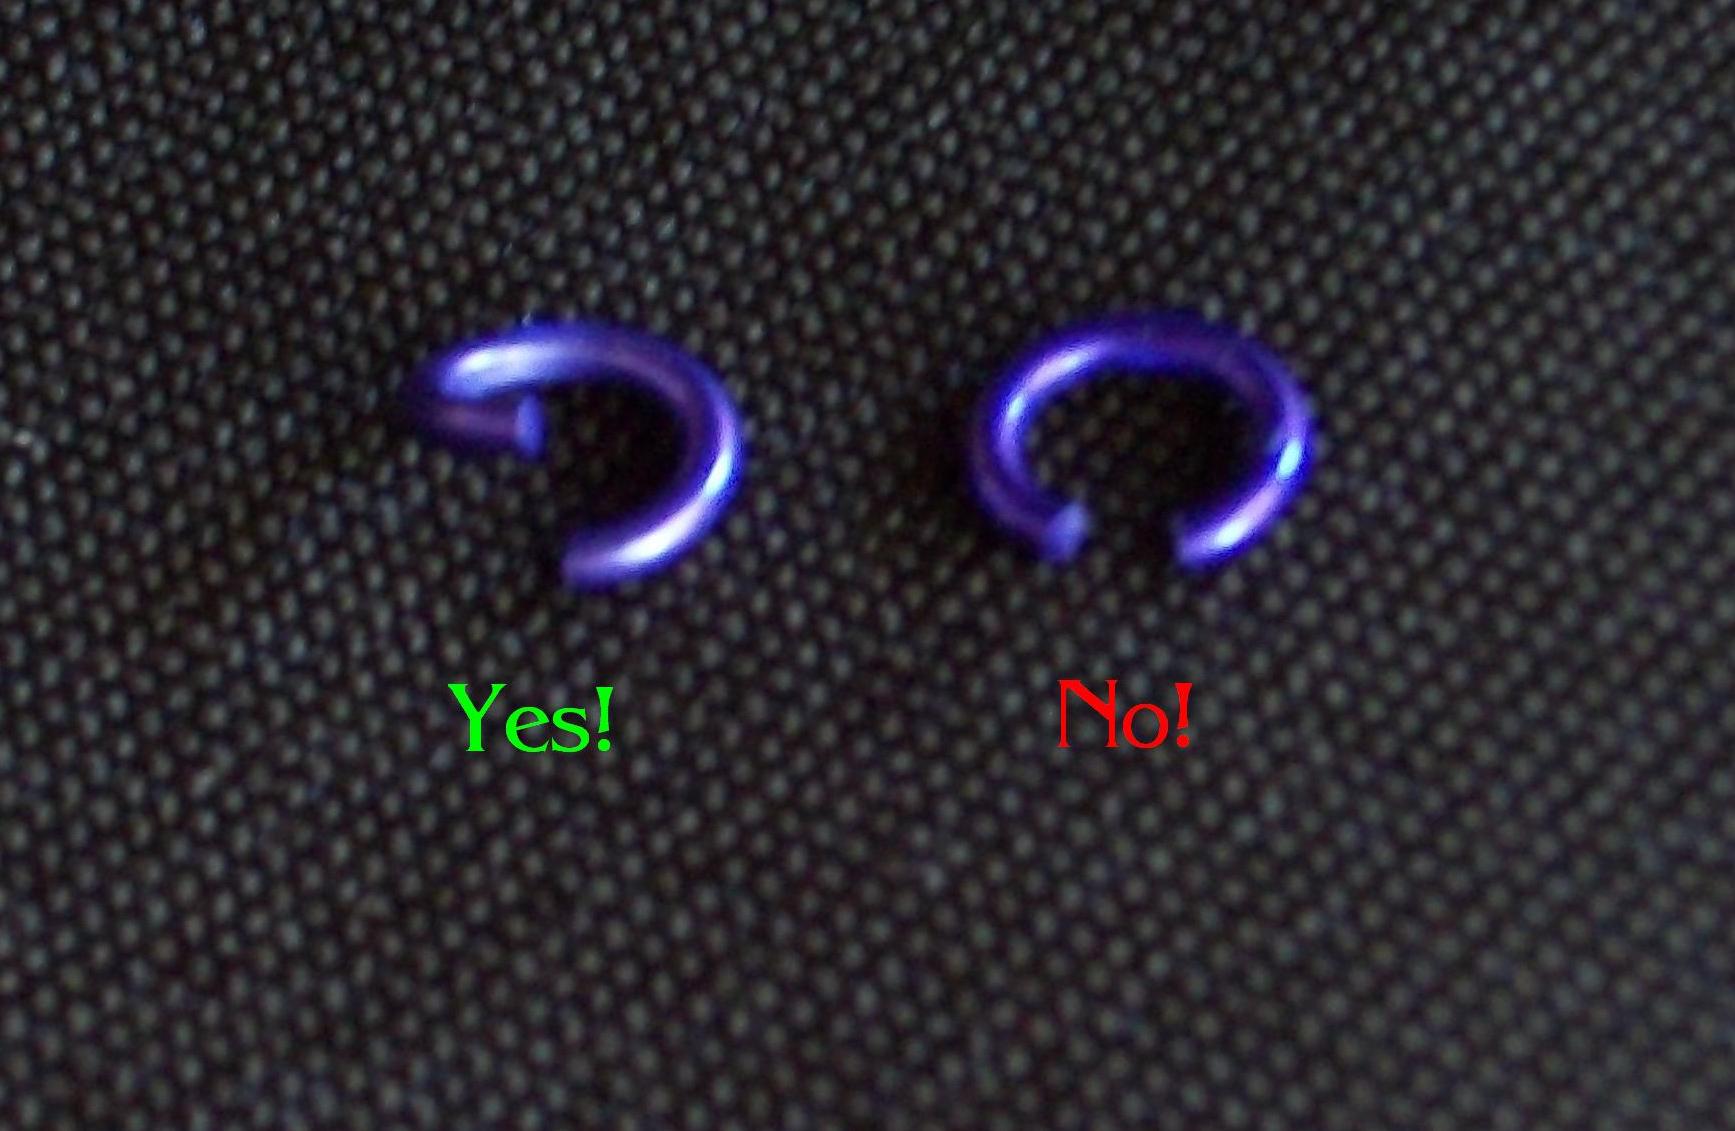
Now that you’ve seen how to open a ring, you close it the exact same way. Depending on the metal you are using, you may need to push the two ends of the ring a little past closed, so that when you relax your grip, they “spring back” to a nice even closure.
It’s as simple as that! Now you’re ready to tackle any chainmaille pattern, assured that your jump rings are closed securely. Happy weaving!
Have a Wire Jewelry Idea you’d like to share? Click Here to submit your idea. You could be featured on our Blog!
Click to Receive Daily Tips by Email
Related Posts


6 Comments

Wire Jewelry Ideas
-
 See Yourself as a Creative Thinker-Part IV By Karen Meador, PhD
Wire Jewelry Article for September 27th, 2017 If...
- September 27, 2017
-
 See Yourself as a Creative Thinker-Part III By Karen Meador, PhD
Wire Jewelry Article for September 20th, 2017 If...
- September 20, 2017
-
 See Yourself as a Creative Thinker-Part II By Karen Meador, PhD
Wire Jewelry Article for September 13th, 2017 If you...
- September 13, 2017
-
 See Yourself as a Creative Thinker By Karen Meador PhD
Wire Jewelry Article for September 6th, 2017 This is...
- September 6, 2017

Design & Inspiration
-
 Free Pattern: Smile Cluster Necklace by Karen Meador
by Judy Ellis, Wirejewelry.com Wire Jewelry Pattern for August...
- August 7, 2017
-
 Free Pattern: Long crystal round maille earrings by Kylie Jones
by Judy Ellis, Wirejewelry.com Wire Jewelry Pattern for August...
- August 3, 2017
-
 Free Pattern: Stone Twist Wrap by Karen Meador
by Judy Ellis, Wirejewelry.com Wire Jewelry Pattern for July...
- July 31, 2017
-
 Free Pattern: Floating Bead Earrings By Kimberly Newman
by Judy Ellis, Wirejewelry.com Wire Jewelry Pattern for July...
- July 27, 2017
Featured Tools
-
 Get to Know Your Hand Tools – Tube-Cutting Jig By Helen I. Driggs
by Judy Ellis, Wirejewelry.com Wire Jewelry Tip for August...
- August 4, 2017
-
 Wire Jewelry Video: Using Punch Pliers by Judy Freyer Thompson
by Judy Ellis, Wirejewelry.com Wire Jewelry Tip for August...
- August 2, 2017
-
 Wire Jewelry Video: Aligning a Hole Punch by Judy Freyer Thompson
by Judy Ellis, Wirejewelry.com Wire Jewelry Tip for July...
- July 26, 2017
-
 Get to Know Your Hand Tools – Wire Cutters – Helen I. Driggs
by Judy Ellis, Wirejewelry.com Wire Jewelry Tip for July...
- July 25, 2017
Brenda
March 27, 2013 at 9:15 am
Great Instructions and Clearly Understandable Passing on to my readers if this is ok with you
Rose
March 27, 2013 at 11:05 am
Hi Brenda, sure, feel free to link to this tutorial. Thanks for stopping by!
GardenLadyToo
March 27, 2013 at 3:42 pm
I do pretty much the same thing, except that I used the back side of a pair of bent-nose pliers to hold the jump ring (gives a better grip without marring the wire) and a flat-nose in the other hand to “twist” not pull the ring open. Same thing to close it.
Also, when I make my own jump rings, I cut them at a slant rather than at a 90-degree angle. This lets me close them really really snugly, with no chance of the next connected ring sneaking through a tiny gap.
Rose
March 27, 2013 at 3:57 pm
Very smart tip! Thanks
Kate
March 27, 2013 at 9:19 pm
I’m not a chain maille artist (but I’d like to give it a try someday when I have time). I’m a silversmith who incorporates bezeling, embedding or pronging precious or semi-precious stones and often embellishing my work with some filigree or wirework (since filigree is so time-consuming). Of course, jump rings are always a necessity to finish a piece (except rings and such). I do prefer to make my own jump rings so I have the perfect size and shape can make them on the spot.
These are great tips; of course, you never pull them open, only back and forth. I do cut mine at a slight slant, as Garden Lady mentioned. However, here’s my addition: someone told me (and it works) to move the ring back and forth a few times to “work-harden” it. Then, at a slant (I finally found cutters that are good enough that I never need to file edges) I literally work the ends of the jump rings into place until they snap back exactly as they were cut. So far, I have not had a failed jump ring and my work has a guarantee for the lifetime of the wearer. I haven’t had to fix or replace a jump ring!
I would hope this method would work with chain maille as well, except you would probably have to work it back and forth before attempting to place the ring, of course.
Thanks for all the great tips!
Margo
April 3, 2013 at 3:11 pm
I have never attempted making my own jump rings but want to try. How much of a slant would be needed to get the opening right?