


- NEW DVD Series – Stone Setting with Bezels
- Tube Set Charm by Kim St. Jean
- Prong Basket Pendant by Kim St. Jean
- NEW DVD Series – Stone Setting with Cold Connections
- New DVD Series – Stone Setting with Wire
- NEW DVD Series: Introduction to Stone Setting by Kim St. Jean
- Featured Tool: Bracelet Bending Plier
- NEW Dvd by Eva Sherman
- Fun, Fast Fold Forming DVD Series
- Double Band Ear Cuff from Alex Simkin
Free Pattern: Moonstone Woven Wire Bangle by Delilah

by Judy Ellis, Wirejewelry.com
Wire Jewelry Pattern for August 14th, 2017
Moonstone Woven Wire Bangle
by Delilah

This is a very versatile wove wire bangle; it can be made in a variety of wire types and stone beads.
The instructions and pictures here are meant to guide you step by step throughout the whole process, from the first bend to the last. I could state this tutorial is for the beginners, as well, but with one condition: arm yourself with patience for working with pretty long wires. On the other hand, everything is simple. A bit of imagination for the last steps and that will do.
Materials:
- 22 Gauge Round Silver Plated Silver Copper Craft Wire – 24 ft (Pattern Quantity 3 Feet, Product ID: H17-I22-24FT)
- 28 Gauge Round Silver Plated Silver Copper Craft Wire – 45 ft (Pattern Quantity 36 Feet, Product ID: H17-I28-45FT)
- 18 Gauge Round Silver Plated Silver Copper Craft Wire – 12 ft (Pattern Quantity 4 Feet, Product ID: H17-I18-12FT)
- 6mm moonstone round beads (Pattern Quantity 18 Pieces)
- 4mm Crystal 5000 Round Swarovski Crystal Beads – Pack of 12 (Pattern Quantity 18 Pieces, Product ID: A13-110)
Tools:
- Round Nose Wire Plier (Pattern Quantity 1 Pieces, Product ID: G2-507)
- Flat Nose Wire Plier (Pattern Quantity 1 Pieces, Product ID: G2-506)
- 5 inch Plato Slim Flush Cutters for Wire Working or Beading – Pack of 1 (Pattern Quantity 1 Pieces, Product ID: G35-3)
- Steel Bracelet Mandrels – Round (Pattern Quantity 1 Pieces, Product ID: MAN-216.00)
Directions:
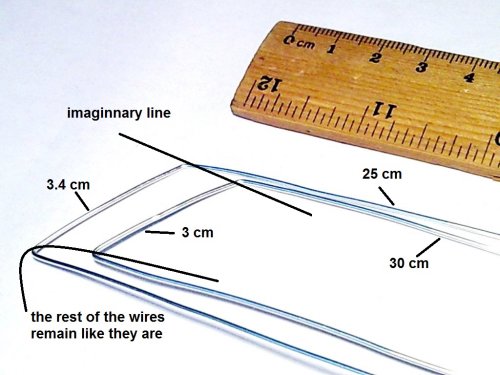
Step 1: Cut the 4 feet of 18g wire in half. I made some measurements when shaping the frame of the bangle, and I use metric, so grab a ruler with centimeters and follow along to my photo and measurements.
Take the 2 ft wires and bend one at 25cm, 3.4cm from the first bend, make a second bend. Take the other 2 ft wire and bend one at 30cm and then 3cm from that bend, make a second bend, as shown.
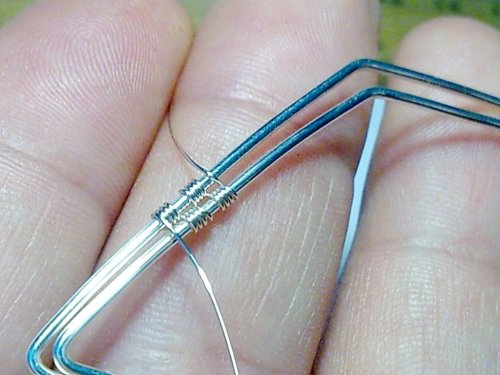
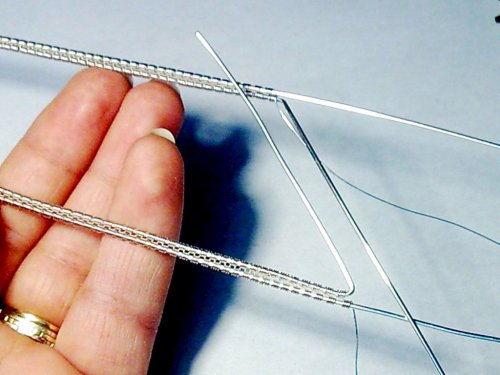
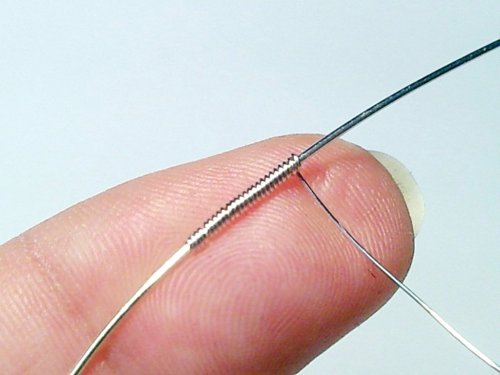
Step 2: Cut 23 feet of 28g wire and then cut that in half. The short end of each frame wire should be slanted a bit, as shown. Place the two frame wires one within the other. With one of the pieces of 28g wire, begin weaving at the middle of the short end of the frame, wrapping the way you see in the following pictures: 4 coils on one wire, 4 on the other. Continue weaving until you’ve woven 8.5″.
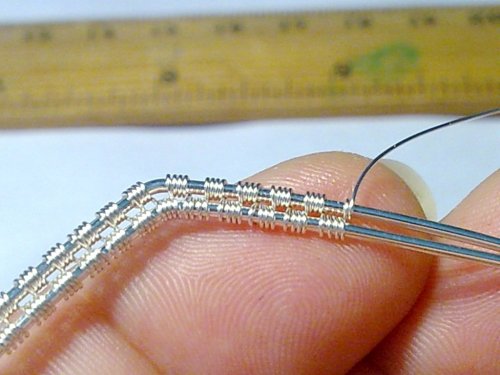
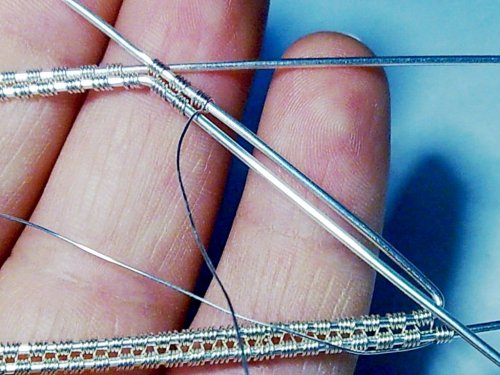
Step 3: With the second piece of 28g wire, begin weaving in the other direction, starting next to the first weave, and continuing down the other side of the frame wires for 8.5″.
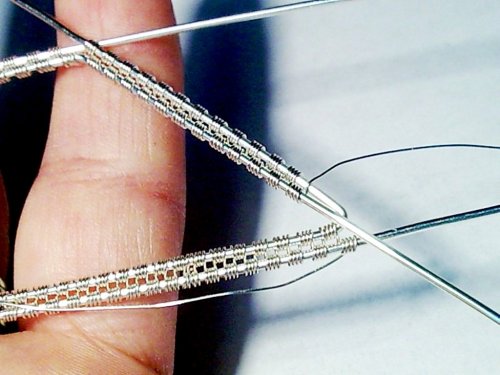
Step 4: Using chain-nose pliers, or flat-nose pliers, bend the two inner wires, side by side, to match the angle of the other end of the bracelet.

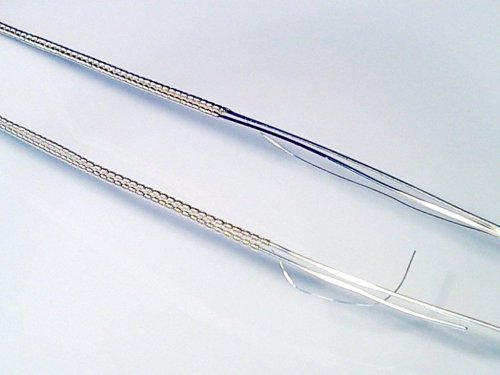
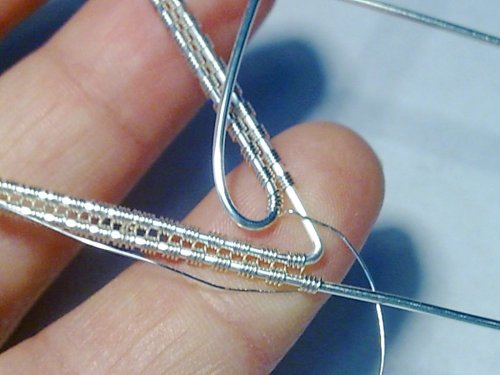
Step 5: Using the weaving wire left on the shorter side of the bracelet, continue the weaving around the corner and the length of the end.
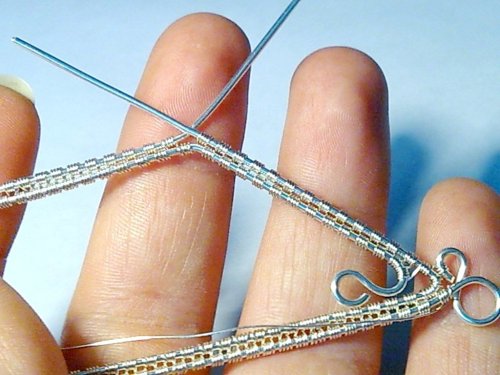
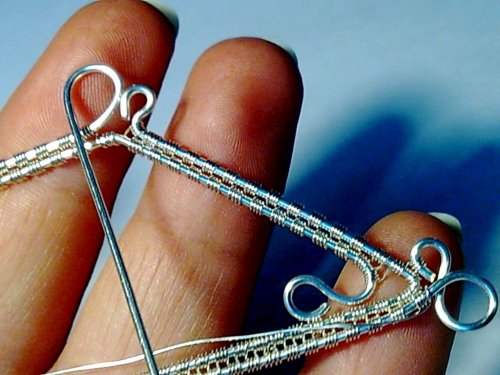
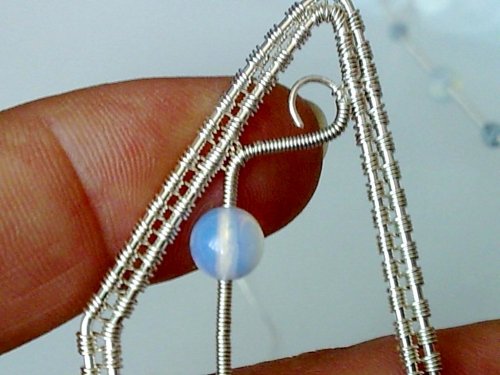
Step 6: Gently bend back the inner frame wire with your fingers, so the bend fits inside the sharp bend of the frame. Trim the wire to about an inch. Use round-nose pliers to make a small closed loop in the opposite direction. Then gently push it in place against the frame.
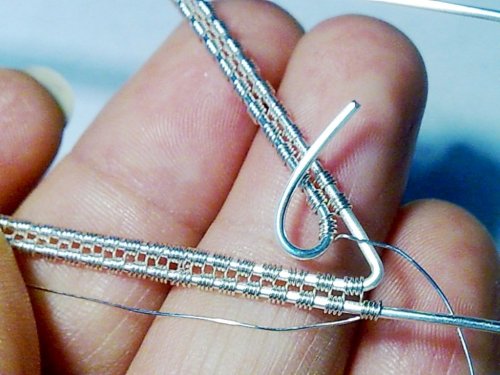
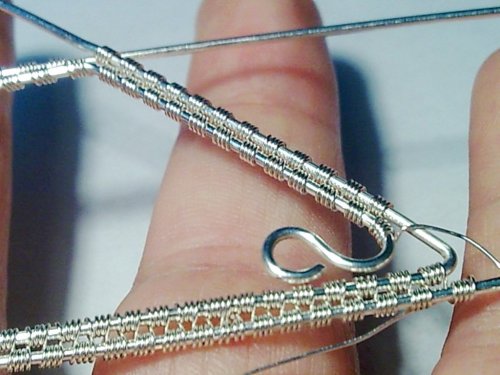
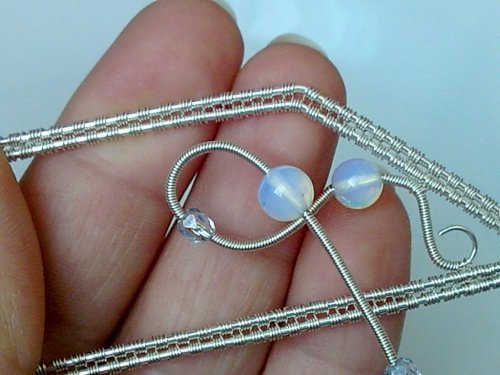
Step 7: With the outer wire, use round-nose pliers to create a figure-8, one larger loop next to a smaller one, trim and press it against the frame.

Step 8: With the 28g weaving wire, weave the the small loop of the figure-8 to the frame wire.
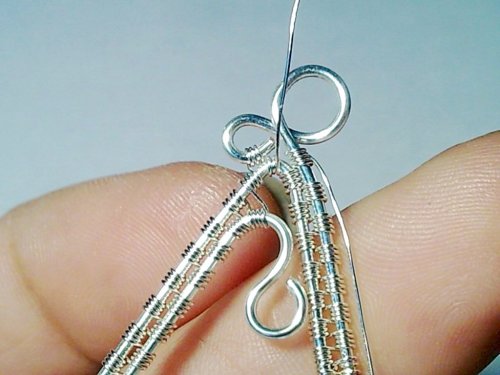
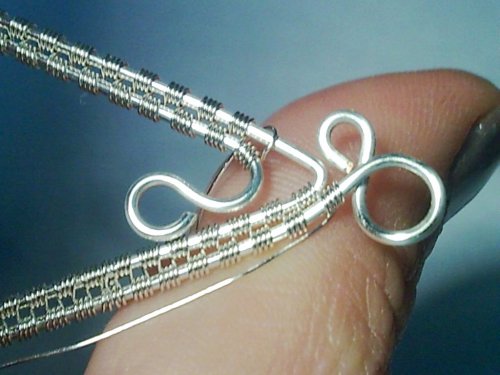
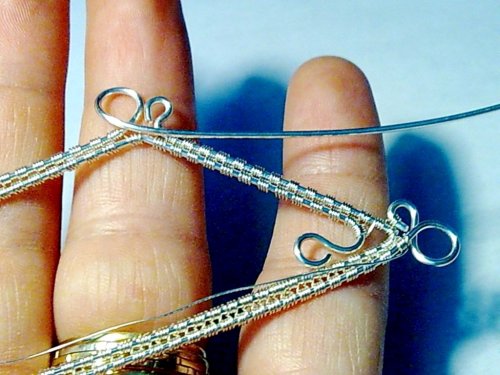
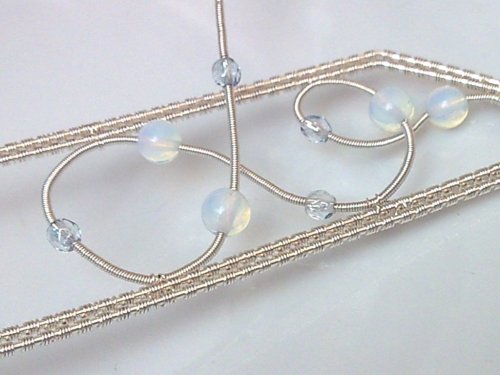
Step 9: On the other corner, use a round-nose pliers to create a loop with the frame wire along the long side of the bracelet, as shown.
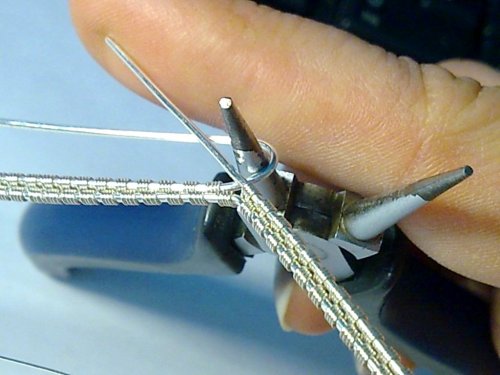
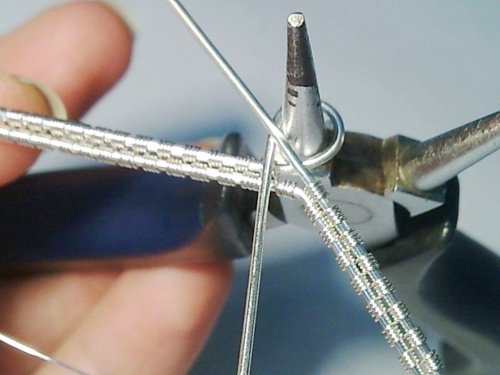
Step 10: Trim the frame wire on the short end of the bracelet to about 1/4″ and using round-nose pliers, make a small loop that sits next to the larger one you just made.
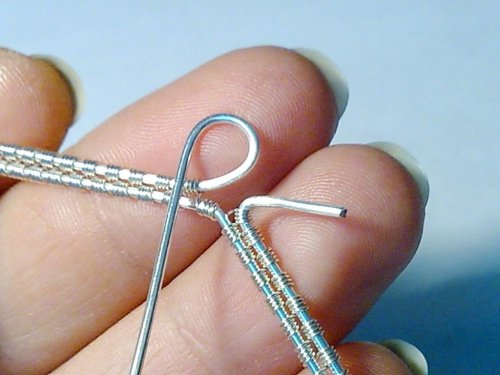
Step 11: Before trimming the long frame wire, gently wrap it around the length of the end, like a vine, for embellishment. Wrap the end snugly around the frame and trim. Pinch closed with chain-nose pliers.
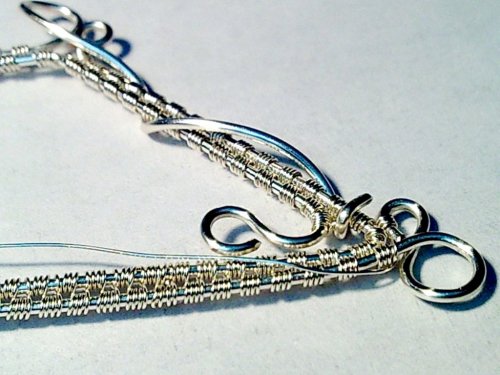
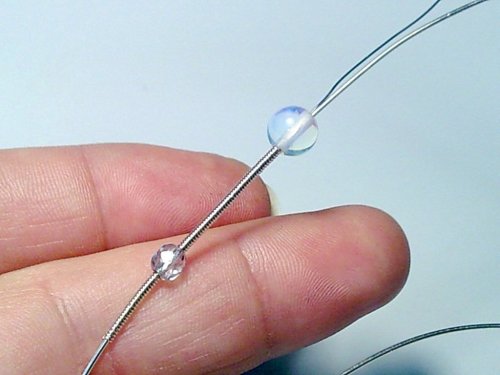
Step 12: Now we’ll coil the 22g length of wire with the remaining 28g wire. Coil tightly and snugly around the 22g wire, and alternate adding a crystal and then a moonstone bead every 3/4″-1″ for the length of the wire. Be sure to string the beads over both the core wire and the 28 wrapping wire, then continue coiling after each bead.
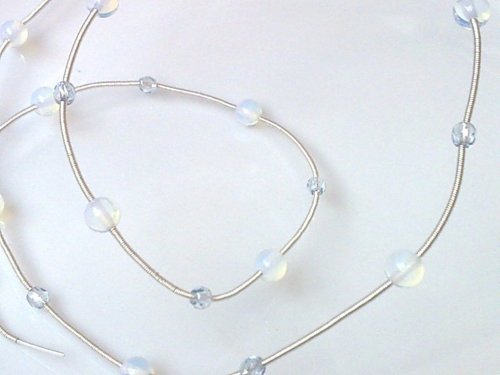
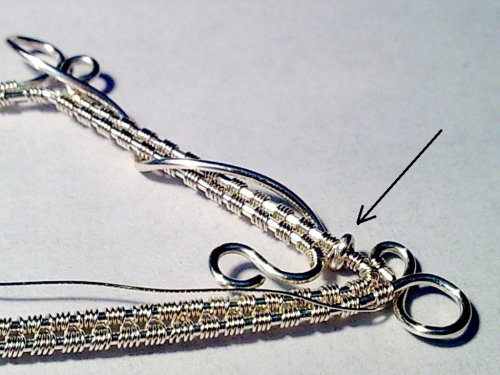
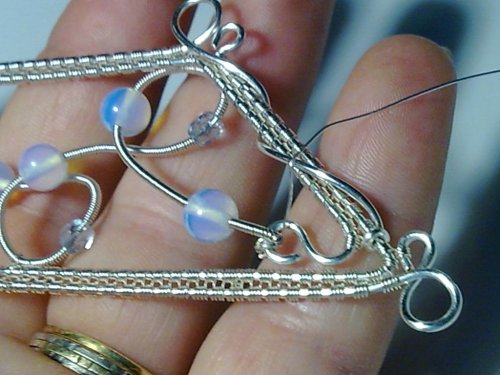
Step 13: Make a small loop at one end of the coiled wire and use the remaining 28g wire to secure it tightly to the frame with a few wraps. Bend this coiled wire in loops and curls, in a freeform design. As the bends touch the frame, secure them with some wrapping wire, as shown in these photos.

Step 14: Continue to loop and bend and attach with 28g wire. When you reach the other end of the bracelet, wrap the 22g wire around the inside loop of the frame, and trim and pinch in all wire ends. Trim any loose wires elsewhere.

Step 15: Using a bracelet mandrel or soup can, bend the bracelet around the can, bending the ends past each other.

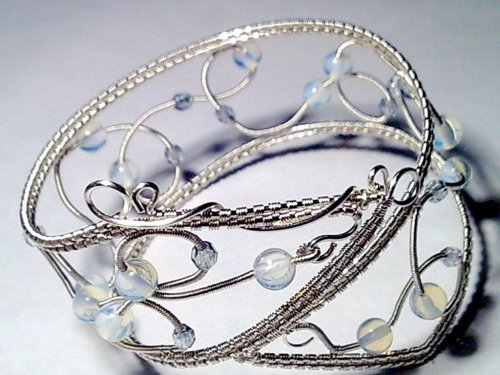
Happy Wrapping!
![]()
Click to Receive Daily Tips by Email
4 Comments

Wire Jewelry Ideas
-
 See Yourself as a Creative Thinker-Part IV By Karen Meador, PhD
Wire Jewelry Article for September 27th, 2017 If...
- September 27, 2017
-
 See Yourself as a Creative Thinker-Part III By Karen Meador, PhD
Wire Jewelry Article for September 20th, 2017 If...
- September 20, 2017
-
 See Yourself as a Creative Thinker-Part II By Karen Meador, PhD
Wire Jewelry Article for September 13th, 2017 If you...
- September 13, 2017
-
 See Yourself as a Creative Thinker By Karen Meador PhD
Wire Jewelry Article for September 6th, 2017 This is...
- September 6, 2017

Design & Inspiration
-
 Free Pattern: Smile Cluster Necklace by Karen Meador
by Judy Ellis, Wirejewelry.com Wire Jewelry Pattern for August...
- August 7, 2017
-
 Free Pattern: Long crystal round maille earrings by Kylie Jones
by Judy Ellis, Wirejewelry.com Wire Jewelry Pattern for August...
- August 3, 2017
-
 Free Pattern: Stone Twist Wrap by Karen Meador
by Judy Ellis, Wirejewelry.com Wire Jewelry Pattern for July...
- July 31, 2017
-
 Free Pattern: Floating Bead Earrings By Kimberly Newman
by Judy Ellis, Wirejewelry.com Wire Jewelry Pattern for July...
- July 27, 2017
Featured Tools
-
 Get to Know Your Hand Tools – Tube-Cutting Jig By Helen I. Driggs
by Judy Ellis, Wirejewelry.com Wire Jewelry Tip for August...
- August 4, 2017
-
 Wire Jewelry Video: Using Punch Pliers by Judy Freyer Thompson
by Judy Ellis, Wirejewelry.com Wire Jewelry Tip for August...
- August 2, 2017
-
 Wire Jewelry Video: Aligning a Hole Punch by Judy Freyer Thompson
by Judy Ellis, Wirejewelry.com Wire Jewelry Tip for July...
- July 26, 2017
-
 Get to Know Your Hand Tools – Wire Cutters – Helen I. Driggs
by Judy Ellis, Wirejewelry.com Wire Jewelry Tip for July...
- July 25, 2017
Jacky O'Callaghan
August 14, 2017 at 8:24 am
This is gorgeous, and your instructions and photos are so clear. Thank you.
Lisa Tulla
August 14, 2017 at 11:03 pm
I would really like to receive more patterns. I’m new at jewelry making and I’m excited about all of the potential projects. The step by step pictures are great!
Karen Meador
August 15, 2017 at 5:43 am
The pictures in this tutorial are outstanding. Thanks for sharing.
Linda Regulski
August 16, 2017 at 10:17 am
Thank you for this wonderful tutorial, it is simply stunning!