


- NEW DVD Series – Stone Setting with Bezels
- Tube Set Charm by Kim St. Jean
- Prong Basket Pendant by Kim St. Jean
- NEW DVD Series – Stone Setting with Cold Connections
- New DVD Series – Stone Setting with Wire
- NEW DVD Series: Introduction to Stone Setting by Kim St. Jean
- Featured Tool: Bracelet Bending Plier
- NEW Dvd by Eva Sherman
- Fun, Fast Fold Forming DVD Series
- Double Band Ear Cuff from Alex Simkin
The Five Cs of Wire Wrapping: Step 2 Connect By Melissa Cable

by Judy Ellis, Wirejewelry.com
Wire Jewelry Tip for June 21st, 2017
The Five “Cs” of Wire Wrapping: Step 2 Connect
by Melissa Cable
The next step in our in-depth look at the perfect wire wrapped loop is how to connect wire loops together. At this point, your circle is still open so you can slide a piece of chain, closed jump ring, component, or another wire wrapped loop into the circle before coiling it closed in Step 3. Of course, the loops on many jump rings and earwires can be opened, so you can complete your wire wrapped loop before connecting them to these types of components.
In this step, we will learn HOW to connect and WHEN to connect. But first, let’s review the parts of the circle we created in Step 1.
We have a CIRCLE with a TAIL and a longer wire BASE.
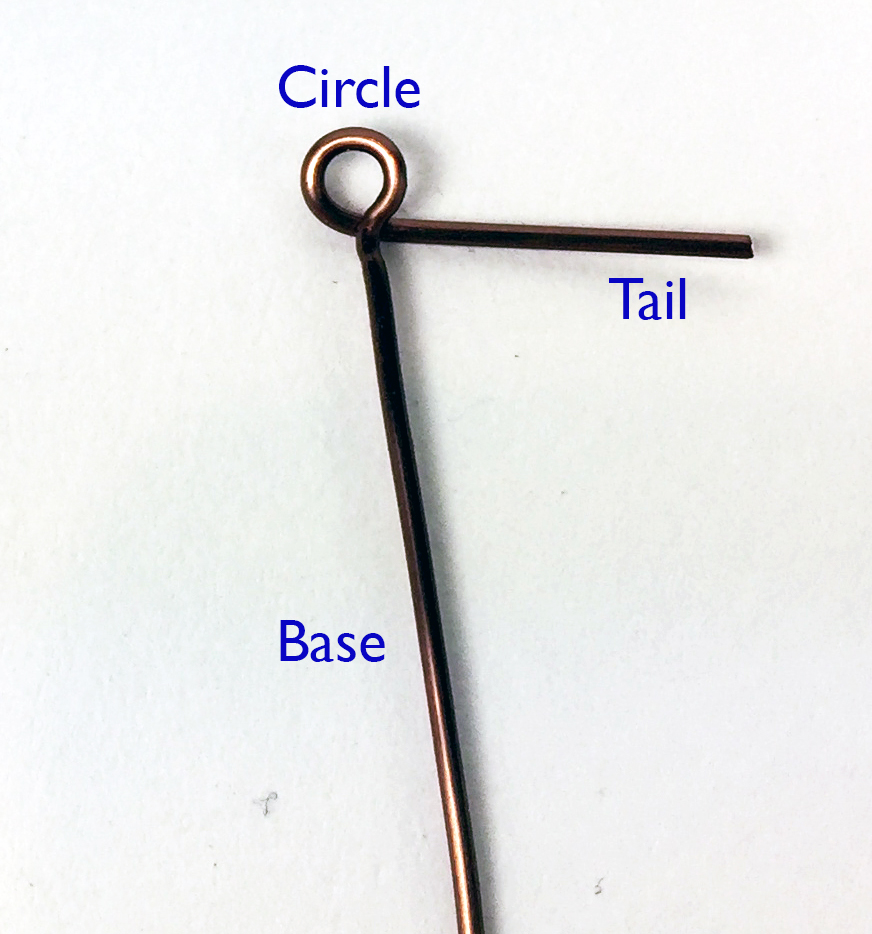
Make sure to not confuse your tail and the base. You risk not having enough wire to hold the bead. To get an idea of how we will be using each of these parts, next week in Step 3, we will coil the tail around the base and add a bead. Then, we’ll make another wire wrapped loop on the other side of the bead using what is left of the base.
HOW to connect
After creating a circle, place the tail into the loop of the connector (the item you are connecting to, in this case, a wire wrapped segment). Notice in the photo how I am holding the tail between my thumb and forefinger and the base between my thumb and middle finger.
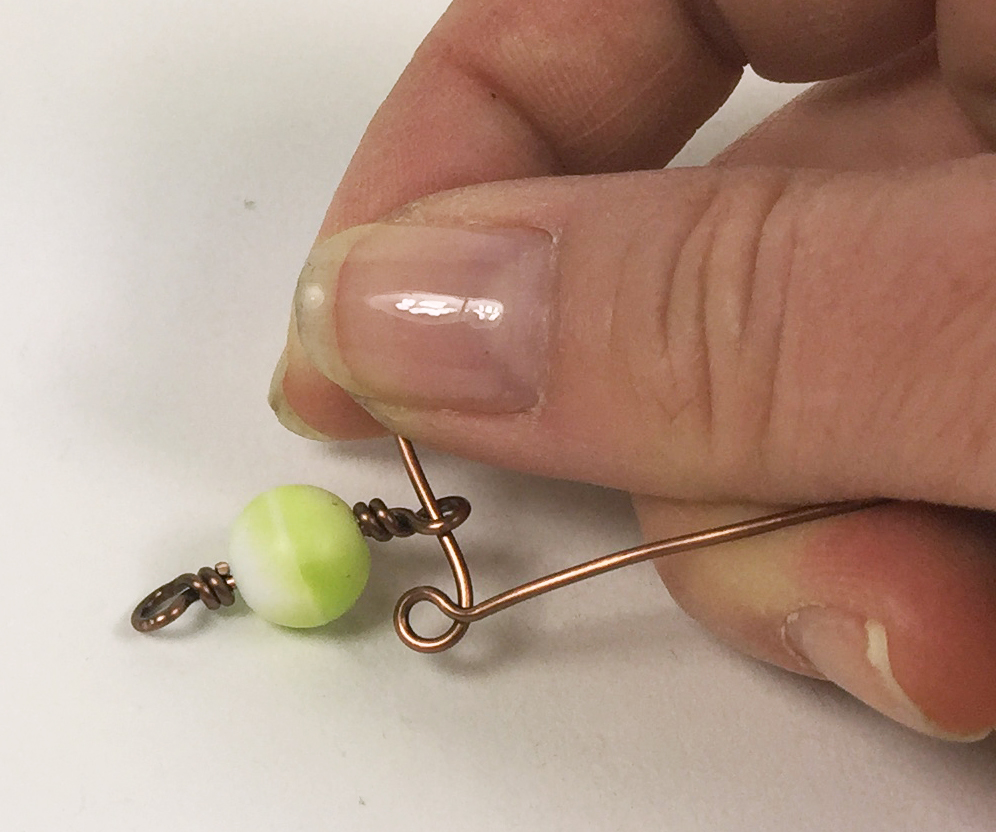
Holding everything in place minimizes the circle becoming misshapen when you pull the connector into the circle through the space where the circle and base intersect.
WHEN to connect: Build-as-you-go method
I prefer the build-as-you-go method because it allows me to see the project take shape as I work. In this method, you start at one end and connect the pieces together until you reach the desired length. Other times you may start in the center and work your way outward from each side so that the design remains balanced. Either way, you are connecting after every other wrap. For example:
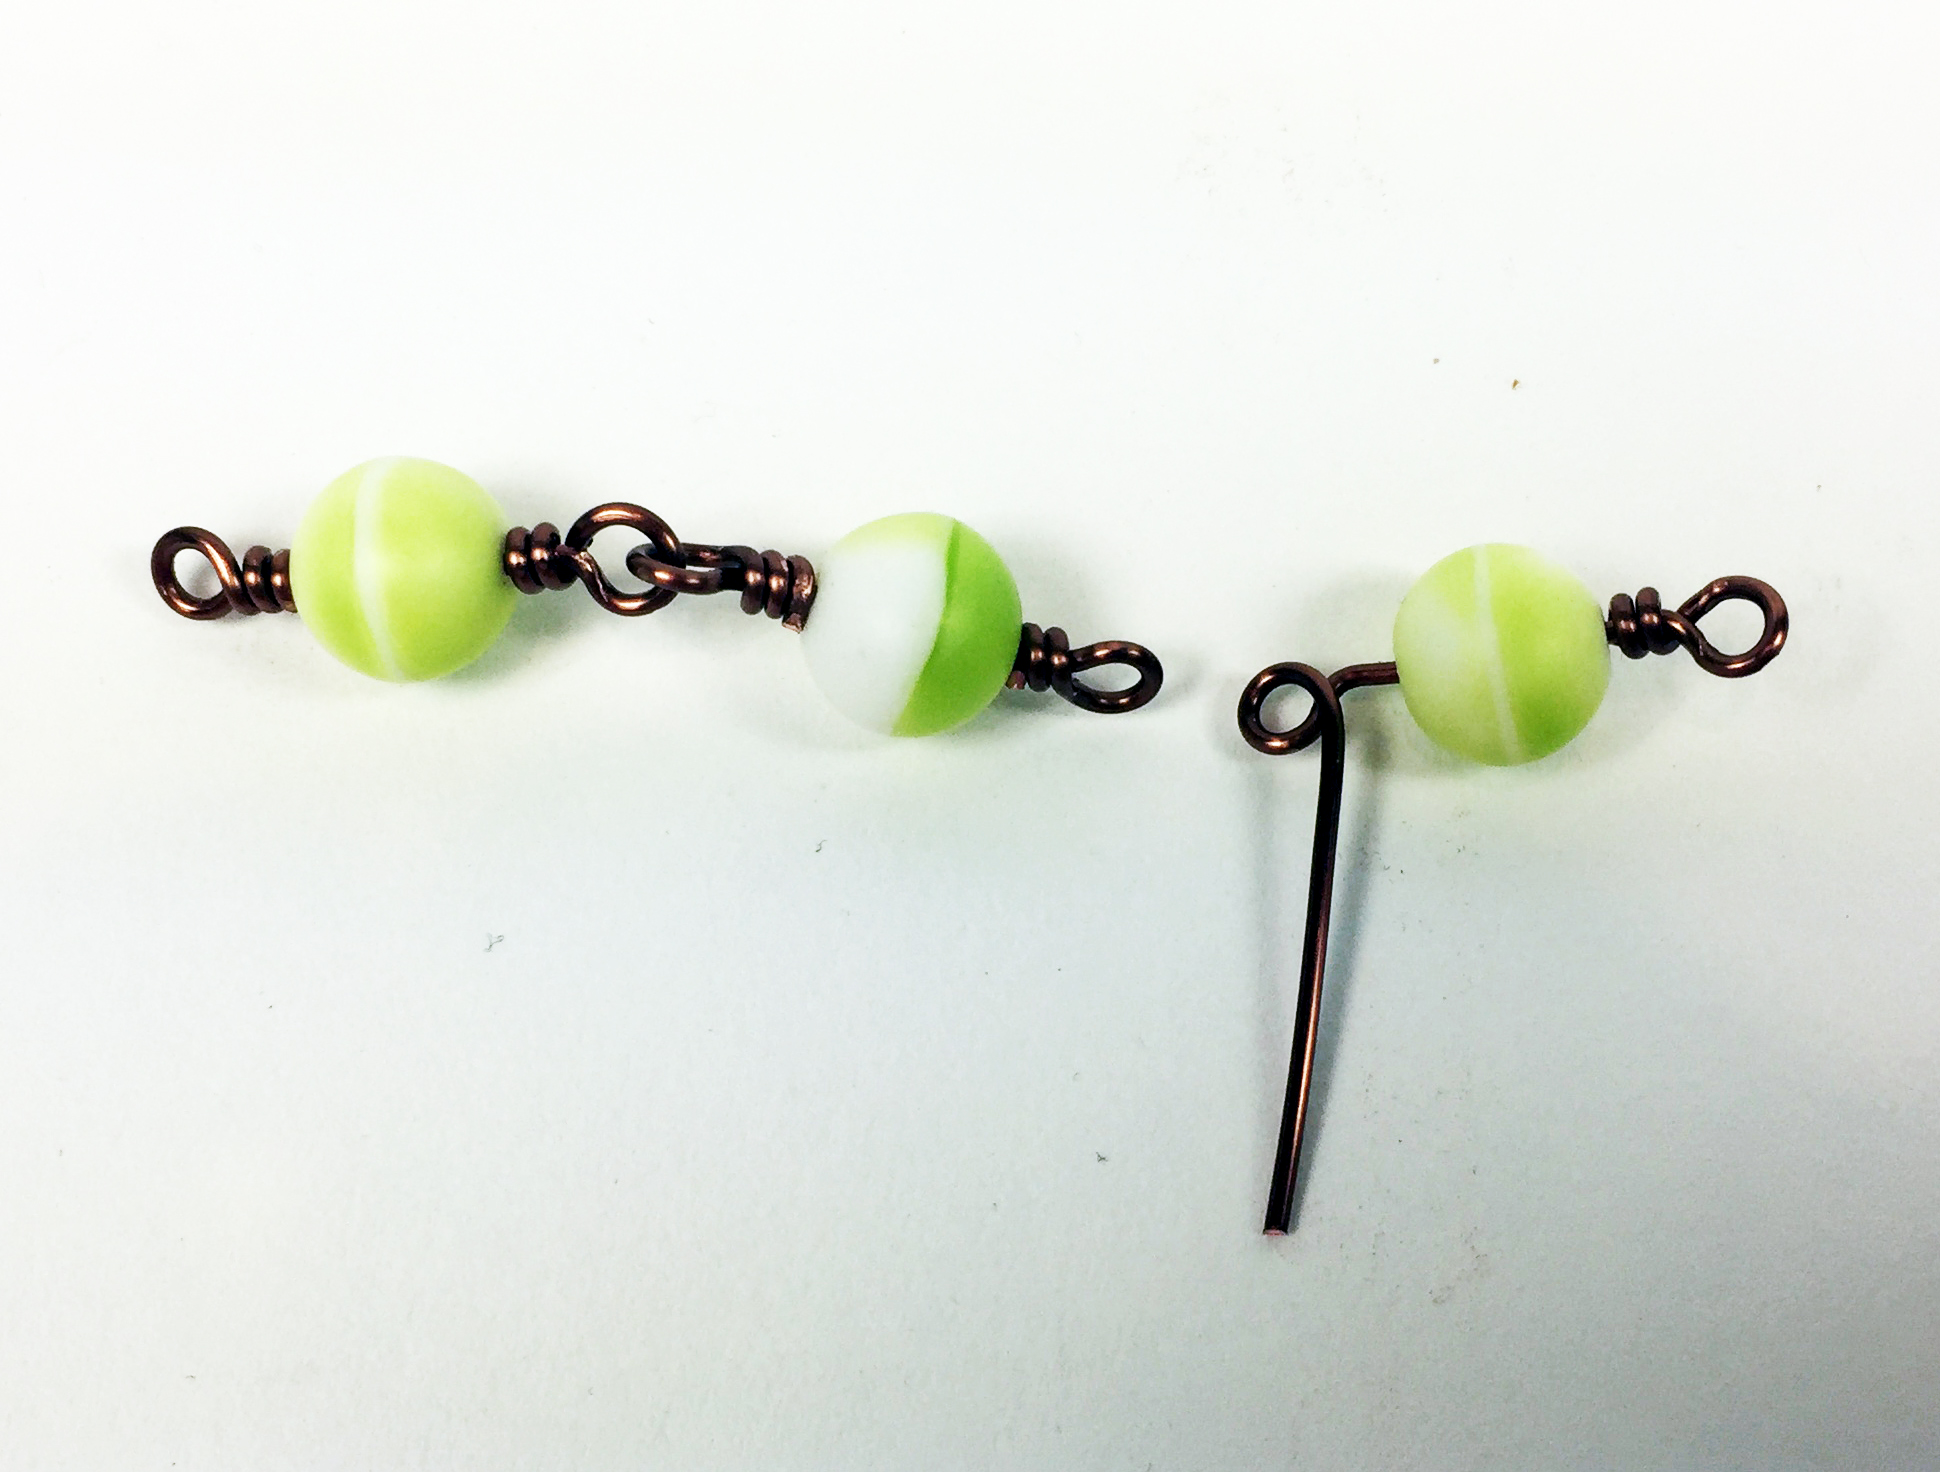
Segment 1: Create a wire wrapped loop, load a bead onto the wire, create a second wire wrapped loop on the other side of the bead.
Rest of Segments: Create a wire wrapped loop, load a bead onto the wire, create a circle, connect it to the previous segment, finish your “Cs” (coil, cover, then cut and clean)
Why?
I always connect on the second circle because this means I have one fewer step where pesky previous segments are hanging in my way while I am coiling. If I connect while making the first circle of a new segment, I have the previous segments hanging for both the first and second wire wrapped loop.
WHEN to Connect: Assembly-line method
Once you are comfortable with a design, and you do not need to see it take shape as you progress, you can work in assembly-line fashion. Simply complete both wire wrapped loops for every other segment and skip connecting them to something. Then, for the segments in between, do the opposite – connect on both ends.

Why?
It’s the same number of wraps and connections, right? It is indeed. But, by breaking it into repetitive tasks, you will find that your speed increases as you specialize in that task. And hey, if you add a little music, according to one of my favorite magazines, you may even go faster!
You’ve now completed two of the five steps to perfect wire wrapped loops!
Step 1: Circle
Step 2: Connect
Coming Up!
Step 3: Coil
Step 4: Cover then Cut
Step 5: Clean
Happy Wrapping!
![]()
Click to Receive Daily Tips by Email

Wire Jewelry Ideas
-
 See Yourself as a Creative Thinker-Part IV By Karen Meador, PhD
Wire Jewelry Article for September 27th, 2017 If...
- September 27, 2017
-
 See Yourself as a Creative Thinker-Part III By Karen Meador, PhD
Wire Jewelry Article for September 20th, 2017 If...
- September 20, 2017
-
 See Yourself as a Creative Thinker-Part II By Karen Meador, PhD
Wire Jewelry Article for September 13th, 2017 If you...
- September 13, 2017
-
 See Yourself as a Creative Thinker By Karen Meador PhD
Wire Jewelry Article for September 6th, 2017 This is...
- September 6, 2017

Design & Inspiration
-
 Free Pattern: Smile Cluster Necklace by Karen Meador
by Judy Ellis, Wirejewelry.com Wire Jewelry Pattern for August...
- August 7, 2017
-
 Free Pattern: Long crystal round maille earrings by Kylie Jones
by Judy Ellis, Wirejewelry.com Wire Jewelry Pattern for August...
- August 3, 2017
-
 Free Pattern: Stone Twist Wrap by Karen Meador
by Judy Ellis, Wirejewelry.com Wire Jewelry Pattern for July...
- July 31, 2017
-
 Free Pattern: Floating Bead Earrings By Kimberly Newman
by Judy Ellis, Wirejewelry.com Wire Jewelry Pattern for July...
- July 27, 2017
Featured Tools
-
 Get to Know Your Hand Tools – Tube-Cutting Jig By Helen I. Driggs
by Judy Ellis, Wirejewelry.com Wire Jewelry Tip for August...
- August 4, 2017
-
 Wire Jewelry Video: Using Punch Pliers by Judy Freyer Thompson
by Judy Ellis, Wirejewelry.com Wire Jewelry Tip for August...
- August 2, 2017
-
 Wire Jewelry Video: Aligning a Hole Punch by Judy Freyer Thompson
by Judy Ellis, Wirejewelry.com Wire Jewelry Tip for July...
- July 26, 2017
-
 Get to Know Your Hand Tools – Wire Cutters – Helen I. Driggs
by Judy Ellis, Wirejewelry.com Wire Jewelry Tip for July...
- July 25, 2017
0 comments