


- NEW DVD Series – Stone Setting with Bezels
- Tube Set Charm by Kim St. Jean
- Prong Basket Pendant by Kim St. Jean
- NEW DVD Series – Stone Setting with Cold Connections
- New DVD Series – Stone Setting with Wire
- NEW DVD Series: Introduction to Stone Setting by Kim St. Jean
- Featured Tool: Bracelet Bending Plier
- NEW Dvd by Eva Sherman
- Fun, Fast Fold Forming DVD Series
- Double Band Ear Cuff from Alex Simkin
The Five “Cs” of Wire Wrapping: The Circle By Melissa Cable

by Judy Ellis, Wirejewelry.com
Wire Jewelry Tip for June 14th, 2017
The Five “Cs” of Wire Wrapping: The Circle
by Melissa Cable
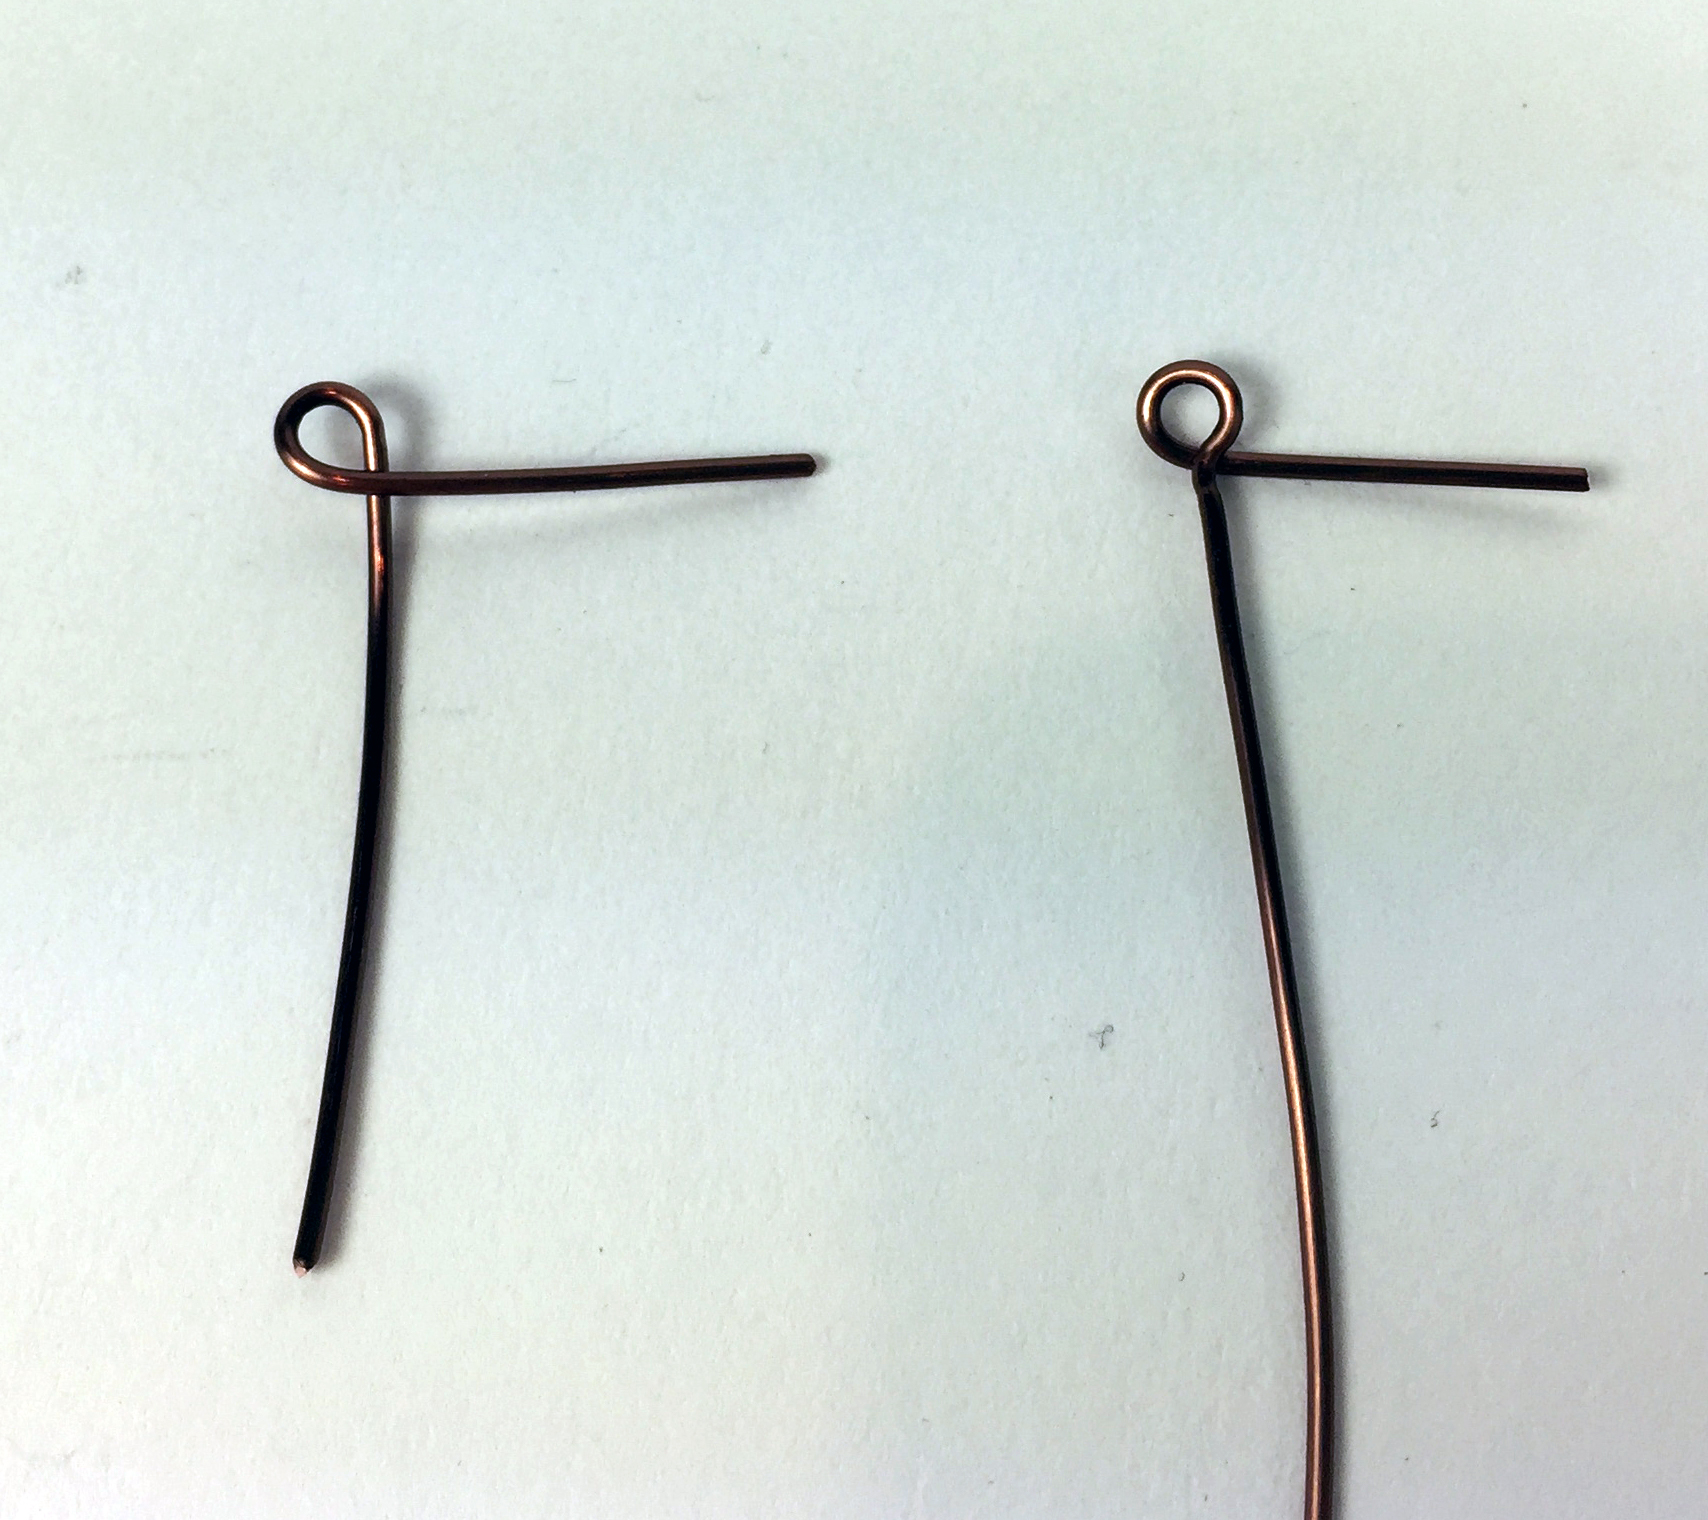
We’re back with Step 1 of consistent wire wrapped loops: the circle. Creating the perfect circle means that the wire loop is centered over the wire. Notice the difference between the photos. One circle looks more like a backwards “P” while the other loop is a circle centered neatly over the rest of the wire.
To achieve this quality, your movements will alternate between the pliers and wire.
Step 1: Circle
Over the next 5 lessons, we’ll create a wire wrapped segment with an 8mm bead in the middle. Start with a 3” piece of wire of any gauge.
Pliers: with the round nose pliers in your dominate hand, grab the wire approximately 1.25” from the end, holding the pliers so they are parallel to the table
Wire: push the wire away from you so it rests at a 90 degree angle (it will point directly away from you)
Pliers: holding onto the wire with your other hand, open the pliers and rotate them away from you 45 degrees. Close the pliers.
Wire: pull the wire towards you and around the top of the pliers (it will point straight down at the table)
Pliers: holding onto the wire with your other hand again, open the pliers and rotate them toward you 45 degrees. Close the pliers. The plier will return to its original position, parallel to the table.
Wire: Push the wire under the pliers on the right side (the tip side of the pliers). Left handed students may find it helpful to push the wire under on the left side, away from the tip of the pliers.
Why?
The act of rotating your pliers away from you is what creates the 45 degree bend in the wire at the point where the wire and circle meet. That bend centers the circle neatly over the wire, preventing it from looking like a P.
Pushing the wire underneath the pliers on the tip side means that in Step 3, when you start to wrap the coil, you will be wrapping towards you. I like to see what is coming! If you want to wrap away from you, push the wire underneath on the right side of the wire, away from the tip of the pliers.
Tip
If you want a consistent sized circle every time, mark your pliers with a Sharpie marker or a piece of masking tape. Even easier, consider purchasing a stepped round nose plier. These pliers have stepped jaws versus the graduated jaws of a standard pair of round nose pliers.
Coming Up in the Coming Weeks!
Five Lessons to Perfect Wire Wrapped Loops
Lesson 1: Circle
Lesson 2: Connect
Lesson 3: Coil
Lesson 4: Cover then Cut
Lesson 5: Clean
Happy Wrapping!
![]()
Click to Receive Daily Tips by Email
3 Comments

Wire Jewelry Ideas
-
 See Yourself as a Creative Thinker-Part IV By Karen Meador, PhD
Wire Jewelry Article for September 27th, 2017 If...
- September 27, 2017
-
 See Yourself as a Creative Thinker-Part III By Karen Meador, PhD
Wire Jewelry Article for September 20th, 2017 If...
- September 20, 2017
-
 See Yourself as a Creative Thinker-Part II By Karen Meador, PhD
Wire Jewelry Article for September 13th, 2017 If you...
- September 13, 2017
-
 See Yourself as a Creative Thinker By Karen Meador PhD
Wire Jewelry Article for September 6th, 2017 This is...
- September 6, 2017

Design & Inspiration
-
 Free Pattern: Smile Cluster Necklace by Karen Meador
by Judy Ellis, Wirejewelry.com Wire Jewelry Pattern for August...
- August 7, 2017
-
 Free Pattern: Long crystal round maille earrings by Kylie Jones
by Judy Ellis, Wirejewelry.com Wire Jewelry Pattern for August...
- August 3, 2017
-
 Free Pattern: Stone Twist Wrap by Karen Meador
by Judy Ellis, Wirejewelry.com Wire Jewelry Pattern for July...
- July 31, 2017
-
 Free Pattern: Floating Bead Earrings By Kimberly Newman
by Judy Ellis, Wirejewelry.com Wire Jewelry Pattern for July...
- July 27, 2017
Featured Tools
-
 Get to Know Your Hand Tools – Tube-Cutting Jig By Helen I. Driggs
by Judy Ellis, Wirejewelry.com Wire Jewelry Tip for August...
- August 4, 2017
-
 Wire Jewelry Video: Using Punch Pliers by Judy Freyer Thompson
by Judy Ellis, Wirejewelry.com Wire Jewelry Tip for August...
- August 2, 2017
-
 Wire Jewelry Video: Aligning a Hole Punch by Judy Freyer Thompson
by Judy Ellis, Wirejewelry.com Wire Jewelry Tip for July...
- July 26, 2017
-
 Get to Know Your Hand Tools – Wire Cutters – Helen I. Driggs
by Judy Ellis, Wirejewelry.com Wire Jewelry Tip for July...
- July 25, 2017
Janet
June 14, 2017 at 12:10 pm
I’ve never seen a better description of these steps or better explanation of why. Thank you!
Melissa Cable
June 16, 2017 at 1:58 pm
My pleasure Janet! Be sure to look for the next 4 steps in the coming weeks.
Cindy
June 14, 2017 at 7:00 pm
Wonderful explanation of how to get it perfect every time. I struggled with this. Now I understand why. Thanks!