


- NEW DVD Series – Stone Setting with Bezels
- Tube Set Charm by Kim St. Jean
- Prong Basket Pendant by Kim St. Jean
- NEW DVD Series – Stone Setting with Cold Connections
- New DVD Series – Stone Setting with Wire
- NEW DVD Series: Introduction to Stone Setting by Kim St. Jean
- Featured Tool: Bracelet Bending Plier
- NEW Dvd by Eva Sherman
- Fun, Fast Fold Forming DVD Series
- Double Band Ear Cuff from Alex Simkin
A New Idea for Starting a Chainmail Weave by Marilyn Gardiner

by Judy Ellis, Wirejewelry.com
Wire Jewelry Tip for May 19th, 2017
A New Idea for Starting a Chainmail Weave
by Marilyn Gardiner
The starting rings of some chainmail weaves are very difficult to keep in order so they don’t just become a messy jumble when you pick them up and try to find where to put that next jump ring.
One way to do this is by punching holes is an old credit card or loyalty card for the starting rings. Another is to wrap them in painter’s tape so they don’t move.
While browsing in a craft store I noticed a package of 10 small squares of flexible, plastic canvas (7-count) intended for needlepoint. It is very inexpensive. I also found Pinterest pages and e-books with tons of creative ideas for using them.
I bought a package and started experimenting. First, I cut the 4” square into 4 pieces.
Here’s how I started the European 4-1 weave (one ring at a time method):
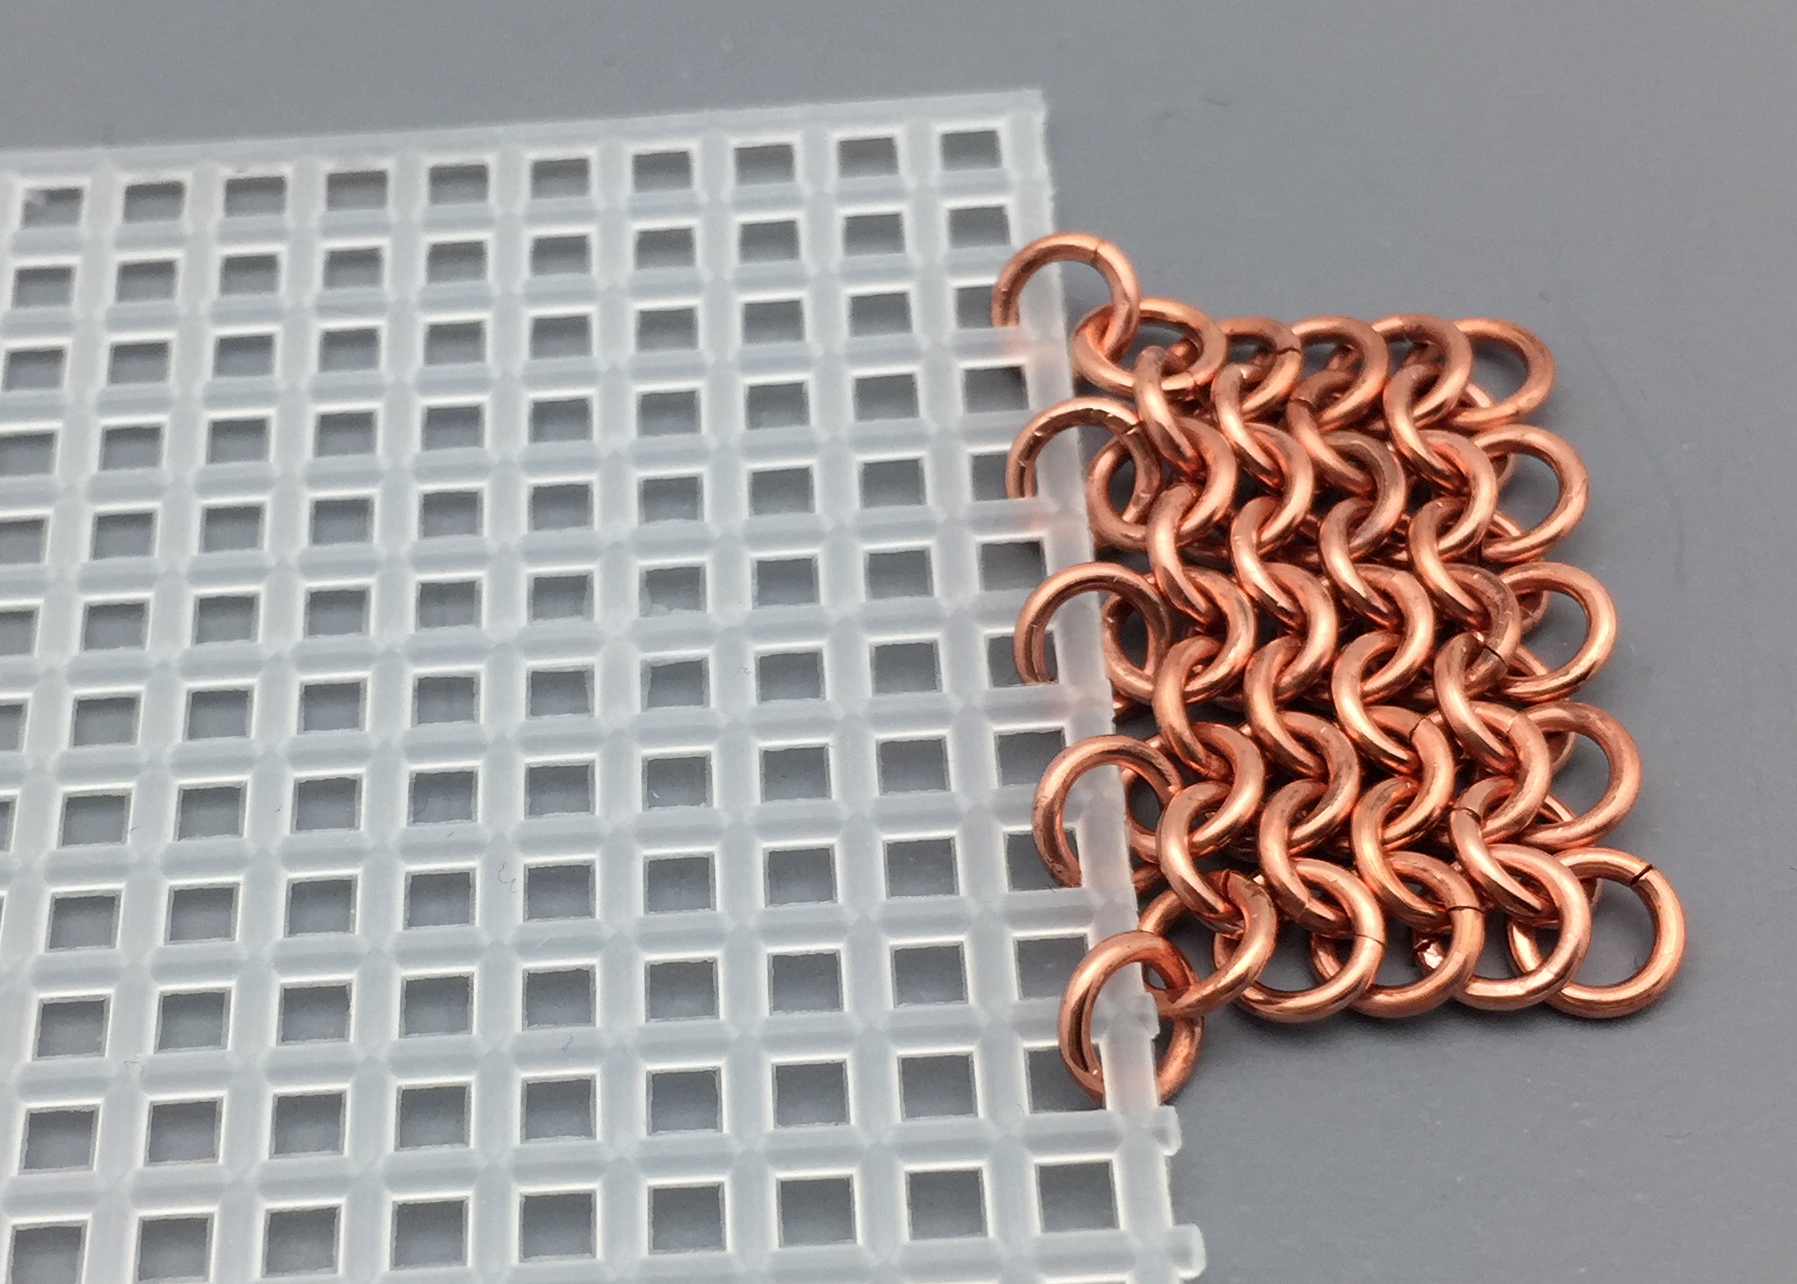
You’ll notice that I used 5 extra rings to attach the starting row to the canvas, and that I used alternate holes. (There are 7 holes to the inch.) The main copper rings are 18 awg, 3.5 mm ID. The attaching rings are 4 mm ID. I tried adding the starting row to the canvas, but it was too tight.
Next I thought I’d try a round weave: Roundmaille.

There are 3 connection points for this weave, so I positioned the first two at a corner so I could use 2 edge holes. Then the third point of the triangle was easy to place.
I could also use this method to start Turkish Roundmaille and Inverted Roundmaille.
The third example is an advanced level weave called Oops.

I used 16 awg, 5 mm ID rings, and it worked perfectly to add the starting row directly to the canvas, without skipping holes or it being too tight.
I cut the 4 inch squares into 4 pieces, but now I can see that they could be much smaller and still work well.
I plan to continue looking back at weaves I teach to see if this canvas can improve the ease of beginning a new weave for students.
Happy Wrapping!
![]()
Click to Receive Daily Tips by Email
4 Comments

Wire Jewelry Ideas
-
 See Yourself as a Creative Thinker-Part IV By Karen Meador, PhD
Wire Jewelry Article for September 27th, 2017 If...
- September 27, 2017
-
 See Yourself as a Creative Thinker-Part III By Karen Meador, PhD
Wire Jewelry Article for September 20th, 2017 If...
- September 20, 2017
-
 See Yourself as a Creative Thinker-Part II By Karen Meador, PhD
Wire Jewelry Article for September 13th, 2017 If you...
- September 13, 2017
-
 See Yourself as a Creative Thinker By Karen Meador PhD
Wire Jewelry Article for September 6th, 2017 This is...
- September 6, 2017

Design & Inspiration
-
 Free Pattern: Smile Cluster Necklace by Karen Meador
by Judy Ellis, Wirejewelry.com Wire Jewelry Pattern for August...
- August 7, 2017
-
 Free Pattern: Long crystal round maille earrings by Kylie Jones
by Judy Ellis, Wirejewelry.com Wire Jewelry Pattern for August...
- August 3, 2017
-
 Free Pattern: Stone Twist Wrap by Karen Meador
by Judy Ellis, Wirejewelry.com Wire Jewelry Pattern for July...
- July 31, 2017
-
 Free Pattern: Floating Bead Earrings By Kimberly Newman
by Judy Ellis, Wirejewelry.com Wire Jewelry Pattern for July...
- July 27, 2017
Featured Tools
-
 Get to Know Your Hand Tools – Tube-Cutting Jig By Helen I. Driggs
by Judy Ellis, Wirejewelry.com Wire Jewelry Tip for August...
- August 4, 2017
-
 Wire Jewelry Video: Using Punch Pliers by Judy Freyer Thompson
by Judy Ellis, Wirejewelry.com Wire Jewelry Tip for August...
- August 2, 2017
-
 Wire Jewelry Video: Aligning a Hole Punch by Judy Freyer Thompson
by Judy Ellis, Wirejewelry.com Wire Jewelry Tip for July...
- July 26, 2017
-
 Get to Know Your Hand Tools – Wire Cutters – Helen I. Driggs
by Judy Ellis, Wirejewelry.com Wire Jewelry Tip for July...
- July 25, 2017
Connie MacDonald
May 19, 2017 at 9:47 am
That’s great. I was taught to use a paper clip, now I have another way to try. Thanx
Barbara Anderson
May 19, 2017 at 10:48 am
Brilliant! I wish I had thought of that!
Emma Guy
May 19, 2017 at 11:24 am
Love these articles
Lolly
June 3, 2017 at 7:28 am
Way cool. Going to try this. Thanks for sharing.