


- NEW DVD Series – Stone Setting with Bezels
- Tube Set Charm by Kim St. Jean
- Prong Basket Pendant by Kim St. Jean
- NEW DVD Series – Stone Setting with Cold Connections
- New DVD Series – Stone Setting with Wire
- NEW DVD Series: Introduction to Stone Setting by Kim St. Jean
- Featured Tool: Bracelet Bending Plier
- NEW Dvd by Eva Sherman
- Fun, Fast Fold Forming DVD Series
- Double Band Ear Cuff from Alex Simkin
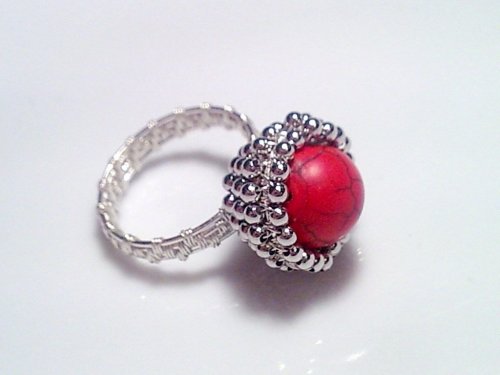
Free Pattern: Beaded Bezel Wire Ring

by Judy Ellis, Wirejewelry.com
Wire Jewelry Pattern for May 8th, 2017
Beaded Bezel Wire Ring
by Delilah
In this tutorial you will learn how to make a beautiful ring with silver plated wire, metal beads and a round focal bead. Note that this ring is not adjustable, so you’ll have to pay attention to the size wanted.

Materials:
- 2mm silver metal beads (Pattern Quantity – 72 Pieces)
- Matte Carnelian 12mm Round Beads – 8 Inch Strand (Pattern Quantity – 1 Piece, Product ID: A1-272 )
- 20 Gauge Round Silver Plated Silver Copper Craft Wire – 18 ft (Pattern Quantity – 16in Inches, Product ID: H17-I20-18FT )
- 28 Gauge Round Silver Plated Silver Copper Craft Wire – 45 ft (Pattern Quantity – 14ft Piece, Product ID: H17-I28-45FT )
Tools:
- Classic Wubbers Medium Flat Nose Pliers (Product ID: G2-1237)
- Classic Wubbers Chain Nose Pliers (Product ID: G2-1234)
- Classic Wubbers Round Nose Pliers (Product ID: G2-1235)
- Xuron Flush Cutter – Pack of 1 (Product ID: G2-504)
- Stainless Steel Ring Mandrel Sizes 1-15 (Product ID: G7-2 )
Directions:
Step 1: Holding one end of the 20g wire against the mandrel, wrap it 4 times, leaving the other end long.

Tip: I use a permanent marker as a mandrel, since I’ve already determined it’s the diameter I need. If you decide to use a mandrel, make sure you measure a smaller size than you need, because when removing the wires from the mandrel, they tend to open a bit, enlarging the ring about 1-2mm. The ring in this tutorial is about 19mm inner diameter and the permanent marker measures 17-18 mm, just to give you an idea.
If there are any more questions about the size, do please feel free to ask, and I’ll be more than glad to answer and help, if necessary.
Step 2: Using the 28g wire, we’ll weave the shank wires together, working from left to right. Start by wrapping the 28g wire 3 times around the first two shank wires. Leave about a 3ft tail of 28g wire, and start about an inch in from the short end of the shank wire. (Pic 2). Bring the 28g wire up between the first and second shank wire and cross over to the third shank wire. Wrap three times around the second and third wires (Pic 3-4). Bring the 28g wire up between the second and third shank wires and wrap three times around the third and the fourth wires (Pic 5).Then weave back again. Note that the wrapping wire should go under the next two shank wires in order to be in the right place to wrap the next two wires three times. Continue weaving back and forth across the shank wires
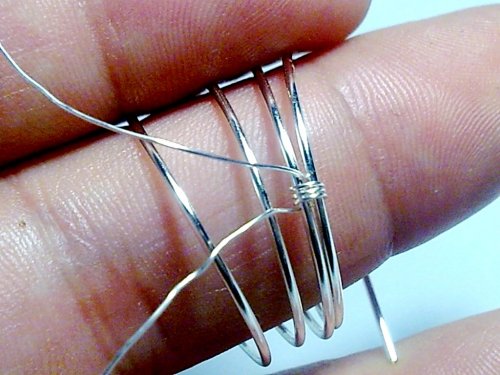
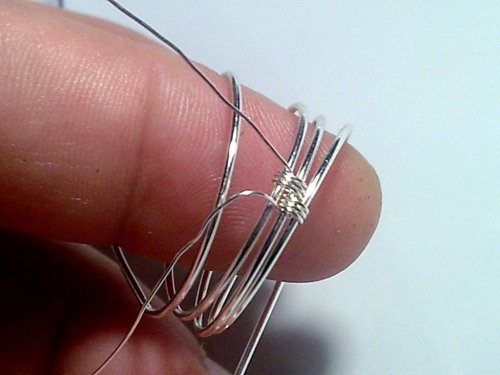
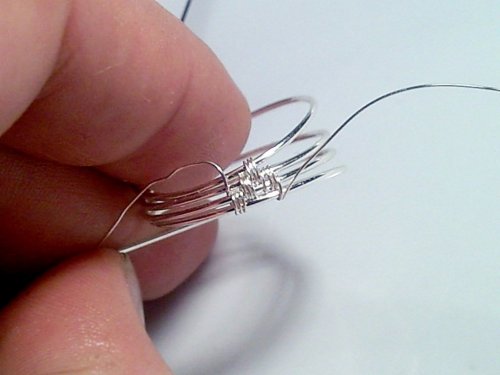

Step 3: Weave the 28g wire until all the shank wires are woven together. Leave ¼” of the short end shank wire unwoven.
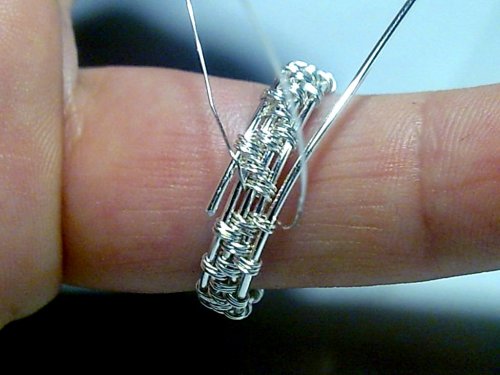
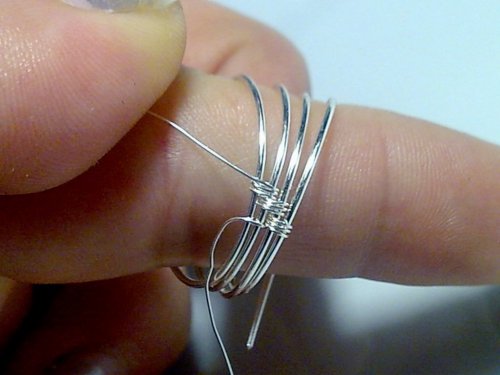
Step 4: Using round-nose pliers, make a small loop in the short end of the shank wire.
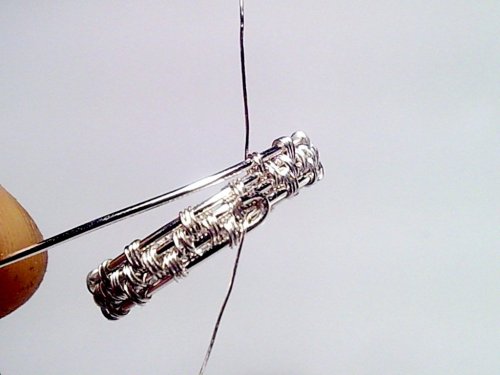
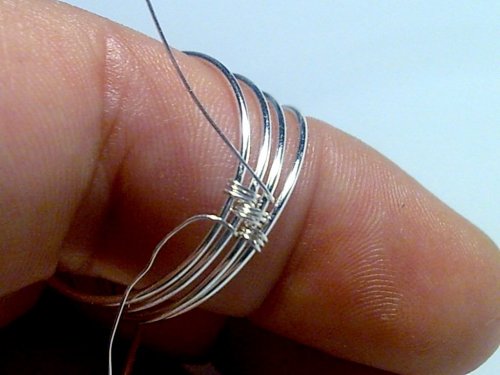
Step 5: Coil the 28g wire 5-6 times around the long shank wire.

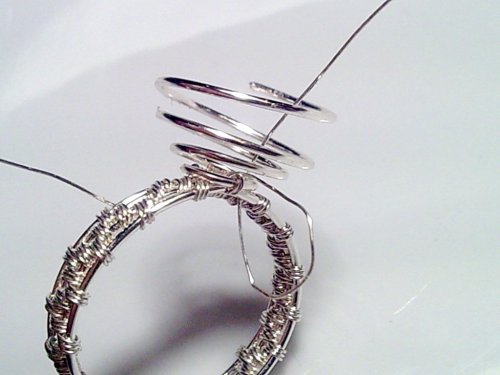
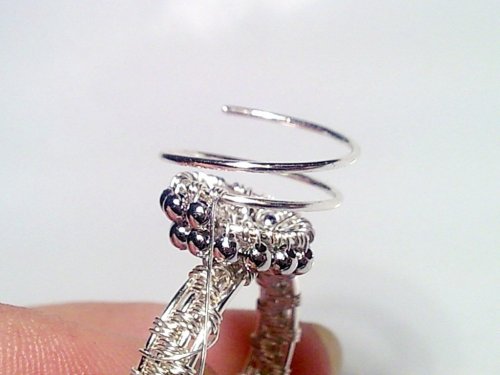
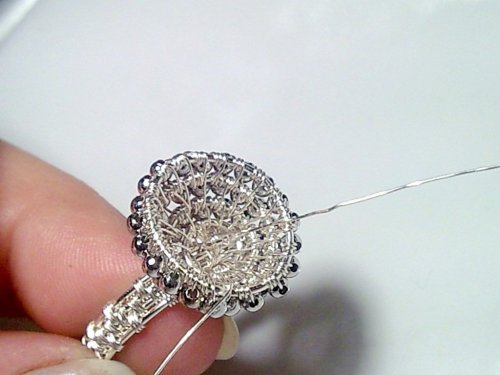
Step 6: Use the long end of the shank wire to create a 3D spiral to hold the focal bead. I used my fingers, but if you think you have something to help you, just use it. Start with a small circle and make each subsequent one a little larger. Note that the spiral must be as large as the focal bead, so keep testing the fit of the bead in the spiral as you shape it.
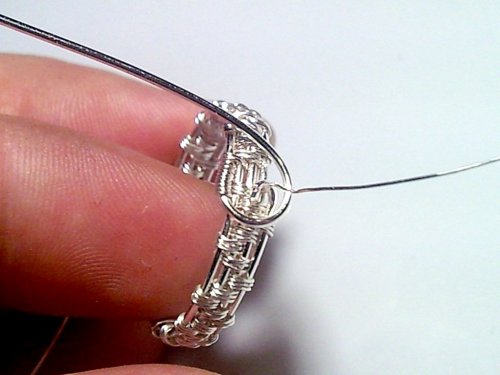


Step 7: Take the longer end of the 28g wire and thread it up through the center of the spiral. Then wrap it around the first coil of the spiral and the shank wire below it. Wrap them together 3 times in order to secure the spiral.

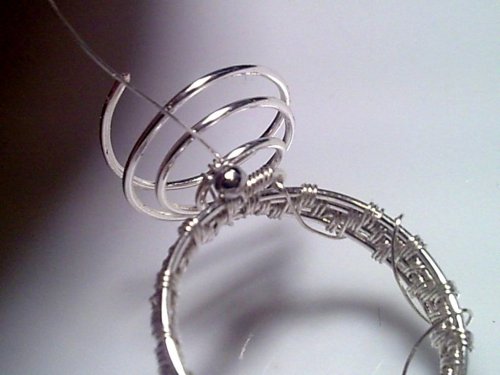
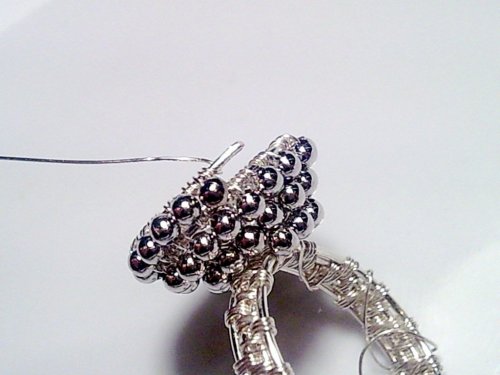
Step 8: Notice that I wrapped the shorter end of the 28g wire around the shank a bit, in order to keep it out of the way. Now it’s time to attach metal beads. They’ll be added between the circles of the spiral, in a continuous row. Thread a bead onto the 28g wire then bring the wire down and around the 20g wire below it. Then bring it up to the spiral wire above it and wrap the 28g wire twice around the spiral wire. Continue stringing on beads and wrapping once on the wire below it and twice on the spiral wire above it.

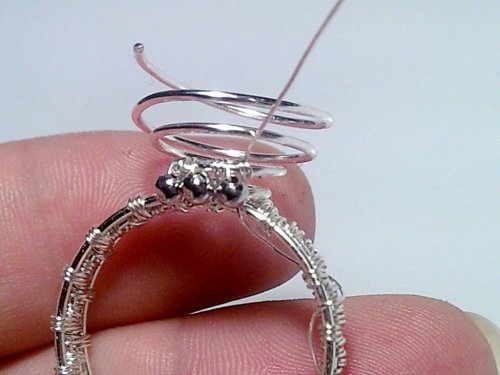
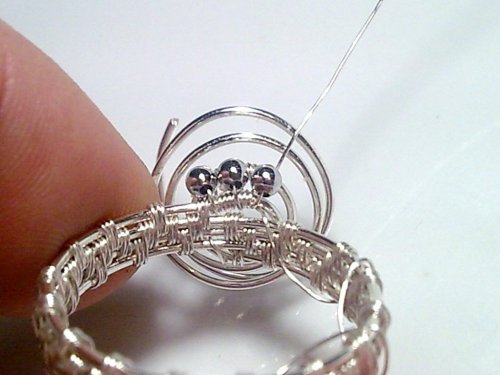
Step 9: Continue adding beads, row by row, until the spiral is completely covered.
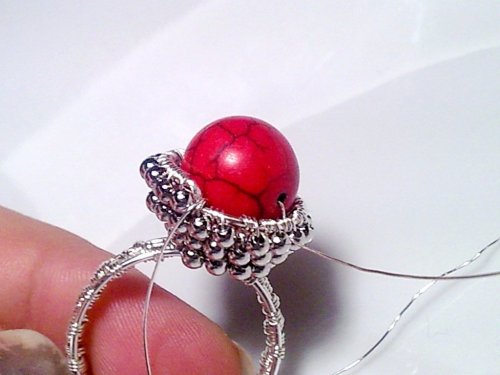
Step 10: Bend the end of the 20g wire toward the wall created by the beads, and tuck it behind the last bead.
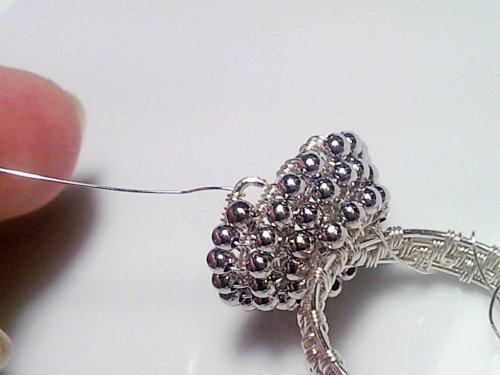
Step 11: Unwrap the other end of the 28g wire from the shank. Use it secure the beaded spiral to the shank by wrapping it around the shank and the base wire of the beaded spiral in several places. Then thread it up the middle of the spiral.
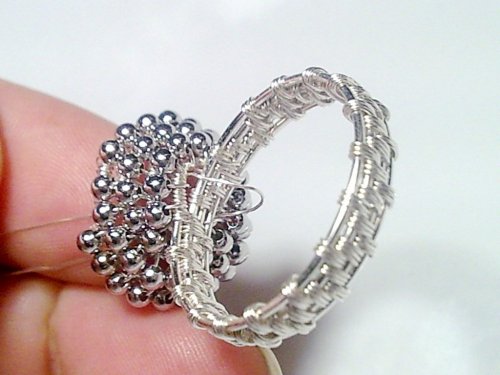
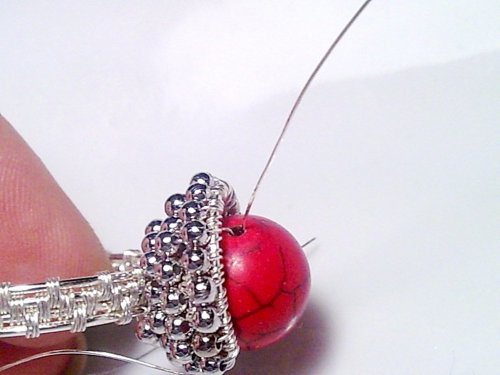
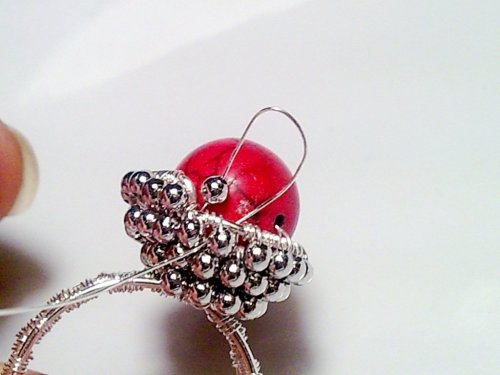
Step 12: String on the focal bead and seat it in the spiral. Turn the bead slightly wrap 28g wire around the top wire of the spiral. Then thread the wire back through the bead

Step 13: Thread the wire down through the beaded wall and secure it by wrapping it a couple times around a wall wire. Trim the wire and push it to the inside of the wall of beads

Step 14: Thread the other end of the 28g wire up the inside of the wall of beads so it exits next to the last metal bead. String on a bead and bring the 28g wire down behind the 20g wire and back up. String on a second bead and repeat.
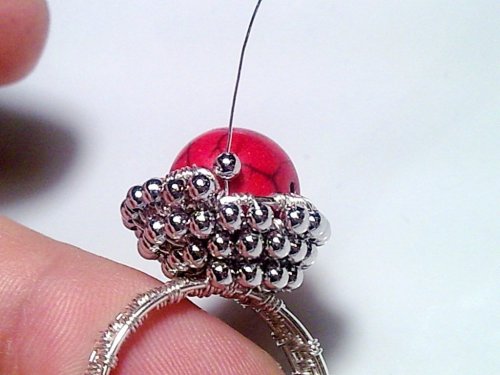

Step 15: Continue to add beads in this manner until you have a complete row around the focal bead. Secure the row by wrapping the wire two-three times around a base wire. Then, carefully cut the wire and hide its end between the beads.


Happy Wrapping!
![]()
Click to Receive Daily Tips by Email
3 Comments

Wire Jewelry Ideas
-
 See Yourself as a Creative Thinker-Part IV By Karen Meador, PhD
Wire Jewelry Article for September 27th, 2017 If...
- September 27, 2017
-
 See Yourself as a Creative Thinker-Part III By Karen Meador, PhD
Wire Jewelry Article for September 20th, 2017 If...
- September 20, 2017
-
 See Yourself as a Creative Thinker-Part II By Karen Meador, PhD
Wire Jewelry Article for September 13th, 2017 If you...
- September 13, 2017
-
 See Yourself as a Creative Thinker By Karen Meador PhD
Wire Jewelry Article for September 6th, 2017 This is...
- September 6, 2017

Design & Inspiration
-
 Free Pattern: Smile Cluster Necklace by Karen Meador
by Judy Ellis, Wirejewelry.com Wire Jewelry Pattern for August...
- August 7, 2017
-
 Free Pattern: Long crystal round maille earrings by Kylie Jones
by Judy Ellis, Wirejewelry.com Wire Jewelry Pattern for August...
- August 3, 2017
-
 Free Pattern: Stone Twist Wrap by Karen Meador
by Judy Ellis, Wirejewelry.com Wire Jewelry Pattern for July...
- July 31, 2017
-
 Free Pattern: Floating Bead Earrings By Kimberly Newman
by Judy Ellis, Wirejewelry.com Wire Jewelry Pattern for July...
- July 27, 2017
Featured Tools
-
 Get to Know Your Hand Tools – Tube-Cutting Jig By Helen I. Driggs
by Judy Ellis, Wirejewelry.com Wire Jewelry Tip for August...
- August 4, 2017
-
 Wire Jewelry Video: Using Punch Pliers by Judy Freyer Thompson
by Judy Ellis, Wirejewelry.com Wire Jewelry Tip for August...
- August 2, 2017
-
 Wire Jewelry Video: Aligning a Hole Punch by Judy Freyer Thompson
by Judy Ellis, Wirejewelry.com Wire Jewelry Tip for July...
- July 26, 2017
-
 Get to Know Your Hand Tools – Wire Cutters – Helen I. Driggs
by Judy Ellis, Wirejewelry.com Wire Jewelry Tip for July...
- July 25, 2017
Connie MacDonald
May 8, 2017 at 8:25 am
I love this ring and will definitely be making it. Does the bead have to be 12mm or can you use 10mm? Thanx
Catherine
May 9, 2017 at 12:10 pm
This is genius. Have never seen anything like this before. Have not made a ring but think I might attempt this. Thanks for the inspiration and great hints,tips and knowledge you share.
Jill Jensen
May 17, 2017 at 10:19 am
I love you guys I’m a self taught artist. Your videos (free ones)!have emencely helped me learn