


- NEW DVD Series – Stone Setting with Bezels
- Tube Set Charm by Kim St. Jean
- Prong Basket Pendant by Kim St. Jean
- NEW DVD Series – Stone Setting with Cold Connections
- New DVD Series – Stone Setting with Wire
- NEW DVD Series: Introduction to Stone Setting by Kim St. Jean
- Featured Tool: Bracelet Bending Plier
- NEW Dvd by Eva Sherman
- Fun, Fast Fold Forming DVD Series
- Double Band Ear Cuff from Alex Simkin
How to Make a Round Center in a Spiral

by Judy Ellis, Wirejewelry.com
Wire Jewelry Pattern for November 16th 2016
How to Make a Round Center in a Spiral
by Judy Larson
Have you ever been making a spiral and the middle ends up looking well, less “round” than you imagined? If so, today we have a great tip to help you create a more “round” center….
Judy Says:

Before getting to the tip on making a round center on a spiral coil, it might be useful to go over a few basics.
It is always a good idea to make a coil charm from different wires so get a “feel” of how each wire behaves. The following steps show how most spiral coils are made, using a flush cut end to start.
Directions:
Step 1: You can use either a chain nose or a round nose pliers to start the center of a spiral. There are pros and cons for the use of each. Try both to see which works best for you. Each piece of wire used for the charms is straightened and cut 2″ long (flush cut on both ends).
Chain nose pliers: Note: Make sure that the tip of your pliers is very fine to obtain the smallest center loop possible.
Tightly grasp the very tip of a 2″ piece of wire with the tips of the pliers. Twist the tips of the pliers while pushing the wire with your thumb, creating a partial loop shaped like a “P.”

Round nose pliers: Note: The jaws of some inexpensive pliers, and even some expensive ones, have tips that are not the same size.
If you have a pair like this, use the same tip throughout your project. Round nose pliers will not grip the wire very well, but the darker satin finish pliers seem to have more grip to them with less hand pressure on your part than shiny ones.

Tightly grasp the very tip of a 2″ piece of wire with the tips of the pliers. Twist the tips of the pliers while pushing the wire with your thumb, creating a loop. Shift the pliers and continue pushing the wire around the loop, creating a drooping “P.”


You will find that chain nose pliers give you a better grip on the wire tip, making it easier to curl. Round nose pliers make it easier to make a more than full loop but do not grasp wire tips well. In the next step, you have to continue the spiral. Using chain nose pliers, this is more difficult to do with the small curl you just created.
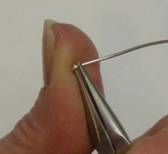
Step 2: Grasp the wire loop with the soft jaw pliers as shown, with just a bit of the loop showing. Hint: The closer to the hinge you grasp the wire, the less pressure you need to exert on the pliers to keep the wire from slipping. Push the wire tail around the outside of the loop. Loosen your grip on the loop, shift the loop, grasp again, and push the wire tail around the outside of the loop.
Continue in this manner until there is ½” of wire left. Note: When soft jaw pliers are new, the surface is more slippery than when they have been used a while. You may have trouble with the coil slipping if you hold it close to the tip of the pliers. It may be easier for you to make the coil closer to the plier hinge. An added benefit is that you do not have to exert as much pressure to hold the wire there.


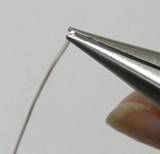
Step 3: Grasp the tip of the wire tail with your round nose pliers. Rotate the pliers back toward the spiral, creating a loop.


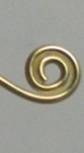
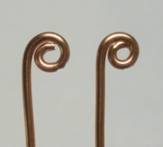
TIP: Because the wire end you start with is flush cut, the center of you spiral coil can become teardrop shaped. There is a way to avoid that. However, this technique should be done only on solid or filled wires, not plated ones. Only a round nose pliers is used for this technique.
The wire on the left is cut normally with a flush cutter making a flat cut. The wire on the right is cut at a sharp angle with a flush cutter, which is what is needed to make a better, more rounded spiral canter.
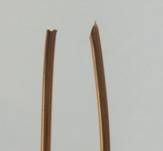
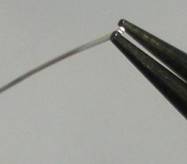
Grasp the very tip of the sharply angled wire with a round nose pliers. Make a curl in the end of the wire around the very tip of the pliers. Do not remove the pliers but shift them around so you can lap the tip of the wire. Notice how the tip of the wire on the right, made with an angled cut wire, seems to blend in to the curve while the one on the left, made with a flush cut wire, does not.
Also, the one on the left took more pressure on the pliers to continue the spiral over the flat end, therefore denting the wire. The dent will get covered up as the spiral progresses, but still can show a bit.
I hope you’ve enjoyed this simple tip. For more of Judy’s tips – CLICK HERE!
Happy Wrapping!
![]()
Click to Receive Daily Tips by Email
Related Posts


One Comment

Wire Jewelry Ideas
-
 See Yourself as a Creative Thinker-Part IV By Karen Meador, PhD
Wire Jewelry Article for September 27th, 2017 If...
- September 27, 2017
-
 See Yourself as a Creative Thinker-Part III By Karen Meador, PhD
Wire Jewelry Article for September 20th, 2017 If...
- September 20, 2017
-
 See Yourself as a Creative Thinker-Part II By Karen Meador, PhD
Wire Jewelry Article for September 13th, 2017 If you...
- September 13, 2017
-
 See Yourself as a Creative Thinker By Karen Meador PhD
Wire Jewelry Article for September 6th, 2017 This is...
- September 6, 2017

Design & Inspiration
-
 Free Pattern: Smile Cluster Necklace by Karen Meador
by Judy Ellis, Wirejewelry.com Wire Jewelry Pattern for August...
- August 7, 2017
-
 Free Pattern: Long crystal round maille earrings by Kylie Jones
by Judy Ellis, Wirejewelry.com Wire Jewelry Pattern for August...
- August 3, 2017
-
 Free Pattern: Stone Twist Wrap by Karen Meador
by Judy Ellis, Wirejewelry.com Wire Jewelry Pattern for July...
- July 31, 2017
-
 Free Pattern: Floating Bead Earrings By Kimberly Newman
by Judy Ellis, Wirejewelry.com Wire Jewelry Pattern for July...
- July 27, 2017
Featured Tools
-
 Get to Know Your Hand Tools – Tube-Cutting Jig By Helen I. Driggs
by Judy Ellis, Wirejewelry.com Wire Jewelry Tip for August...
- August 4, 2017
-
 Wire Jewelry Video: Using Punch Pliers by Judy Freyer Thompson
by Judy Ellis, Wirejewelry.com Wire Jewelry Tip for August...
- August 2, 2017
-
 Wire Jewelry Video: Aligning a Hole Punch by Judy Freyer Thompson
by Judy Ellis, Wirejewelry.com Wire Jewelry Tip for July...
- July 26, 2017
-
 Get to Know Your Hand Tools – Wire Cutters – Helen I. Driggs
by Judy Ellis, Wirejewelry.com Wire Jewelry Tip for July...
- July 25, 2017
maria emilia
November 16, 2016 at 7:21 am
I love this technique I was doing it wrong and getting frustrated in the process thank you for your constant support by sharing your knowledge with us. God bless you