


- NEW DVD Series – Stone Setting with Bezels
- Tube Set Charm by Kim St. Jean
- Prong Basket Pendant by Kim St. Jean
- NEW DVD Series – Stone Setting with Cold Connections
- New DVD Series – Stone Setting with Wire
- NEW DVD Series: Introduction to Stone Setting by Kim St. Jean
- Featured Tool: Bracelet Bending Plier
- NEW Dvd by Eva Sherman
- Fun, Fast Fold Forming DVD Series
- Double Band Ear Cuff from Alex Simkin
Sticker Templates

by Judy Ellis, Wirejewelry.com
Wire Jewelry Tip for June 10th, 2016
Sticker Templates
by Judy Larson
Today we are bringing you a quick tip form our good friend, Judy Larson about how to create perfectly matched shapes.
Judy Says:

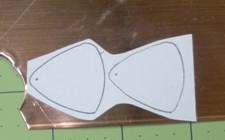
Cutting perfectly matching shapes out of sheet metal can be a bit tricky. But with a few tricks of your own, it will be a snap!

Solution 1: Use re-positionable sticky notes to make your templates.
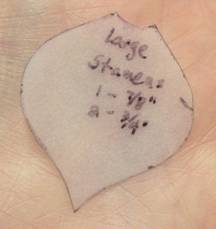
Step 1: Draw your shapes on re-positionable note paper, making sure that as much of your design as possible is on the sticky portion of the note.
Step 2: Cut the template out.
Step 3: Adhere the sticky note template to your clean sheet metal and cut around the shape.
Step 1: There are two ways to do this.
~ If you are only making one or two of an item
Solution 2A:
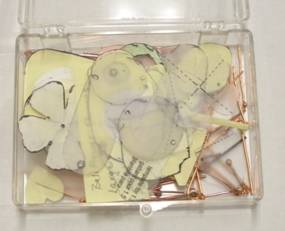
- Cardboard and paper can become misshapen with use, so draw your template shape on thin plastic and cut it out.
- Hint: Save all your sticky note and plastic templates. Keep notes about the project on the template if there is room.
- Place your template on a piece of paper and trace around it. You do not have to cut this paper shape out exactly, just cut around it.
~ If you are making multiple sets or use the same shapes over and over:
Solution 2B:
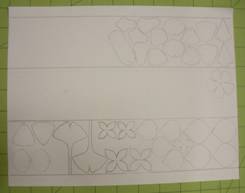
- Draw lines on a piece of typing paper so that you have strips the width your **Xyron uses, either 1.5″, 2.5″, 5″ or 9″.
- Fill the space between the lines with tracings of the desired shapes. Save this sheet as your original. Make a copy of your original.
- Cut the copied strips apart. Note: a 2.5″ Xyron was used here.
Step 2: Run the cut out shapes or each paper strip through your machine.
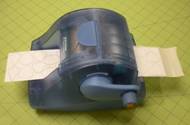

Step 3: Cut the sticker sheet apart. You do not have to cut each piece out exactly, just cut around them. Adhere the stickers to your clean metal sheet.
Step 4: Cut the metal shape out. Remove the sticker and you are ready to use the blank in your project. Hint: Replace the sticker on the paper backing as you may be able to use it several more times.

I hope that you enjoyed this quick tip. If you are looking for sheet metal to get started on your own projects – CLICK HERE! To see more tips from Judy – CLICK HERE!
Happy Wrapping!
![]()
**Used with permissions from the Xyron company. To learn more about them, you can follow them on Facebook, Pinterest, YouTube or Twitter
Click to Receive Daily Tips by Email
Related Posts


3 Comments

Wire Jewelry Ideas
-
 See Yourself as a Creative Thinker-Part IV By Karen Meador, PhD
Wire Jewelry Article for September 27th, 2017 If...
- September 27, 2017
-
 See Yourself as a Creative Thinker-Part III By Karen Meador, PhD
Wire Jewelry Article for September 20th, 2017 If...
- September 20, 2017
-
 See Yourself as a Creative Thinker-Part II By Karen Meador, PhD
Wire Jewelry Article for September 13th, 2017 If you...
- September 13, 2017
-
 See Yourself as a Creative Thinker By Karen Meador PhD
Wire Jewelry Article for September 6th, 2017 This is...
- September 6, 2017

Design & Inspiration
-
 Free Pattern: Smile Cluster Necklace by Karen Meador
by Judy Ellis, Wirejewelry.com Wire Jewelry Pattern for August...
- August 7, 2017
-
 Free Pattern: Long crystal round maille earrings by Kylie Jones
by Judy Ellis, Wirejewelry.com Wire Jewelry Pattern for August...
- August 3, 2017
-
 Free Pattern: Stone Twist Wrap by Karen Meador
by Judy Ellis, Wirejewelry.com Wire Jewelry Pattern for July...
- July 31, 2017
-
 Free Pattern: Floating Bead Earrings By Kimberly Newman
by Judy Ellis, Wirejewelry.com Wire Jewelry Pattern for July...
- July 27, 2017
Featured Tools
-
 Get to Know Your Hand Tools – Tube-Cutting Jig By Helen I. Driggs
by Judy Ellis, Wirejewelry.com Wire Jewelry Tip for August...
- August 4, 2017
-
 Wire Jewelry Video: Using Punch Pliers by Judy Freyer Thompson
by Judy Ellis, Wirejewelry.com Wire Jewelry Tip for August...
- August 2, 2017
-
 Wire Jewelry Video: Aligning a Hole Punch by Judy Freyer Thompson
by Judy Ellis, Wirejewelry.com Wire Jewelry Tip for July...
- July 26, 2017
-
 Get to Know Your Hand Tools – Wire Cutters – Helen I. Driggs
by Judy Ellis, Wirejewelry.com Wire Jewelry Tip for July...
- July 25, 2017
kath
June 11, 2016 at 5:36 am
Could you again, Put Charts on the Site concerning,”A Complete Guide to Jewelry Wire, Size, And Uses”. Please! Thank You So Much.
I Always Look forward To All The Things, Tricks, And Wonderful Patterns.
“You All “Are The Best Of The Best”.
bill Schwartz
June 12, 2016 at 11:04 pm
All of my sticky note paper has a very thin band of adhisive. Is there a brand that has a wider band. Do you saw cut your sheet metal or use a tin snip?
Bill Schwartz
Judy Larson
June 15, 2016 at 2:38 pm
For my 6×6 Sheet Metal Series of Templates and Tutorials, I try to make sure that all the patterns can be cut out with both shears and a saw. But in all the tutorials, I use a pair of french shears as so many people still do not use a saw and would like to work with metal. I try to avoid using anything with a serrated edge so that there is less filing to do on the edges of the metal.
Unfortunately, I do not know of a note paper that has a wider band of sticky adhesive. A lot of the time, I just trace around my plastic templates directly onto the metal and then cut the designs out.