


- NEW DVD Series – Stone Setting with Bezels
- Tube Set Charm by Kim St. Jean
- Prong Basket Pendant by Kim St. Jean
- NEW DVD Series – Stone Setting with Cold Connections
- New DVD Series – Stone Setting with Wire
- NEW DVD Series: Introduction to Stone Setting by Kim St. Jean
- Featured Tool: Bracelet Bending Plier
- NEW Dvd by Eva Sherman
- Fun, Fast Fold Forming DVD Series
- Double Band Ear Cuff from Alex Simkin
FREE Pattern: Leaf Bail

by Judy Ellis, Wirejewelry.com
Wire Jewelry Free Pattern for May 23rd, 2016
Leaf Bail by Judy Larson
The leaves on the trees are finally out and the flowers are all beginning to bloom… Summer is on it’s way. Today we share a great pattern with you – a Leaf Bail.
What is a bail, you may ask?
- Definition: A bail (also spelled “bale”) is a component of certain types of jewelry, mostly necklaces, that is used to attach a pendant or stone. The bail is normally placed in the center of the necklace where the pendant hangs. Some bails are made so a pendant can be attached after the necklace production is completed.
So today, we are giving you a great pattern – and it can easily be created and added to any project that you love!
Judy Says:

Soldering experience is necessary to make this bail.
Materials:
- 18 gauge round (shown) or half round dead soft wire– (Using half round wire will give you more surface area contact for soldering.)
- 24 gauge sheet metal
Tools And Other Supplies:
- Tools for your preferred method of cutting out sheet metal shapes
- Tools and solder for your preferred method of soldering
- Bench Block
- Texturing Hammer
- Butane torch and fire brick
- 6-Step Barrel Pliers
- Rubber or nylon head hammer
- 1mm dimple pliers
- Ultra fine point permanent marker
- Metal file
- Pickle and pickle pot
- Tumbler
- Optional: Liver of Sulfur
Before you get started:
The template for this Bail was previously published on our blog as part of Judy’s Christmas Jewelry component Templates – CLICK HERE to read that post and download Judy’s Templates.
Directions:
Step 1: Make your pattern using the photo as a guide.

Step 2: Trace the pattern onto sheet metal. Cut the leaf shape out using your preferred method. This is a thinner metal so metal shears were used here. Since the piece will be textured, scratches, etc., caused by shears will not be an issue. Draw a line down the center of the metal piece using an ultra fine point permanent marker.
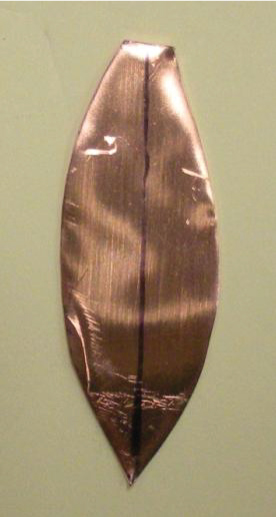
Step 3: Texture the metal piece-any hammer texture will be fine. The narrower side of a Mini TruStrike Sharp Designer Hammer was used in this tutorial. Notice that the piece expands in size when you texture it. When you are finished texturing the piece it will probably have curled up a bit. Carefully flatten it on the bench block using the rubber or nylon head hammer.

Step 4: If the sides are sharp after texturing, use a file to soften the edges.
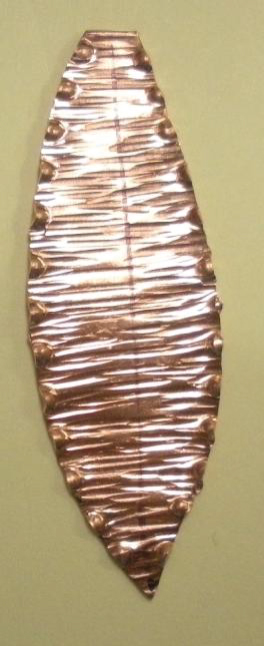
Step 5: Flip the piece over and use an ultra fine point permanent marker to draw a line across the back side of the metal piece about 1/8″ up from the pointed tip.

Step 6: The first decorative dimple should be formed right on the line. Place the indented cup side of the dimpling pliers on the FRONT side of the metal piece. The edge of the metal piece should be on the edge of the indented cup. When you close the jaws of the pliers, the hook portion should be just inside the edge of the metal piece right on the line on the BACK side of the piece.

Step 7: To make each succeeding dimple along each side of the bail, place the edge of the indented side of the dimpling pliers jaw against the previous dimple. As in Step 6, the edge of the metal piece should be on the edge of the indented cup. When you close the jaws of the pliers, the hook portion should be just inside the edge of the metal piece.

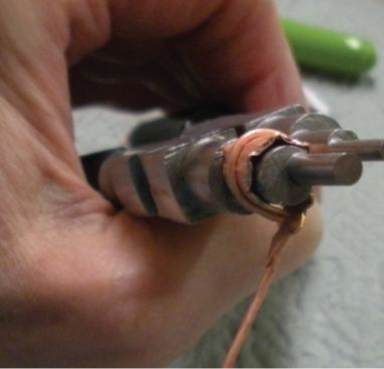
Step 8: Cut a piece of 18 gauge round wire about 1 inch longer than the metal piece. Make sure it is straight. Hint: Roll the wire between two bench blocks to straighten it.

Step 9: Place the wire on the line. The wire should hang over the square end of the leaf about ¼”. Solder the wire in place using your preferred method.
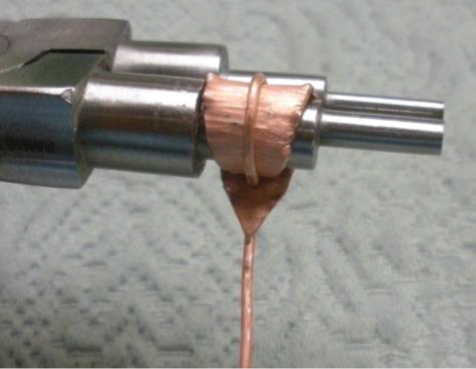
Step 10: Trim the wire flush with the square end of the leaf.
Step 11: Pickle the piece to remove fire scale.
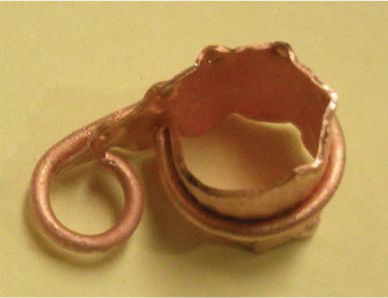
Step 12: Using Step 4 on the 6-step pliers, curl the back square end of the leaf towards the front as shown. Note that the wire is on the OUTSIDE. You may need to use Step 5 if the leaf expanded a great.
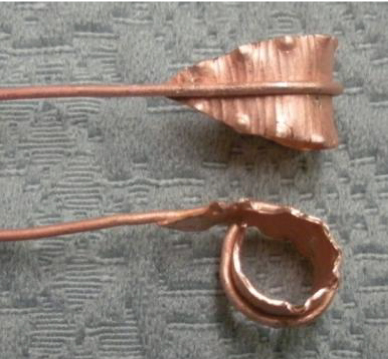
Step 13: To make the lower pendant loop, use Step 2 of the 6 step pliers, or whichever step on the pliers is necessary to obtain the size loop you need to fit your pendant. Once the loop is made, trim off the excess wire. Move the pendant loop into place at the back of the bail.

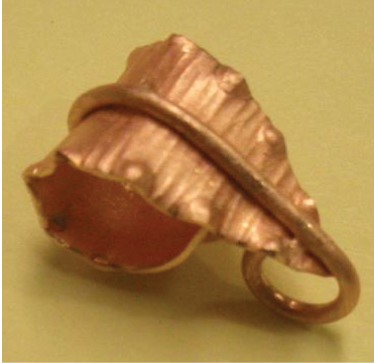
Step 14: Tumble the bail with steel shot to harden and polish it.
Step 15: Optional: Patina the bail, if desired, using a liver of sulfur solution. Polish with very fine steel wool to bring out the hammered details.
Step 16: Optional: Tumble for 30 minutes or so with steel shot if you want the bail to have a brighter shine after the you steel wool the patina. Tumbling will not affect the patina.
The green bail below was enlarged and dabbed with alcohol paints to turn it into a pendant—by Kathi Nelson


Happy Wrapping!
![]()
Click to Receive Daily Tips by Email
Related Posts


Wire Jewelry Ideas
-
 See Yourself as a Creative Thinker-Part IV By Karen Meador, PhD
Wire Jewelry Article for September 27th, 2017 If...
- September 27, 2017
-
 See Yourself as a Creative Thinker-Part III By Karen Meador, PhD
Wire Jewelry Article for September 20th, 2017 If...
- September 20, 2017
-
 See Yourself as a Creative Thinker-Part II By Karen Meador, PhD
Wire Jewelry Article for September 13th, 2017 If you...
- September 13, 2017
-
 See Yourself as a Creative Thinker By Karen Meador PhD
Wire Jewelry Article for September 6th, 2017 This is...
- September 6, 2017

Design & Inspiration
-
 Free Pattern: Smile Cluster Necklace by Karen Meador
by Judy Ellis, Wirejewelry.com Wire Jewelry Pattern for August...
- August 7, 2017
-
 Free Pattern: Long crystal round maille earrings by Kylie Jones
by Judy Ellis, Wirejewelry.com Wire Jewelry Pattern for August...
- August 3, 2017
-
 Free Pattern: Stone Twist Wrap by Karen Meador
by Judy Ellis, Wirejewelry.com Wire Jewelry Pattern for July...
- July 31, 2017
-
 Free Pattern: Floating Bead Earrings By Kimberly Newman
by Judy Ellis, Wirejewelry.com Wire Jewelry Pattern for July...
- July 27, 2017
Featured Tools
-
 Get to Know Your Hand Tools – Tube-Cutting Jig By Helen I. Driggs
by Judy Ellis, Wirejewelry.com Wire Jewelry Tip for August...
- August 4, 2017
-
 Wire Jewelry Video: Using Punch Pliers by Judy Freyer Thompson
by Judy Ellis, Wirejewelry.com Wire Jewelry Tip for August...
- August 2, 2017
-
 Wire Jewelry Video: Aligning a Hole Punch by Judy Freyer Thompson
by Judy Ellis, Wirejewelry.com Wire Jewelry Tip for July...
- July 26, 2017
-
 Get to Know Your Hand Tools – Wire Cutters – Helen I. Driggs
by Judy Ellis, Wirejewelry.com Wire Jewelry Tip for July...
- July 25, 2017
0 comments