


- NEW DVD Series – Stone Setting with Bezels
- Tube Set Charm by Kim St. Jean
- Prong Basket Pendant by Kim St. Jean
- NEW DVD Series – Stone Setting with Cold Connections
- New DVD Series – Stone Setting with Wire
- NEW DVD Series: Introduction to Stone Setting by Kim St. Jean
- Featured Tool: Bracelet Bending Plier
- NEW Dvd by Eva Sherman
- Fun, Fast Fold Forming DVD Series
- Double Band Ear Cuff from Alex Simkin
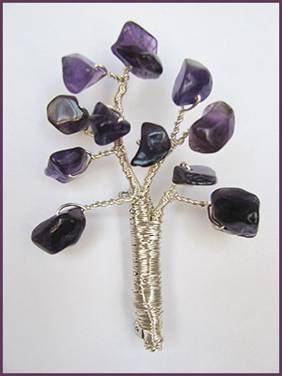
FREE Pattern: Tree Pin with Gem Chips

by Judy Ellis, Wirejewelry.com
Wire Jewelry Free Pattern for May 2nd, 2016
Tree Pin with Gem Chips
by Albina Manning
We love sharing great patterns from our contributors. This is such a fun pattern by Albina that I just had to share it with all of you! I hope you enjoy creating it!
Albina Says:

This tutorial shows how to make a Tree pin using gem chips and wire. It will take not more than an hour to make it!
Skill Level: Intermediate
Materials
Tools
1. First, it is a good idea make a sketch of the pin. Usually, I draw a “tree” in real size placing gem chips as leaves. In this example two right branches will be made from two separate wire pieces.

2. Cut 6″ (15cm) 22 ga wire. String one gem chip on the middle of the wire.
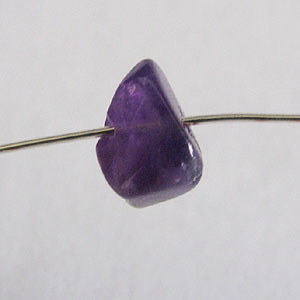
3. Twist the wire 5-7 times forming a “twig” according the pattern (sketch).
4. String another chip placing it on the distance of “a twig”.

5. Twist the wire as described in step 3 until two wire ends meet each other.

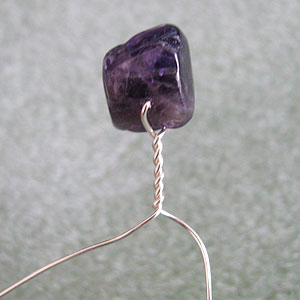
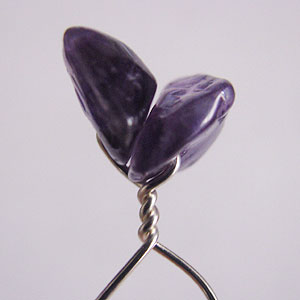
6.Twist the wire ends forming the “a branch”.

7. You can check the size of the branch with the sketch.

8. Make the third “leaf” as shown in Steps 4-5.

9.Finish the second branch twisting the wire ends.
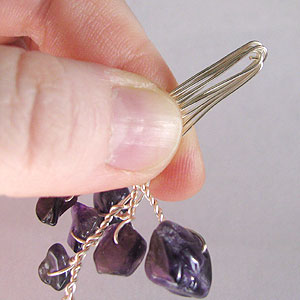
10. Cut 22 ga wire 1 ft (30cm) long. For a top of a tree string two gem chips instead of 1. Twist the wire.
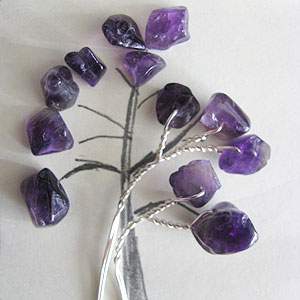
11. Using the same technique, make another part of a tree (base).

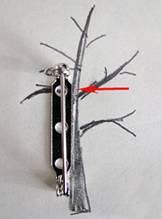
12. Put together all wire ends. Bend the wires either with your hands, or with pliers according the sketch determining the length of the pin. Trim the wire ends approximately under pin’s head (red arrow).
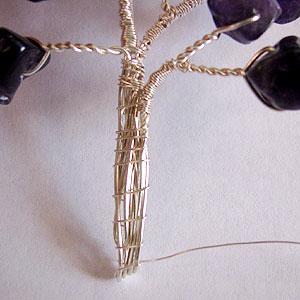
13. Take a piece of 28 ga wire (you can work from a wire spool). Fold the wire in 1 inch (2.5cm) and place it between the first two “leaves”.

14. Using the long piece of wire (from a spool), start wrapping down. Wrap until you reach the place where the first branch attaches the base

15. Wrap in the same manner two other branches.

16. Attach other branches to the base wrapping them together

17. Attach the second branch and slightly wrap the rest part of a pin until you reach a pin’s bottom.
18. Wrap the pin coiling to the end of the hinge.

19. Now, attach a pin back wrapping it as shown.
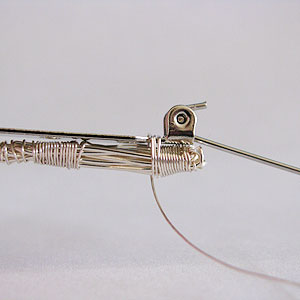
20. Wrap up until you attach the whole pin back.
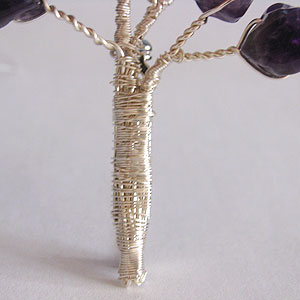
21. If necessary, wrap more along the “tree trunk”. Actually, your tree pin is ready, but…

22. You can lift some the gem chips at 90 degree angle as shown (red arrow). This will give 3-D effect to your pin

Congratulations! You’ve made your first Tree Pin!
I hope you’ve enjoyed this fun and FREE Pattern from Albina. If you’d like to read more of Albinas tips, or see more of her patterns, CLICK HERE.
Happy Wrapping!
![]()
Click to Receive Daily Tips by Email
Related Posts


3 Comments

Wire Jewelry Ideas
-
 See Yourself as a Creative Thinker-Part IV By Karen Meador, PhD
Wire Jewelry Article for September 27th, 2017 If...
- September 27, 2017
-
 See Yourself as a Creative Thinker-Part III By Karen Meador, PhD
Wire Jewelry Article for September 20th, 2017 If...
- September 20, 2017
-
 See Yourself as a Creative Thinker-Part II By Karen Meador, PhD
Wire Jewelry Article for September 13th, 2017 If you...
- September 13, 2017
-
 See Yourself as a Creative Thinker By Karen Meador PhD
Wire Jewelry Article for September 6th, 2017 This is...
- September 6, 2017

Design & Inspiration
-
 Free Pattern: Smile Cluster Necklace by Karen Meador
by Judy Ellis, Wirejewelry.com Wire Jewelry Pattern for August...
- August 7, 2017
-
 Free Pattern: Long crystal round maille earrings by Kylie Jones
by Judy Ellis, Wirejewelry.com Wire Jewelry Pattern for August...
- August 3, 2017
-
 Free Pattern: Stone Twist Wrap by Karen Meador
by Judy Ellis, Wirejewelry.com Wire Jewelry Pattern for July...
- July 31, 2017
-
 Free Pattern: Floating Bead Earrings By Kimberly Newman
by Judy Ellis, Wirejewelry.com Wire Jewelry Pattern for July...
- July 27, 2017
Featured Tools
-
 Get to Know Your Hand Tools – Tube-Cutting Jig By Helen I. Driggs
by Judy Ellis, Wirejewelry.com Wire Jewelry Tip for August...
- August 4, 2017
-
 Wire Jewelry Video: Using Punch Pliers by Judy Freyer Thompson
by Judy Ellis, Wirejewelry.com Wire Jewelry Tip for August...
- August 2, 2017
-
 Wire Jewelry Video: Aligning a Hole Punch by Judy Freyer Thompson
by Judy Ellis, Wirejewelry.com Wire Jewelry Tip for July...
- July 26, 2017
-
 Get to Know Your Hand Tools – Wire Cutters – Helen I. Driggs
by Judy Ellis, Wirejewelry.com Wire Jewelry Tip for July...
- July 25, 2017
ArlineJ
May 2, 2016 at 11:15 am
Beautiful, I love this idea! I’ll try it with green wire. And put a pin back on the wire while wrapping the wire with the chips.
Thank you so much for a great idea.
Barbara Hiffman
May 6, 2016 at 7:13 am
I think I will make this project into a Family Tree by using
beads/crystals in the Birthstone colors for my 8 Grandchildren.
I can also make a pendant by adding a jump ring.
Thanks for the basic idea.
Barb
DIANNE RODWELL
May 11, 2016 at 3:58 pm
just lovely! thank you for sharing this joyful creation!!
dianne