


- NEW DVD Series – Stone Setting with Bezels
- Tube Set Charm by Kim St. Jean
- Prong Basket Pendant by Kim St. Jean
- NEW DVD Series – Stone Setting with Cold Connections
- New DVD Series – Stone Setting with Wire
- NEW DVD Series: Introduction to Stone Setting by Kim St. Jean
- Featured Tool: Bracelet Bending Plier
- NEW Dvd by Eva Sherman
- Fun, Fast Fold Forming DVD Series
- Double Band Ear Cuff from Alex Simkin
Petal Forming on a Wood Block

by Judy Ellis, Wirejewelry.com
Wire Jewelry Tip for April 25th, 2016
Petal Forming on a Wood Block
by Judy Larson
We love sharing tips from our friend, Judy Larson. Judy always has creative, easy to follow tips that are perfect for everyone from the beginner to advanced. Today we share a tip about creating a beautifully shaped petal using a hammer and a wood block.
Judy Says:
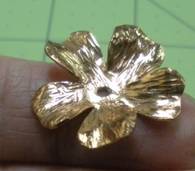
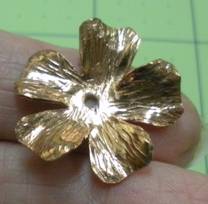
Forming and shaping metal flowers to give them dimension is fun, particularly when you do not have to spend a lot of money on expensive shaping tools to do it. A good hammer and a piece of wood works just fine!
Note: You can use Pre cut metal shapes for the flower or you can create your own using one of Judy’s templates.
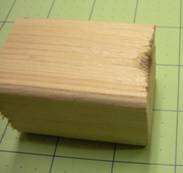
I always have a lot of scrap lumber left over from my woodworking projects so I have made a number of tools using small leftover pieces.
A scrap of 2×2 pine makes a perfect petal forming tool. If you are not a woodworker, your local lumberyard will have bins full of scraps they will probably give you. If you find a pallet that is being thrown away, you will have more wood to cut up than you know what to do with-probably enough to last you a lifetime!
Instructions:
1. Cut a short piece of wood, just big enough to easily handle. Since pine is so soft, a hammer easily compresses rounded indentations on the ends.
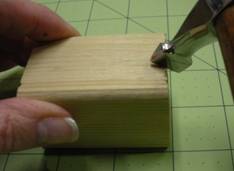
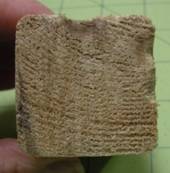
2. I find that I can easily hold my flower shape while also holding my block, which is about 2.25” long. If you have trouble doing this, cut it a bit longer and clamp it to your work surface or in your vise.
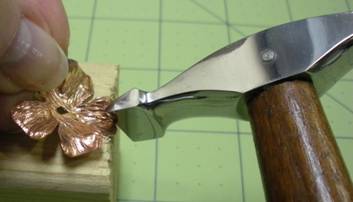
3. Hammer the center of the petal edge into the indentation.
4. To curve the outer corners of the petal, hammer them around the corner of the wood block. Continue shaping the petals until you are happy with the shape. Hint: You may need to anneal your piece several times during the shaping as hammering and texturing work hardens the metal.
Use and Re-Use:
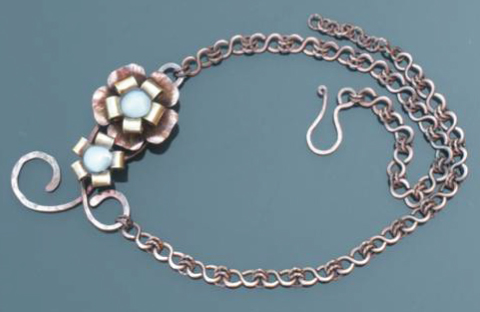
Trying to make something using only scrap materials can be a lot of fun. This necklace was totally made from things that were thrown away.
The large flower, made from copper flashing used on a re-roofing project, was shaped on a scrap wood block.
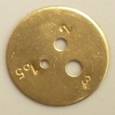
I used brass shell casings which were cut to make the flower center and the smaller flower.
The centers of the flowers are fish eardrums encased in resin left over from a bar top project. ( **yes, that really says fish eardrums – see the definition below** )
And the wire was electrical wire stripped from a house that was being torn down.
I hope you’ve enjoyed this great tip from Judy! If you’d like to read more from Judy, – CLICK HERE.
Judy is also our Featured Wire Artist of the Month for April. CLICK HERE to read more about her.
Happy Wrapping!
![]()
***An Otolith , also called a “fish eardrum” is a stone like concretion in the inner ear of some vertebrates, as the whale” Lake Erie. Otoliths are from the ear bones of the sheeps head fish. These ivory white bones wash up on the shores of Lake Erie where they are collected by beach combers (like me) for various reasons. Lucky stones are so named because they are thought to bring good luck to fishermen.
Click to Receive Daily Tips by Email
Related Posts


2 Comments

Wire Jewelry Ideas
-
 See Yourself as a Creative Thinker-Part IV By Karen Meador, PhD
Wire Jewelry Article for September 27th, 2017 If...
- September 27, 2017
-
 See Yourself as a Creative Thinker-Part III By Karen Meador, PhD
Wire Jewelry Article for September 20th, 2017 If...
- September 20, 2017
-
 See Yourself as a Creative Thinker-Part II By Karen Meador, PhD
Wire Jewelry Article for September 13th, 2017 If you...
- September 13, 2017
-
 See Yourself as a Creative Thinker By Karen Meador PhD
Wire Jewelry Article for September 6th, 2017 This is...
- September 6, 2017

Design & Inspiration
-
 Free Pattern: Smile Cluster Necklace by Karen Meador
by Judy Ellis, Wirejewelry.com Wire Jewelry Pattern for August...
- August 7, 2017
-
 Free Pattern: Long crystal round maille earrings by Kylie Jones
by Judy Ellis, Wirejewelry.com Wire Jewelry Pattern for August...
- August 3, 2017
-
 Free Pattern: Stone Twist Wrap by Karen Meador
by Judy Ellis, Wirejewelry.com Wire Jewelry Pattern for July...
- July 31, 2017
-
 Free Pattern: Floating Bead Earrings By Kimberly Newman
by Judy Ellis, Wirejewelry.com Wire Jewelry Pattern for July...
- July 27, 2017
Featured Tools
-
 Get to Know Your Hand Tools – Tube-Cutting Jig By Helen I. Driggs
by Judy Ellis, Wirejewelry.com Wire Jewelry Tip for August...
- August 4, 2017
-
 Wire Jewelry Video: Using Punch Pliers by Judy Freyer Thompson
by Judy Ellis, Wirejewelry.com Wire Jewelry Tip for August...
- August 2, 2017
-
 Wire Jewelry Video: Aligning a Hole Punch by Judy Freyer Thompson
by Judy Ellis, Wirejewelry.com Wire Jewelry Tip for July...
- July 26, 2017
-
 Get to Know Your Hand Tools – Wire Cutters – Helen I. Driggs
by Judy Ellis, Wirejewelry.com Wire Jewelry Tip for July...
- July 25, 2017
LaVerle
April 25, 2016 at 12:24 pm
What on earth are fish eardrums??? I like the recycle projects.
Cathy Barron
April 30, 2016 at 10:22 am
There is an excellent definition of otoliths at the end of the article. I’m going to Google it to see a picture of one in its natural state. This was a fabulous article!