


- NEW DVD Series – Stone Setting with Bezels
- Tube Set Charm by Kim St. Jean
- Prong Basket Pendant by Kim St. Jean
- NEW DVD Series – Stone Setting with Cold Connections
- New DVD Series – Stone Setting with Wire
- NEW DVD Series: Introduction to Stone Setting by Kim St. Jean
- Featured Tool: Bracelet Bending Plier
- NEW Dvd by Eva Sherman
- Fun, Fast Fold Forming DVD Series
- Double Band Ear Cuff from Alex Simkin
Build A Tool Rack

by Judy Ellis, Wirejewelry.com
Wire Jewelry Tip for March 30th 2016
Build A Tool Rack
by Judy Larson
If you are like me you have tools, tools, and more tools, Sometimes its hard to keep them all straight. Today I’m sharing a great step by step tutorial from Judy Larson on building your own Tool Rack to keep your tools organized!
Judy Says:

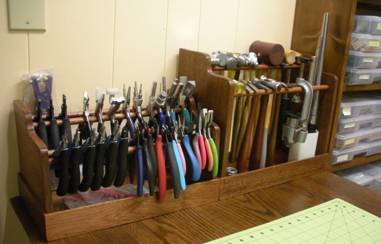
If you are a tool addict collector like I am, you have way too many tools and no easy way to store them. What you see here is my solution for the tools I use most often. I always had to dig around in a drawer to find a needed tool so usually I left my most often used tools scattered all over my work surface. Tools in drawers, especially hammer heads, were getting scratched up.
When I built these tool racks to fit the top of my desk, I really was not sure if they would keep me more organized. Having the racks out makes cleaning up after a project is done so much easier that I find I am now putting my tools in the racks when I am done using them. It is easier to find a specific tool on the rack rather than digging around in a drawer full of tools to find it and my hammer faces are no longer in danger of getting scratched.
Materials:
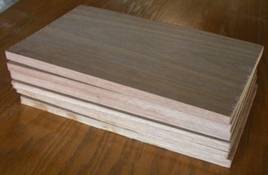
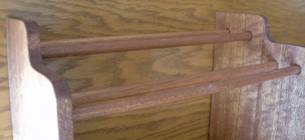
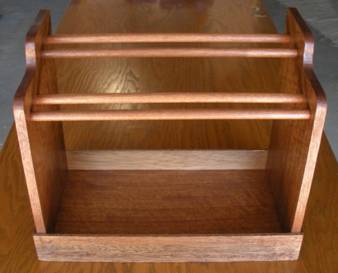
I obviously have a tough time throwing out leftover lumber! I had many small pieces of ½” thick by 8″ wide mahogany left over from a woodworking project, just enough for a couple of tool racks. I also had ¼”x 2″ mahogany lathe left from a different project I did for my son which I used that to make a frame around the base of each rack. This makes the base a storage tray for small parts and replacement items that go with the tools in the racks so I do not have to try to remember where I put them. I purchased ½” mahogany dowels from the hardware store.
The tool racks in my work room are about 14″ wide. If I could only make rack one for both hammers and pliers, I would not make it any wider than 18″ because the weight of the tools would bend the ½” dowels. Also, since dowels come in 3 foot lengths (you can get 4 foot ones in some places), I can make one rack with two dowels, not four. Play with this simple and easy to make design and create your own fabulous customized tool rack.
Directions:
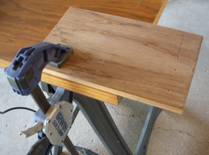
Step 1: Cut your pieces out: Decide on the width, depth and height of your tool rack. For my hammer tool rack, the sides needed to be 12″ tall. For the plier tool rack, I wanted the sides about 7½” tall. The width of the bottom can be up to 18″. The depth of the piece, from the front to the back, is up to you. You might even want to put handles on the sides if you plan to carry it from place to place.
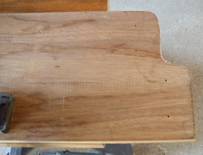
Step 2: Make your pattern: I customize my hammer handles by grinding them down and sanding them to fit my hand better. The distance between the dowels needs to accommodate the handles of your hammers, so you will need to do some measuring. Most, if not all, your hammers should fit using the following measurements.
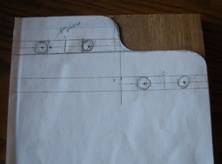
I found that the distance from center to center of the holes, using ½” dowels, needed to be 1-7/8″ for my larger hammers with longer handles. For smaller, shorter hammers, the distance from center to center of the holes needed to be 1-1/2″. I placed the center of the hole closest to the back 1-3/16″ from the back and 1-1/4″ down from the top.
The center of the hole closest to the front was 1″ in from the front edge and 2-3/4″ down from the top before I cut the curved top design
For pliers on the plier rack, the distance center to center of the holes needed to be 1-1/2″. I placed the center of the hole closest to the back 1-3/16″ from the back and 1-1/4″ down from the top. The center of the hole closest to the front was 1″ in from the front edge and 2-3/4″ down from the top before I cut the curved top design.
Transfer your pattern to the two wood sides, making sure you make a right and a left side.
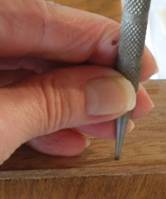
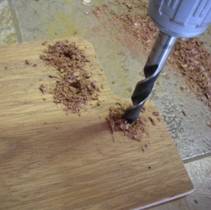
Step 3: Use an awl to make starter holes at the marks for the holes where the dowels will be inserted. The tip of your drill bit will sit in the hole when you start, keeping it from skipping across the wood.

Step 4: Use the depth of the bottom piece to gauge the length of the side frame piece.
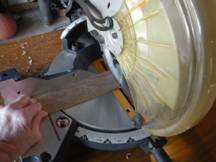
Step 5: Cut a side frame piece for each end of the bottom. I have a chop saw, which makes square cuts easy, but any saw will do.
Step 6: It will be easier to attach the side frame pieces to the bottom if you start the nails before trying to attach it. Hint: Drill pilot holes smaller than your finish nails so you will not split the wood.

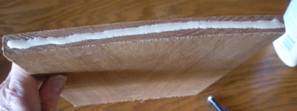
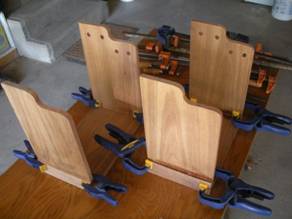
Step 7: Apply a thin line of glue down the center of one short side of the bottom piece. Center a side piece over the glue on the bottom piece, making sure that the lower edge of the side piece is even with the bottom edge of the bottom piece and that the ends of the side frame piece are even with the front and back of the bottom piece.
Step 8: Attach the side frame pieces. Use a nail set to countersink the nail heads.
Step 9: I am a woodworker so I own many types and sizes of clamps. Since I have them, I clamped the ends to the bottom until the glue set, about 3 to 4 hours. This is optional, but it is helpful to clamp any time you glue two pieces together because it helps make the join and the finished piece stronger.

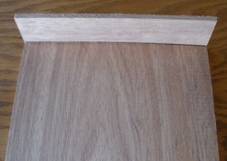
Step 10: Optional: Cut the curved top on of end of each tall side piece. Hint: Since the piece is short, clamp it to the end of your work surface to make cutting easier.
Step 11: It will be easier to now sand the cut edge lightly before continuing.
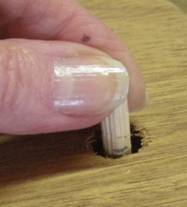
Step 12: Using a drill bit that corresponds to the size of dowel you are using, drill holes 2/3 to ¾ of the way through the side pieces at the starter holes you made with the awl. Make all the holes the same depth. If you do not have a drill press, use a small dowel that you have marked to the depth you want. Insert it in the drilled hole to see how much more you need to drill.
Step 13: Glue nail and clamp the tall sides to the bottom and the side frame ends.
Step 14: Determine the length you need to cut your dowels. Cut 4 lengths of ½” dowel.
Step 15: It is not necessary if you measured a tight fit for your dowels, but you can place a small amount of glue in each dowel hole. Insert a dowel into a hole on one side and slide down into the hole on the opposite side. Repeat with the other 3 dowels.
Step 16: As you did for the sides in Steps 4 and 5, use the width of the bottom piece to gauge the length of the front and back frame pieces. Cut front and back frame piece to fit.
Step 17: Following Steps 6 through 9, glue, nail and clamp the front and back frame pieces in place, creating the base tray.

Step 18: Sand the entire piece to a smooth finish.
Step 19: Use your desired method to finish your tool rack.
This fantastic tool rack would look great on anyone’s workbench. I hope you enjoy creating it!
Happy Wrapping!
![]()
Click to Receive Daily Tips by Email
Related Posts


One Comment

Wire Jewelry Ideas
-
 See Yourself as a Creative Thinker-Part IV By Karen Meador, PhD
Wire Jewelry Article for September 27th, 2017 If...
- September 27, 2017
-
 See Yourself as a Creative Thinker-Part III By Karen Meador, PhD
Wire Jewelry Article for September 20th, 2017 If...
- September 20, 2017
-
 See Yourself as a Creative Thinker-Part II By Karen Meador, PhD
Wire Jewelry Article for September 13th, 2017 If you...
- September 13, 2017
-
 See Yourself as a Creative Thinker By Karen Meador PhD
Wire Jewelry Article for September 6th, 2017 This is...
- September 6, 2017

Design & Inspiration
-
 Free Pattern: Smile Cluster Necklace by Karen Meador
by Judy Ellis, Wirejewelry.com Wire Jewelry Pattern for August...
- August 7, 2017
-
 Free Pattern: Long crystal round maille earrings by Kylie Jones
by Judy Ellis, Wirejewelry.com Wire Jewelry Pattern for August...
- August 3, 2017
-
 Free Pattern: Stone Twist Wrap by Karen Meador
by Judy Ellis, Wirejewelry.com Wire Jewelry Pattern for July...
- July 31, 2017
-
 Free Pattern: Floating Bead Earrings By Kimberly Newman
by Judy Ellis, Wirejewelry.com Wire Jewelry Pattern for July...
- July 27, 2017
Featured Tools
-
 Get to Know Your Hand Tools – Tube-Cutting Jig By Helen I. Driggs
by Judy Ellis, Wirejewelry.com Wire Jewelry Tip for August...
- August 4, 2017
-
 Wire Jewelry Video: Using Punch Pliers by Judy Freyer Thompson
by Judy Ellis, Wirejewelry.com Wire Jewelry Tip for August...
- August 2, 2017
-
 Wire Jewelry Video: Aligning a Hole Punch by Judy Freyer Thompson
by Judy Ellis, Wirejewelry.com Wire Jewelry Tip for July...
- July 26, 2017
-
 Get to Know Your Hand Tools – Wire Cutters – Helen I. Driggs
by Judy Ellis, Wirejewelry.com Wire Jewelry Tip for July...
- July 25, 2017
Judi Morningstar
March 30, 2016 at 1:26 pm
What a great idea. I love these tool holders. Unfortunately, I would not be able to make these. Has anyone seen them for sale anywhere?