


- NEW DVD Series – Stone Setting with Bezels
- Tube Set Charm by Kim St. Jean
- Prong Basket Pendant by Kim St. Jean
- NEW DVD Series – Stone Setting with Cold Connections
- New DVD Series – Stone Setting with Wire
- NEW DVD Series: Introduction to Stone Setting by Kim St. Jean
- Featured Tool: Bracelet Bending Plier
- NEW Dvd by Eva Sherman
- Fun, Fast Fold Forming DVD Series
- Double Band Ear Cuff from Alex Simkin
Japanese Origami Bracelet

by Judy Ellis, Wirejewelry.com
Wire Jewelry Free Pattern for March 2nd 2016
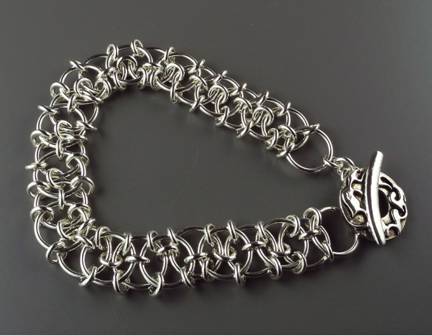
Japanese Origami Bracelet
by Marilyn Gardiner
Today we share a great chain mail pattern that is perfect for the beginner – the Japanese Origami Bracelet.
Introduction
The Origami weave is a variant of the Japanese 6 in 1 pattern created by FrostMage (Greg Gervais). He named it Origami because the chain is folded over on itself.
Skill Level: Beginner
Materials:
- 31 jump rings, 16 gauge (AWG), 9mm ID (inner diameter)
- 95 jump rings, 16 gauge (AWG), 3mm ID ( inner diameter)
- 1 toggle clasp
There are sufficient rings to make a 9″ bracelet, including the toggle.
Tools:
- 2 pair Flat Nose Pliers
Strategy:
- Make 2 lengths of chain
- Adjust the chain lengths to fit.
- Join the 2 chains.
- Fold and connect the 2 chains.
- Add the clasp.
Instructions:
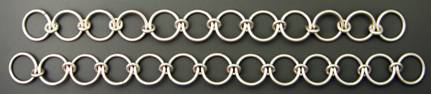
- Make 2 Lengths of Chain:
Close some large rings and open a number of small rings.
Scoop up 2 large rings with a small ring and close it.
Open up the pair of large rings.

Continue the chain: pick up a small open ring and use it to add another large closed ring to the chain. Continue the chain until it has about 12 large rings.
Start a new chain and use about 13 large rings.
Lay them out one above the other.

- Adjust the Chain Lengths to Fit:
Measure your wrist and decide on a finished bracelet length.
Subtract 1″ for the clasp.
The length of the longer chain should equal this length.
Adding one large ring will increase the bracelet length by 1/4″.
The two lengths of chain can have an equal number of large rings, or one can be a ring shorter than the other.
- Join the 2 Chains:
The photos show a close-up shot and a look at the whole chain.
Notice that the large rings of the top chain sit in between the large rings of the bottom chain.
You will use 2 small rings to connect each pair of large rings in the top row to a large ring in the second row. See the red dots.Each large ring (except at the ends) will have 4 small rings connecting it to the rings that surround it.


- Fold and Connect the 2 Chains:
This is the fun Origami folding step!
Fold the top chain over top of the bottom one. It will look like the photo.
(Now is the time to make any final adjustments in length.)

Now, connect them together at the bottom edge. See the red dots in the photos below that show where to place the first two small rings.
Continue adding small rings that join the edges until you reach the other end.

- Add the Toggle Clasp (Ring and Bar):
At one end of the chain put a 3 mm jump ring through the end ring and through the loop on the back of the ring-part of the toggle clasp.

The bar-part of the toggle needs a shank so that it can fold sideways to pass through the ring-part. You’ll use about 4 or 5 small rings and link them together into a mini chain like the photo.Start by putting one small ring through the end ring of the bracelet. One-by-one, link a couple more rings onto that one, and then connect the final ring to the bar-part of the toggle.


Congratulations! Your bracelet is ready to wear and admire!
If this is your first chain mail pattern and you need a great tutorial on opening and closing jump rings – Marilyn gives us a wonderful tutorial on how she does it – easily and cleanly! CLICK HERE TO READ IT!
Happy Wrapping!
![]()
Click to Receive Daily Tips by Email
Related Posts


6 Comments

Wire Jewelry Ideas
-
 See Yourself as a Creative Thinker-Part IV By Karen Meador, PhD
Wire Jewelry Article for September 27th, 2017 If...
- September 27, 2017
-
 See Yourself as a Creative Thinker-Part III By Karen Meador, PhD
Wire Jewelry Article for September 20th, 2017 If...
- September 20, 2017
-
 See Yourself as a Creative Thinker-Part II By Karen Meador, PhD
Wire Jewelry Article for September 13th, 2017 If you...
- September 13, 2017
-
 See Yourself as a Creative Thinker By Karen Meador PhD
Wire Jewelry Article for September 6th, 2017 This is...
- September 6, 2017

Design & Inspiration
-
 Free Pattern: Smile Cluster Necklace by Karen Meador
by Judy Ellis, Wirejewelry.com Wire Jewelry Pattern for August...
- August 7, 2017
-
 Free Pattern: Long crystal round maille earrings by Kylie Jones
by Judy Ellis, Wirejewelry.com Wire Jewelry Pattern for August...
- August 3, 2017
-
 Free Pattern: Stone Twist Wrap by Karen Meador
by Judy Ellis, Wirejewelry.com Wire Jewelry Pattern for July...
- July 31, 2017
-
 Free Pattern: Floating Bead Earrings By Kimberly Newman
by Judy Ellis, Wirejewelry.com Wire Jewelry Pattern for July...
- July 27, 2017
Featured Tools
-
 Get to Know Your Hand Tools – Tube-Cutting Jig By Helen I. Driggs
by Judy Ellis, Wirejewelry.com Wire Jewelry Tip for August...
- August 4, 2017
-
 Wire Jewelry Video: Using Punch Pliers by Judy Freyer Thompson
by Judy Ellis, Wirejewelry.com Wire Jewelry Tip for August...
- August 2, 2017
-
 Wire Jewelry Video: Aligning a Hole Punch by Judy Freyer Thompson
by Judy Ellis, Wirejewelry.com Wire Jewelry Tip for July...
- July 26, 2017
-
 Get to Know Your Hand Tools – Wire Cutters – Helen I. Driggs
by Judy Ellis, Wirejewelry.com Wire Jewelry Tip for July...
- July 25, 2017
Linda Barton
March 2, 2016 at 11:40 am
Great looking bracelet! IF you hit the “Print” page at the top be aware that the Materials list is not included. You’ll have to make a note or attachment.
Judy Ellis
March 3, 2016 at 10:25 am
Marlene, Our customer service will be sending you a copy of the pattern. Sorry that you’ve had some issues with the printing.
Dana
March 10, 2016 at 10:01 am
When I click on “print” I only get the first page, no instructions.
Judy Ellis
March 10, 2016 at 10:15 am
Dana, We are sorry that you are having trouble printing. Here are a couple of suggestions: Reduce your print size, perhaps that will help. Also, check the paper orientation (landscape vs portrait) that might also help. You can also try printing it to a PDF then printing the PDF. We’ve printed the pattern here at the office several times with no issue using the print function, so there may just be a printer function that needs to be adjusted. If you continue to have difficulty, feel free to contact our customer service department and they can help you.
Helen Lovelace
March 19, 2016 at 7:18 am
Absolutely delightful Thank you.
Kat
April 3, 2016 at 5:09 pm
“You Definitely KNOW HOW TO Explain & SHOW EXAMPLES”. Thank You & Please Never Change.