


- NEW DVD Series – Stone Setting with Bezels
- Tube Set Charm by Kim St. Jean
- Prong Basket Pendant by Kim St. Jean
- NEW DVD Series – Stone Setting with Cold Connections
- New DVD Series – Stone Setting with Wire
- NEW DVD Series: Introduction to Stone Setting by Kim St. Jean
- Featured Tool: Bracelet Bending Plier
- NEW Dvd by Eva Sherman
- Fun, Fast Fold Forming DVD Series
- Double Band Ear Cuff from Alex Simkin
Bound for Glory Angel

by Judy Ellis, Wirejewelry.com
Wire Jewelry Tip for December 21st, 2015
On the 10th Day of Christmas…

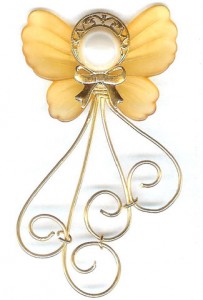
Bound for Glory Angel Pin by Anita Russell
As we get closer to Christmas, I thought you might enjoy a pattern for a Beautiful Angel. This Bound for Glory Pattern could be used as a pin, a pendant or even made larger to be used an an ornament on your holiday tree or wreaths. Enjoy!
Bound for Glory Angel Pin

Skill Level: Beginner
Technique: Wrapping a bundle, gluing components
Making this angel should be fun and easy. Feel free to substitute pieces from your own jewelry box or parts on hand. Come as close to these as you can. Don’t have the right parts? Most craft stores carry pieces you’ll find that are just perfect for the project.
Note: You will need to wait for glue to dry between steps.
Materials
- 20-gauge round half hard wire, four 5″ pieces
- 21-gauge half round half hard wire, 4″ (can use scrap, or work off the coil)
Note: you can substitute 20-gauge round wire if using craft wire that isn’t available in half round. - Small earring dangle, approx 15mm in diameter
- 11mm pearl cabochon (substitution: a pearl button with the shank cut off)
- Lucite or other wings approx 35x25mm
- 3 jump rings made from your 20-gauge wire, about 4mm ID
- Gold bow approx 12x5mm
- Tie tac finding
Tools
Instructions:
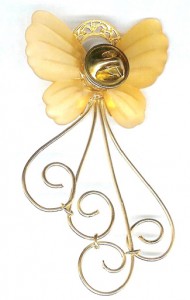
- Glue the face (11mm pearl) to the halo (15mm earring dangle).

- Using round nose pliers, make an open spiral at the end of each of the four 20-gauge wires, making sure the open spirals are different sizes.
Line up the straight ends of the 4 wires, so that the ends are parallel. Make a bundle at this end, using half-round wire to wrap 4 or 5 times to show. Trim the 4 wires to be nearly flush with the wrap wire.
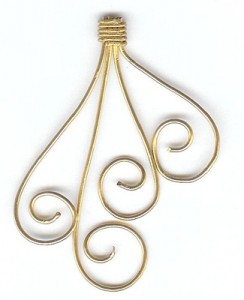
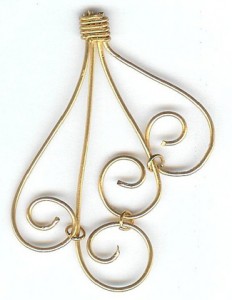
- Attach the 3 jump rings to the open spirals for stability. You’ve completed the angel’s skirt.
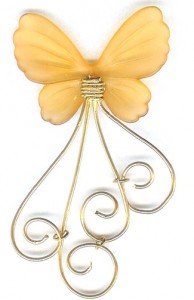
- Glue the angel’s skirt to the front of your wings with E6000 glue. Wait at least 1-1/2 hours for the glue to dry before going on to the next step.
- Glue the halo-face combination to the front of the wings, just above the skirt. Allow glue to dry.
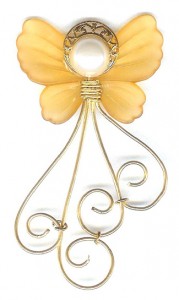
- Glue the bow to the bundle wrap wire for a finished look. Allow glue to dry.
- Glue the flat part of the tie tac to the back of the wings, in the center. Let the glue dry.
- Wear and enjoy!


I hope you enjoy this beautiful Angel Pattern!
Happy Wrapping!
![]()
Click to Receive Daily Tips by Email
Related Posts


Wire Jewelry Ideas
-
 See Yourself as a Creative Thinker-Part IV By Karen Meador, PhD
Wire Jewelry Article for September 27th, 2017 If...
- September 27, 2017
-
 See Yourself as a Creative Thinker-Part III By Karen Meador, PhD
Wire Jewelry Article for September 20th, 2017 If...
- September 20, 2017
-
 See Yourself as a Creative Thinker-Part II By Karen Meador, PhD
Wire Jewelry Article for September 13th, 2017 If you...
- September 13, 2017
-
 See Yourself as a Creative Thinker By Karen Meador PhD
Wire Jewelry Article for September 6th, 2017 This is...
- September 6, 2017

Design & Inspiration
-
 Free Pattern: Smile Cluster Necklace by Karen Meador
by Judy Ellis, Wirejewelry.com Wire Jewelry Pattern for August...
- August 7, 2017
-
 Free Pattern: Long crystal round maille earrings by Kylie Jones
by Judy Ellis, Wirejewelry.com Wire Jewelry Pattern for August...
- August 3, 2017
-
 Free Pattern: Stone Twist Wrap by Karen Meador
by Judy Ellis, Wirejewelry.com Wire Jewelry Pattern for July...
- July 31, 2017
-
 Free Pattern: Floating Bead Earrings By Kimberly Newman
by Judy Ellis, Wirejewelry.com Wire Jewelry Pattern for July...
- July 27, 2017
Featured Tools
-
 Get to Know Your Hand Tools – Tube-Cutting Jig By Helen I. Driggs
by Judy Ellis, Wirejewelry.com Wire Jewelry Tip for August...
- August 4, 2017
-
 Wire Jewelry Video: Using Punch Pliers by Judy Freyer Thompson
by Judy Ellis, Wirejewelry.com Wire Jewelry Tip for August...
- August 2, 2017
-
 Wire Jewelry Video: Aligning a Hole Punch by Judy Freyer Thompson
by Judy Ellis, Wirejewelry.com Wire Jewelry Tip for July...
- July 26, 2017
-
 Get to Know Your Hand Tools – Wire Cutters – Helen I. Driggs
by Judy Ellis, Wirejewelry.com Wire Jewelry Tip for July...
- July 25, 2017
0 comments