


- NEW DVD Series – Stone Setting with Bezels
- Tube Set Charm by Kim St. Jean
- Prong Basket Pendant by Kim St. Jean
- NEW DVD Series – Stone Setting with Cold Connections
- New DVD Series – Stone Setting with Wire
- NEW DVD Series: Introduction to Stone Setting by Kim St. Jean
- Featured Tool: Bracelet Bending Plier
- NEW Dvd by Eva Sherman
- Fun, Fast Fold Forming DVD Series
- Double Band Ear Cuff from Alex Simkin
12 Days of Christmas Tips

by Judy Ellis, Wirejewelry.com
Wire Jewelry Tip for December 2nd, 2015
12 Days of Christmas Tips
The other day one of our fantastic contributors, Judy Larson shared her 12 Days Of Christmas Templates And Tutorials series with us and said – “go ahead and share them with everyone” and I thought, what a great idea – so we will be sharing 12 Days of Christmas Tips which will include great holiday projects, tips and patterns (including some of Judy’s) to help brighten your season and keep your creative juices flowing!

And because we love our readers so much – there might even be a little thank you gift included in each post, so make sure to read all the way through – you never know what we might give you!
On the 1st Day of Christmas…
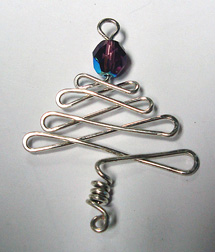
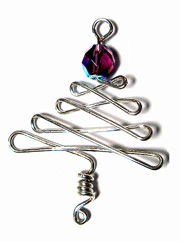
O Christmas Tree Charm
While I was filling out holiday cards for the family business the other day, one of them had a simple tree that seemed to have been done with one brush stroke and it caught my eye. Here is my version, made by using only round wire and round nose pliers. Slip the finished charm onto a ribbon and it will make a wonderful Christmas pendant gift for a co-worker, the mail lady or a child’s teacher; or make a matching pair and add French ear wires for a festive pair of earrings!
Designed by Suzanne Hollingsworth
Skill Level: Beginner/All
Technique: Round Wire & Round Nose Pliers
Materials
Tools
Instructions:
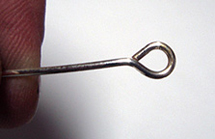
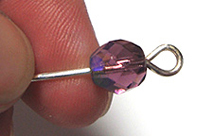
- Straighten, measure, and cut one 12-inch piece of 21-gauge round wire. Use round nose pliers to make a basic “eye” loop at one end. Slide on one 6mm round/faceted bead.

- Just under the bead, use round nose pliers to bend the wire at a 90° to one side, away from the bead. About ¼ inch away from this bend use round nose pliers to add another 90°-looped bend, criss-crossing over itself and heading back toward and past the bead by about ¼ inch. Repeat the looped bend again, this time going beyond the very first looped bend by about 1/8 inch.
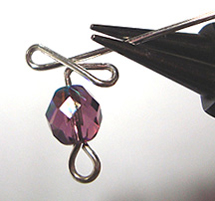
- Continue making looped bends, each segment being just a bit further than the previous.
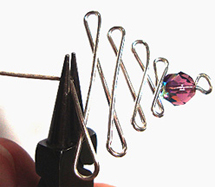
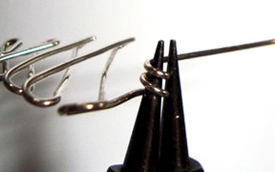
- When your tree is as large as you like, (or until you have about 2 inches of wire left), bring the wire down at a 90° angle and use round nose pliers to roll up the “trunk.” Finish by making a small closed loop at the very end of the wire.
- Your tree should resemble this one.
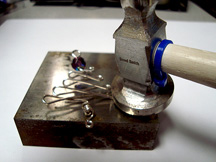
- Now take your tree to the bench block and use a chasing hammer to flatten and smooth each of the looped bends around the edges.
I hope you enjoy making this Christmas Tree charm…
To help kick off your Holiday season – here’s a little gift from all of us here at Wire Jewelry – Take 10% off of anything Site Wide with Promo Code TREE10. This code is good from Dec. 2nd to Dec. 24th -so get a little wire, a few beads or any type of tools you might need to help make your holiday’s bright!
Happy Wrapping!
![]()
Click to Receive Daily Tips by Email
Related Posts


2 Comments

Wire Jewelry Ideas
-
 See Yourself as a Creative Thinker-Part IV By Karen Meador, PhD
Wire Jewelry Article for September 27th, 2017 If...
- September 27, 2017
-
 See Yourself as a Creative Thinker-Part III By Karen Meador, PhD
Wire Jewelry Article for September 20th, 2017 If...
- September 20, 2017
-
 See Yourself as a Creative Thinker-Part II By Karen Meador, PhD
Wire Jewelry Article for September 13th, 2017 If you...
- September 13, 2017
-
 See Yourself as a Creative Thinker By Karen Meador PhD
Wire Jewelry Article for September 6th, 2017 This is...
- September 6, 2017

Design & Inspiration
-
 Free Pattern: Smile Cluster Necklace by Karen Meador
by Judy Ellis, Wirejewelry.com Wire Jewelry Pattern for August...
- August 7, 2017
-
 Free Pattern: Long crystal round maille earrings by Kylie Jones
by Judy Ellis, Wirejewelry.com Wire Jewelry Pattern for August...
- August 3, 2017
-
 Free Pattern: Stone Twist Wrap by Karen Meador
by Judy Ellis, Wirejewelry.com Wire Jewelry Pattern for July...
- July 31, 2017
-
 Free Pattern: Floating Bead Earrings By Kimberly Newman
by Judy Ellis, Wirejewelry.com Wire Jewelry Pattern for July...
- July 27, 2017
Featured Tools
-
 Get to Know Your Hand Tools – Tube-Cutting Jig By Helen I. Driggs
by Judy Ellis, Wirejewelry.com Wire Jewelry Tip for August...
- August 4, 2017
-
 Wire Jewelry Video: Using Punch Pliers by Judy Freyer Thompson
by Judy Ellis, Wirejewelry.com Wire Jewelry Tip for August...
- August 2, 2017
-
 Wire Jewelry Video: Aligning a Hole Punch by Judy Freyer Thompson
by Judy Ellis, Wirejewelry.com Wire Jewelry Tip for July...
- July 26, 2017
-
 Get to Know Your Hand Tools – Wire Cutters – Helen I. Driggs
by Judy Ellis, Wirejewelry.com Wire Jewelry Tip for July...
- July 25, 2017
Stephanie Garland
December 2, 2015 at 7:00 am
Lovely
Brenda Trudell
December 3, 2015 at 5:10 pm
Love this one. Not only is it quick and fairly easy, it can done in so many ways. My mind is in a whirl with ideas. Thank you for bringing it to us and thank you Suzanne Hollingsworth for allowing us to use it.