


- NEW DVD Series – Stone Setting with Bezels
- Tube Set Charm by Kim St. Jean
- Prong Basket Pendant by Kim St. Jean
- NEW DVD Series – Stone Setting with Cold Connections
- New DVD Series – Stone Setting with Wire
- NEW DVD Series: Introduction to Stone Setting by Kim St. Jean
- Featured Tool: Bracelet Bending Plier
- NEW Dvd by Eva Sherman
- Fun, Fast Fold Forming DVD Series
- Double Band Ear Cuff from Alex Simkin
Free Pattern – Silver Linings Ring

by Judy Ellis, Wirejewelry.com
Free Pattern for September 4th, 2015
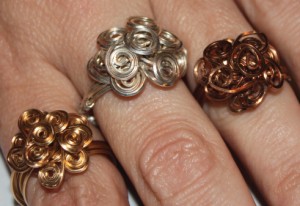
Silver Linings Ring by Layna Palmer
Today we have a great pattern by one of our staff members – Layna Palmer. These quick and easy rings remind us that there is a “Silver Lining” to every situation! Feel free to use Silver, Gold or Copper.. anything you want to make these little gems!
Enjoy!
Silver Linings Ring

Designed by Layna Palmer © 2015
Skill Level: All
Materials
Tools
- Chain nose pliers
- Flat nose pliers
- Wire cutters
- Tape measure or piece of string
- Ruler
- Marker
- Ring mandrel
- Mallet
Instructions
- If you are not sure of your ring size, measure your finger and size on ring mandrel.

Straighten and cut 6, 6 inch pieces of square wire and tape together in a bundle if needed. Find and mark the center or the wires. Place the center of the wires on the ring mandrel about half a size smaller than the finished ring. Bend the wires around the mandrel and twist to secure, hold firmly to prevent the ring from sliding on the mandrel and ending up too large.


- Continue to twist the wires until they are secure and slide down until it is the correct size, or just a little larger since you need to wrap the band when you are finished. You may need to use a mallet to get the ring to the correct size. This will “lock” the wire in place and make the ring more secure.

- Fan the wires out like spokes on a wheel and trim to be even if necessary. Make a small loop in the end of each wire during this step so you don’t poke yourself later on.


- Make a spiral in the end of one of the wires and place it near the band on the ring. Skip two wires and make another spiral, repeat until you reach the starting spiral.

- Now repeat the spiral pattern, skipping one wire between spirals, and then finishing the spiral on all of the wires. Make sure to space the wires, stacking them up as you go, creating a dome on the top of the band. Check your spirals often to make sure you are getting them evenly spaced and filling in spaces as you go. You should end with one spiral at the top of the dome.

- Place your ring back on the mandrel and check your size again. Take the half-round or round wire and start at the center of the wire and center of the band, wrapping as you go out to each side. You don’t need to completely wrap the band, just enough to hold the wire together and size the ring, about an inch and a half in total.

- Place your ring back on the mandrel and tap with a mallet if necessary to get to the correct size. Now take a good look at the spirals on top of the ring and adjust so they are even and there are no empty spots.

- On the silver ring in the picture, I have all of the spirals flat and used a rubber mallet to flatten them against each other. The copper ring has the spirals up off the ring which gives it a little more dimension and a higher profile. The gold ring is how yours will look just after you finish it; no hammering or raising the spirals off the ring.
Congratulations! You’ve made your first Silver Linings Ring!
Happy Wrapping!
![]()
Click to Receive Daily Tips by Email
Related Posts


5 Comments

Wire Jewelry Ideas
-
 See Yourself as a Creative Thinker-Part IV By Karen Meador, PhD
Wire Jewelry Article for September 27th, 2017 If...
- September 27, 2017
-
 See Yourself as a Creative Thinker-Part III By Karen Meador, PhD
Wire Jewelry Article for September 20th, 2017 If...
- September 20, 2017
-
 See Yourself as a Creative Thinker-Part II By Karen Meador, PhD
Wire Jewelry Article for September 13th, 2017 If you...
- September 13, 2017
-
 See Yourself as a Creative Thinker By Karen Meador PhD
Wire Jewelry Article for September 6th, 2017 This is...
- September 6, 2017

Design & Inspiration
-
 Free Pattern: Smile Cluster Necklace by Karen Meador
by Judy Ellis, Wirejewelry.com Wire Jewelry Pattern for August...
- August 7, 2017
-
 Free Pattern: Long crystal round maille earrings by Kylie Jones
by Judy Ellis, Wirejewelry.com Wire Jewelry Pattern for August...
- August 3, 2017
-
 Free Pattern: Stone Twist Wrap by Karen Meador
by Judy Ellis, Wirejewelry.com Wire Jewelry Pattern for July...
- July 31, 2017
-
 Free Pattern: Floating Bead Earrings By Kimberly Newman
by Judy Ellis, Wirejewelry.com Wire Jewelry Pattern for July...
- July 27, 2017
Featured Tools
-
 Get to Know Your Hand Tools – Tube-Cutting Jig By Helen I. Driggs
by Judy Ellis, Wirejewelry.com Wire Jewelry Tip for August...
- August 4, 2017
-
 Wire Jewelry Video: Using Punch Pliers by Judy Freyer Thompson
by Judy Ellis, Wirejewelry.com Wire Jewelry Tip for August...
- August 2, 2017
-
 Wire Jewelry Video: Aligning a Hole Punch by Judy Freyer Thompson
by Judy Ellis, Wirejewelry.com Wire Jewelry Tip for July...
- July 26, 2017
-
 Get to Know Your Hand Tools – Wire Cutters – Helen I. Driggs
by Judy Ellis, Wirejewelry.com Wire Jewelry Tip for July...
- July 25, 2017
Teresa Dalton
September 4, 2015 at 8:27 pm
Thank you for this great tutorial! I have seen similar rings like this but never knew how to do it the right way. Your tutorials just keep getting better! Thanks again, you all are awesome!
Happy regards,
Teresa Dalton
Lisa Dickerson
September 5, 2015 at 8:43 pm
Thank you so very much for sending the ring pattern. I truly enjoy your web site! The grace in which you share your knowledge is wonderful. Thank you. I\’m sure your generosity will be returned 10 fold. Lisa Dickerson
Angel
September 20, 2015 at 7:47 pm
I made this using 22 gauge round wire instead of square, and 20g half round. The spirals on the top turned out tiny because I accidently cut them short, and to me, they gathered up in a more square design than the photos. Over all, though, I love it! I’m certainly going to retry this once I get 22g square. Thanks for sharing the tutorial! ^^
Linda
October 21, 2015 at 5:31 am
Thank you for this pattern. I improved on this general pattern by wire wrapping the 6 wires that go around the finger with 24 gauge wire. Just an alternate idea. You gave me the start. Thanks
Gemstone Engagement Rings
February 28, 2016 at 10:18 pm
Wao…best info sending through this pattern ..i like your post…