


- NEW DVD Series – Stone Setting with Bezels
- Tube Set Charm by Kim St. Jean
- Prong Basket Pendant by Kim St. Jean
- NEW DVD Series – Stone Setting with Cold Connections
- New DVD Series – Stone Setting with Wire
- NEW DVD Series: Introduction to Stone Setting by Kim St. Jean
- Featured Tool: Bracelet Bending Plier
- NEW Dvd by Eva Sherman
- Fun, Fast Fold Forming DVD Series
- Double Band Ear Cuff from Alex Simkin
Easy Egyptian Coil

by Judy Ellis, Wire-Sculpture.com
Wire Wrapping Tutorial May 14, 2014
Easy Egyptian Coil
I thought today I would share with you a quick tutorial about how to make an Egyptian Coil. It’s easy and versatile. I hope you enjoy it!
Tips: Cut all your pieces of wire the same length. Pictured: 20 gauge wire, cut into 6 inch lengths.
When you make your coils, it’s important that they are all consistent. Do the first one, and get it to the point that both ends are coiled, then set it aside and use that one to measure and compare against all the others you do.
Step 1: Put a loop at each end of the wire.
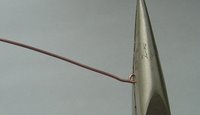
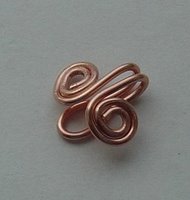
![]()
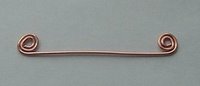
Step 2: Use your pliers to slowly coil the wire at each end.
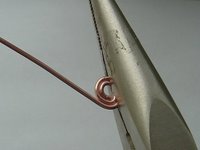
When you’re done you should have a piece like the photo below.
Step 3: Bend it in half one direction.
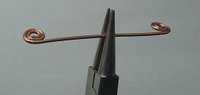
Step 4: Then bend it the other way for a finished single link.
Step 5: You can thread multiple links through each other to make the desired length that you want.
Finished Bracelet

*If you want the coils to overlap, bend the loop over just at or below the height of the coils. If the tail is too long the gap will be big.
If you’d like to practice your coils and spirals before attempting this Egyptian Coil design, take a look at our FREE pattern called Best Ever Coils. Then if you’d like to learn more about working with wire – why not take a look at our Coiling and Weaving DVD Series.
CLICK HERE to order your Wire Supplies today!
Happy Wrapping!
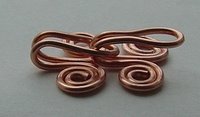
![]()
Original Tutorial by Marie Cristine
Click to Receive Daily Tips by Email
3 Comments

Wire Jewelry Ideas
-
 See Yourself as a Creative Thinker-Part IV By Karen Meador, PhD
Wire Jewelry Article for September 27th, 2017 If...
- September 27, 2017
-
 See Yourself as a Creative Thinker-Part III By Karen Meador, PhD
Wire Jewelry Article for September 20th, 2017 If...
- September 20, 2017
-
 See Yourself as a Creative Thinker-Part II By Karen Meador, PhD
Wire Jewelry Article for September 13th, 2017 If you...
- September 13, 2017
-
 See Yourself as a Creative Thinker By Karen Meador PhD
Wire Jewelry Article for September 6th, 2017 This is...
- September 6, 2017

Design & Inspiration
-
 Free Pattern: Smile Cluster Necklace by Karen Meador
by Judy Ellis, Wirejewelry.com Wire Jewelry Pattern for August...
- August 7, 2017
-
 Free Pattern: Long crystal round maille earrings by Kylie Jones
by Judy Ellis, Wirejewelry.com Wire Jewelry Pattern for August...
- August 3, 2017
-
 Free Pattern: Stone Twist Wrap by Karen Meador
by Judy Ellis, Wirejewelry.com Wire Jewelry Pattern for July...
- July 31, 2017
-
 Free Pattern: Floating Bead Earrings By Kimberly Newman
by Judy Ellis, Wirejewelry.com Wire Jewelry Pattern for July...
- July 27, 2017
Featured Tools
-
 Get to Know Your Hand Tools – Tube-Cutting Jig By Helen I. Driggs
by Judy Ellis, Wirejewelry.com Wire Jewelry Tip for August...
- August 4, 2017
-
 Wire Jewelry Video: Using Punch Pliers by Judy Freyer Thompson
by Judy Ellis, Wirejewelry.com Wire Jewelry Tip for August...
- August 2, 2017
-
 Wire Jewelry Video: Aligning a Hole Punch by Judy Freyer Thompson
by Judy Ellis, Wirejewelry.com Wire Jewelry Tip for July...
- July 26, 2017
-
 Get to Know Your Hand Tools – Wire Cutters – Helen I. Driggs
by Judy Ellis, Wirejewelry.com Wire Jewelry Tip for July...
- July 25, 2017
Marge
May 15, 2014 at 8:46 am
Nice, easy directions!
CJ
May 17, 2014 at 10:25 am
I’m definitely going to try this. The end result is gorgeous!!
Dee
July 17, 2014 at 12:58 pm
Of you’re using a larger gauge, what length wire would you recommend?